I’ve tested many ingredient substitutions so that you can make a pumpkin pie that everyone can enjoy! A sweet, creamy, spiced pumpkin pie recipe that yields an incredible custard pie.
Why you’ll love this recipe
This easy pumpkin pie recipe will show you how to make the most PERFECT pumpkin pie, with a creamy and smooth filling. I also share tips on how to get a deliciously crisp pie crust, instead of a soggy pie crust. (But I also have a recipe for the perfect crustless pumpkin pie, if you’re looking for just the delicious filling and none of the crust!) I also test how to substitute common ingredients in a pumpkin pie recipe, and test if the results still taste amazing. I made a total of 10 different variations of pumpkin pie to get all the information you need to make the best one that’s right for you! Tips on how to elevate the flavor of your pumpkin pie. This is a step by step detailed recipe to help you achieve the most perfect results, every time, with all of my pro tips. Delicious recipe variations to make this dessert even more exciting! Even if you have never made a pumpkin pie before, this recipe will help you through every step of the way.
Pumpkin pie was my first introduction to sweet pumpkin recipes, and I’ve embraced it since then with a bounty of sweet pumpkin desserts like pumpkin cheesecake, pumpkin roll, pumpkin scones, pumpkin pancakes, pumpkin cheesecake profiteroles, pumpkin rice krispie treats etc. Here I share a detailed, complete guide on how to make pumpkin pie, with a step by step recipe, and tips for the creamiest homemade pumpkin pie!
Tips to prevent a soggy crust
One of the things that I don’t like when making (or eating) pumpkin pie is the soggy crust. Baking the pumpkin pie filling in a raw crust, as many of the recipes you’ll find online suggest you do, results in a crust that doesn’t crisp and caramelize at the bottom. So the crust is floppy and raw. But let me share my favorite tips on how to prevent a soggy bottom like that.
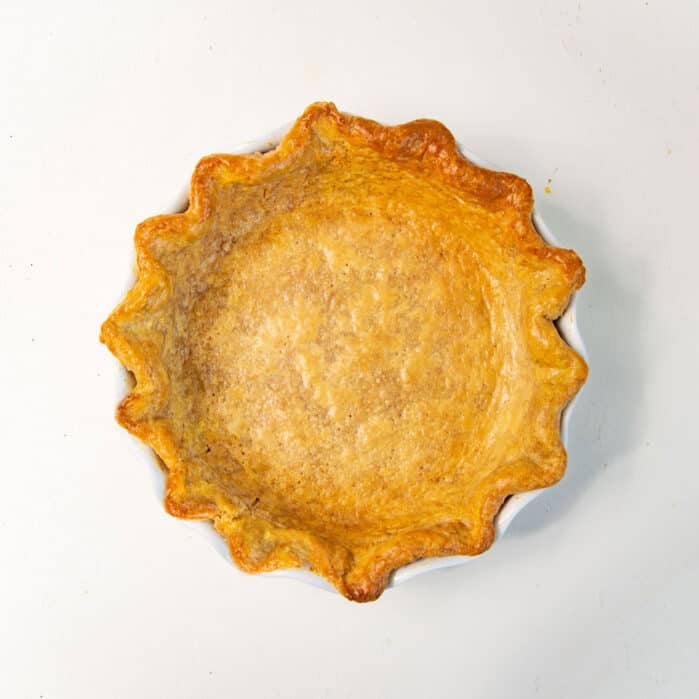
Par-bake your crust! This is the best way to prevent a soggy crust. Blind bake your pie crust to par-bake, so that the crust gets a head start to cook. This will help the crust become crisp, before you add the filling. Seal the pie crust. Brush the inside of your parbaked pie crust with an egg wash, and bake for about 5 minutes to seal it. This also helps to prevent the filling from making the pie crust soggy as it’s poured in and baked. Bake in a preheated oven, on a preheated baking tray or pizza stone. Preheat the oven for at least 30 – 45 minutes, with a baking tray in the bottom third of the oven. This is to preheat the baking tray. The heat in the baking tray will have direct contact with the pie plate, and help make the pie crust nice and crisp. The baking tray will also catch any butter that melts from the pie dough. If you’re pressed for time, or you have to follow a pumpkin pie recipe that calls for a raw pie crust to be filled with the filling and baked, then make sure to place the pie plate in the bottom third of the oven, on a preheated baking tray. This will at least help to significantly minimize the chances of a soggy crust.
The different components of this recipe
What is traditional pumpkin pie usually made of?
Pie crust
A pie crust can be either flaky or crumbly. A crumbly pie crust is where the butter is rubbed into the flour to form smaller clumps, forming a sandy flour mixture that results in a crumbly, sand-like textured “shortcrust” pie crust. Flaky pie crusts have larger clumps of butter in the flour, resulting in uneven thickness as the butter melts during baking. You can use either of these pie crusts for your pumpkin pie, but crumbly pie crusts are better suited for custard based pies. Crumbly pie crusts,
Are easier to cut through. The pumpkin pie filling will create smooth, clean cuts, and a crust that will cut easily is better suited for that reason. Contrasts perfectly with the creamy pumpkin custard filling in the pumpkin pie recipe. Make it easier to have a consistent thickness and structure. This is important for a custard filling, so that the filling bakes evenly and has a consistent texture too.
The varying thicknesses resulting from a flaky pie crust dough create a more uneven crust, with very flaky pockets. This is certainly NOT a bad thing! But, for custard pies to be more consistent, a crust that can be cut more easily is more preferable. If you want a gluten free pumpkin pie, you could substitute with a gluten free crust, OR make my crustless pumpkin pie that is super popular with my readers!
Pumpkin pie filling
What is pumpkin pie filling made of? Most pumpkin pie recipes on the internet are very similar. Pumpkin pie consists of a sweet custard, mixed with pumpkin purée and spices, and baked in a crust. This custard is made in many different ways, and the most famous pumpkin pie recipe in the US of course is Libby’s pumpkin pie recipe that’s printed on Libby’s pumpkin puree cans. However, this pumpkin filling can be made in different ways, and you can easily add different ingredients and flavors. You can make this filling in a bowl with a whisk very easily, but it can also be made in a blender, which is even easier to mix. The goal is to have a silky smooth, perfectly spiced and sweet pumpkin filling. And here I show you how to achieve that! I also talk about how to adapt this pie filling recipe to make a dairy free pumpkin pie, and talk about vegan pumpkin pie too!
Pumpkin pie topping
Classic pumpkin pies are usually served with whipped cream. But you don’t need to be limited to just whipped cream. There are so many fun ways to serve pumpkin pie, and here I share them with you too.
Recipe ingredients
Pie crust
You can use store-bought crusts to make pumpkin pie, or you can make your own pie crust! I honestly prefer the flavor of homemade pie crust, because it’s more buttery and delicious. Plus you can add more flavor to it. Check out my guide for making perfect homemade pie crust for more detailed step by step instructions. It’s the same crust I use to make apple pie, lemon meringue pie, passion fruit pie, banana cream pie etc.
AP flour – All purpose flour is easily accessible, and is a good all-round type of flour to use. AP flour provides a good amount of structure / gluten for the crust, but you must take care to prevent too much gluten from forming as well. Chilled unsalted butter – Butter adds SO MUCH flavor, and also creates the lovely, buttery, crumbly texture in the crust. Chilled water (and chilled vodka – optional) – Water helps to bind the flour and butter to form the dough. Vodka also helps to bring the dough together, while additionally preventing too much gluten from forming. Using chilled liquid will prevent the butter from melting, keeping the dough cold. This prevents extra gluten from forming and also results in the crumbly texture we want for the pie crust. Sugar – Added for additional flavor. You can use white sugar. However for this recipe, I use brown sugar to complement the flavor of the pumpkin pie filling (you can read more about substituting different types of sugar for your baking needs in my guide to types of sugar). Salt – Added for additional flavor and flavor balance. Do not skip the salt!
Optional ingredients
These optional ingredients add extra flavor to your pumpkin pie crust! They are not required to make the pie crust, but will complement the flavor of the pumpkin pie.
Cinnamon Cloves Nutmeg Or pumpkin pie spice Graham cracker crumbs (I do have a separate graham flour pie crust made with graham cracker flour for anyone interested!)
Pumpkin pie filling
100% pumpkin puree from a can – Libby’s pumpkin puree is arguably the most well known pumpkin puree. In Canada, you can use E. D. Smith pumpkin puree (which is what I use here). It’s really important to use pumpkin puree and NOT pumpkin pie filling! Sweetener – Brown sugar, white sugar, honey, or maple syrup will work. For my pumpkin pie recipe, I like to use maple syrup to sweeten the filling. This is also how I sweetened my crustless pumpkin pie. However, you can easily sweeten the pie with sugar as well. Evaporated milk – Milk that has been boiled and reduced to decrease the water content. Kind of like concentrated milk. Evaporated milk adds a very creamy texture to your pumpkin pie. Condensed milk is sweetened evaporated milk. Eggs – Eggs are very important in a custard! Without eggs, the custard will not set. In this pumpkin pie recipe, the eggs in the custard set as it bakes, resulting in a smooth, creamy custard. Spices – These warming spices are Fall classics. You can make your own pumpkin pie spice using these spices, OR you can also buy pumpkin pie spice from the store. I do like to add some cardamom to mine, but that’s optional. Cinnamon Ginger Nutmeg Cloves Cardamom (optional) Cornstarch – I like to add a little cornstarch to my filling. This little bit of cornstarch helps to better stabilize the filling. The starch in the cornstarch molecules expands as they cook and absorb the liquid, creating a matrix. This matrix acts as a buffer to keep the pumpkin pie filling smooth and silky, by preventing the eggs from curdling too fast. Plus, it keeps the filling from weeping and making the crust soggy. Vanilla and salt – Both ingredients are added for extra flavor!
Pumpkin pie topping / serving suggestions
Whipping cream Maple syrup (to sweeten) Vanilla Leftover cinnamon pie crust bites
Step by step instructions for the best pumpkin pie recipe
Making the best pie crust for pumpkin pie
Before you even start to make the pie dough, make sure that your butter and liquid are nice and chilled. This will ensure that the dough is cold throughout. A cold dough will prevent the butter from melting into the dough, which in turn will prevent too much gluten from forming (by preventing overmixing). And that in turn prevents a hard, rubbery crust, and also prevents the crust from shrinking.
First step is to mix the flour with the other dry ingredients in a large bowl. You can easily make enough for 1 crust, but I like to make a double crust so I can use the extra crust for decorations. Second step is to add the butter, and cut it into the flour to form a coarse flour and butter mixture. The butter lumps should not be larger than the size of a pea, and the final mix should resemble coarse, wet sand. Third step – Then add the chilled water (and vodka, if using), until you JUST form a dough. The perfect pie crust dough is where you feel like maybe you could add just a little bit more water! This is because the flour will absorb and redistribute the water from the dough and butter as it rests. So add a little less liquid than you think you need, and just enough to form a dough. Having dry spots on the dough is a sign that you’re good! When you squeeze the dough, it should come together, with some dry spots still visible. Fourth step is to bring the dough together to form a disc of pie dough. I use a parchment paper to help with forming the dough disc. Finally, wrap the dough and let it rest in the fridge.
Once the dough is chilled, roll out the dough until it’s about 3/8 of an inch thick. Line a 9 inch pie plate (1.5 inch deep) with this dough. Make sure to gently lift and shape the dough into the edges of the pan, without stretching it to fit it inside. This will prevent the pie crust from shrinking as it cooks. Trim the excess dough, while leaving a 1 – 1.5 inch border around the edge of the pie plate. Roll this excess dough underneath to form a crust that is flush against the edge of the pie plate. This crust can then be fluted or crimped to form the pie crust edge. Chill the pie plate for at least 30 minutes, until it’s nice and chilled. Preheat your oven to 350 F, for at least 30 minutes, with a baking tray placed in the bottom third of the oven.
Blind baking the pie crust
When the oven is preheated, line the crust with aluminum foil. Make sure the foil is flush against the dough and hanging over the edge of the crust, to act as a crust shield. You may need two pieces of foil to cover the entire pie crust. Fill this with white sugar, at least 3/4 of the way up. I like to make sure that the sugar comes all the way up to the top of the pie plate. Press down on the sugar to make sure it’s completely weighing down on the dough. You can also use rice instead of sugar. I used to use ceramic pie weights for this purpose, but since learning about the sugar hack from Stella Parks, I haven’t used anything other than sugar. Place the pie plate in the oven and bake for about 40 minutes with the pie weights. Next, remove the pie weights and prick the crust with a fork. Then return the pie crust back into the oven for about 5 – 10 minutes to dry out the crust (which will be looking a little wet at this stage). Cover the edge with a pie crust shield or foil to prevent it from browning. OPTIONAL – Brush the inside of the pie crust with an egg white wash and bake for about 3 minutes or so, until the egg brush looks dry. Your par-baked pumpkin pie crust (partially baked pie crust) is now ready to be used.
Making the spiced pumpkin pie filling
Mixing pumpkin pie filling with a hand whisk
Place the spices with cornstarch in a large bowl and whisk to combine. Add about half of the brown sugar or maple syrup and whisk until the cornstarch has no lumps. Mix in the rest of the sugar / maple syrup. Add the eggs and vanilla, and whisk to mix well. Next, stir in the pumpkin, followed by the evaporated milk.
Mixing pumpkin pie filling with a blender
Place all the ingredients in a jug or blender. Pulse a few times to get the ingredients mixed with each other, and not stuck on the wall. Then, blend for a few minutes until the filling is nice and smooth. If needed, use a spatula to scrape down the sides. Allow the filling to rest for a few minutes to remove any excess air. You can also bang the jug on your kitchen counter to remove any large air bubbles.
Baking the perfect pumpkin pie
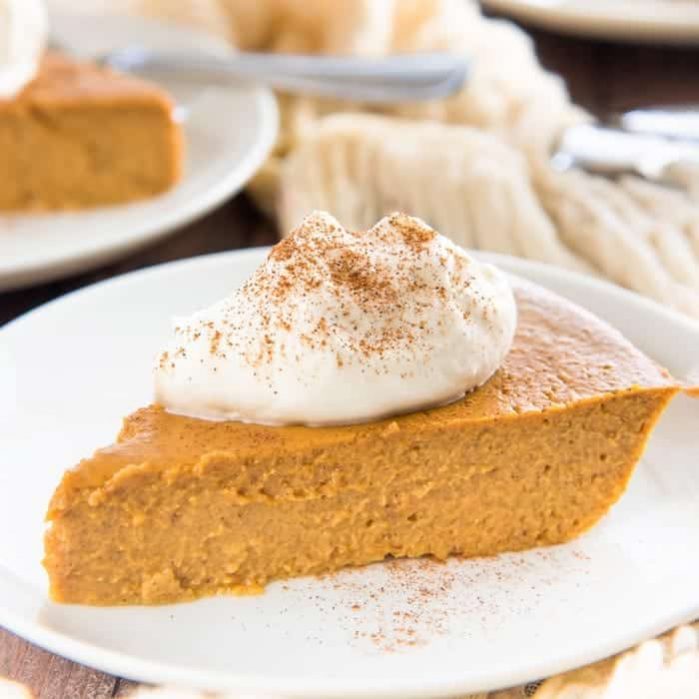
The pumpkin pie is then baked in the preheated oven for about 50 – 60 minutes, at an oven temperature of 350 F / 180 C. This lower temperature ensures that the filling cooks slowly, while maintaining a silky smooth texture. No overbaked, dry pumpkin filling! Plus, this minimizes cracks in the pie filling. If you have a temperature probe, check for the internal temperature of the pie. The internal temperature should reach 175 F / 80 C when the pie is done, and when you shake the pie, the center of the pie should be ever so jiggly too. The custard will continue to cook outside of the oven, and reach 180 F / 82 C. Use a pie shield (silicone or foil) to prevent the crust from browning too much. However, during the last 5 minutes of baking, brush the crust with an egg wash. This will make your pie crust look absolutely beautiful! Let the pie rest at room temperature for about 1 – 2 hours, and then transfer the pie into the fridge. Do not cover the pie if it’s still warm, as the water condensation will drip back onto the pie. Once the pie is completely cool, then cover with plastic wrap. Serve chilled.
How to decorate and serve the pie
Pumpkin pie only needs a little whipped cream on the side! But there are so many ways to decorate your pumpkin pie, and different ideas for toppings too. Pumpkin pie should be served chilled, or slightly cooler than room temperature. With the classic pumpkin pie recipe version, I am always able to consistently bake pies with no cracks. HOWEVER, when I use a blender to mix the pie filling, the excess air incorporated will cause the filling to expand more, and crack as it cools down. This is not necessarily an issue though. Whipped cream can always cover up any cracks. Plus, if it tastes great- that’s all that really matters! To cut neat slices, make sure to,
Use a sharp knife with a straight blade. Make sure that the blade is clean each time you slice into the pie (any residual pie filling or crumbs will not result in clean, smooth cuts). A warm knife blade will also cut through the pie filling easily. This can be done by dipping the blade in hot water and wiping it dry. Make sure to cut through the pie crust as well. Otherwise the pie slice will pull out excess pie crust or filling, or leave behind pie crust and filling.
Pumpkin pie decoration before baking,
Decorate with a pie crust lattice Pie dough cut-outs (pumpkin shapes, hearts, circles, leaves etc.) Crumble topping
Pumpkin pie decoration after baking,
Whipped cream (cream chantilly) piled on top Flavored whipped cream. For example – coffee flavored, or spiced whipped cream (pumpkin spice or cinnamon). Coconut whipped cream (for dairy free or vegan pumpkin pies) Sugar crusted pie crust pieces (you can use puff pastry pieces as well) Candied nuts Maple pecan topping (that I shared in this pumpkin pancakes recipe) Torched meringue Marshmallows Whipped cream cheese or mascarpone
Storage instructions
How long does pumpkin pie last in the fridge?
Once the pumpkin pie is at room temperature, you can wrap it well with plastic wrap or foil and store in the fridge for up to 4 days. For leftovers, these can be kept in the fridge for up to 3 days. However, it depends on how well the pumpkin pie was handled prior to that. Check for any changes in smell, color, and texture before eating. Pumpkin pie tastes better fresh. The crust and filling may start to get stale, especially with leftover pumpkin pie.
How long does pumpkin pie last in the freezer?
You can absolutely freeze pumpkin pie for up to 2 months if it’s prepared properly. Wrap the cooled pumpkin pie with plastic wrap very well, followed by a layer of foil. Again – make sure it’s wrapped very well! This pumpkin pie can be stored in the freezer for up to 2 months. Let it thaw in the fridge over 48 hours, before serving. To save time, you can absolutely make your classic pumpkin pie ahead of time and freeze it for later (makes for a great make-ahead dessert so you have less to worry about on Thanksgiving day).
Ingredients substitutions and frequently asked questions
Recipe variations
Pumpkin pie spice and spice variations
The spice mix added to the pumpkin pie is very important as it adds all the warm spices to flavor the pie. While I do like to make my own, you can absolutely use store-bought pumpkin pie spice. Changing up the spices in the pumpkin pie is a very easy way to change your pumpkin pie recipe, and add your own twist to it.
Par baked vs no par baking
The par baked pie slice is sturdy and steady, and holds up well! The crust is not soggy at all, and there is more caramelization and crispness in the crust. Pumpkin pies baked in a raw crust end up with a soggy crust. This crust is floppy and can’t support the filling.
Hand mixing vs blending the filling
Hand mixing the filling resulted in a pie that had fewer cracks, because less air is added to the filling during the mixing process. But the blended pumpkin pie filling definitely created the silkiest, smoothest filling texture. However the filling is more prone to cracking as it bakes and cools down. But it’s nothing that a little whipped cream can’t cover up!
Using coconut milk
Substituting coconut milk instead of evaporated milk was great! The results were almost the same. The coconut cream filling was slightly thicker, so it resulted in a more dense filling. But you cannot really taste a strong coconut flavor. The filling just tastes a little more nutty.
Using condensed milk
This was surprisingly not overly sweet, which is what I was expecting. It was fine, but I did miss the molassey flavor from brown sugar, and the earthy flavor from maple syrup. It was a good pie, but not as flavorful as when you use brown sugar or maple sugar. An alternative would be to use a can of dulce de leche, made with condensed milk!
Vegan pumpkin pie
This came out so well! But surprisingly, it was the sweetest of all the pies I made. The volume of pie filling was less, but the sugar content was higher. I reduced the sugar from 210 g to 150, and it was still a little too sweet. I might make this again with about 120 – 125 g of sugar because the texture was dense and creamy!
What is pumpkin pie spice?
Here are the individual spices that traditionally make up pumpkin pie spice,
Cinnamon Ground ginger Ground cloves Ground nutmeg Ground allspice
However, I like to make my own spice mix that is very similar to pumpkin pie spice, except I substitute the all spice with cardamom. This is a chai masala mix (chai spice mix) that really adds a lovely, spicy warming note to pumpkin pies! In my opinion, it goes just as well with pumpkin pie as classic pumpkin pie spice. Spice variations for pumpkin pie recipes include,
Chai spices Using only cinnamon Apple pie spice Chinese 5 spice Nutmeg (eggnog twist)
Other flavor combinations and variations
Making mini pumpkin pies Cut your pie crust into circles that will fit inside standard muffin pan cavities. Gently press them in to fit inside the cavities. Pour the pumpkin pie filling to fill each cavity / well, until it’s about 3/4 full. Bake on top of a preheated baking tray on the bottom third of the oven until the filling is firm (with a slight jiggle in the middle). Or until the internal temperature is 180 F / 82 C. Mini pies do not require parbaked crusts.
Other variations
Crustless Pumpkin Pie Pudding Pumpkin Pie Cheesecake (Spiced Pumpkin Cheesecake) Brownie Bottom Pumpkin Cheesecake