The filling is super thick and jammy, while being melt in your mouth soft and delicious. All encased in my incredibly flaky, buttery homemade pie crust, for one of the most memorable fruit pies you’ll ever have! My first strawberry rhubarb pie was from a little bakery in Sydney, Australia. I didn’t even know what the filling was that first time, but I was utterly in love! I was a broke grad student and that mini pie was about a precious $5 – 6 dollars. So, I could only afford to eat this mini pie once a month, and I savored every itty bitty bite. I vowed that I will make my own version of classic strawberry rhubarb pie one day, and that I did, not long after. And many times since then. And now it’s one of my absolute favorite dessert pie recipes. Better yet, my strawberry rhubarb pie tastes even better, because the rhubarb and strawberries are softened into a melt-in-your-mouth, sweet, tart filling. With the flakiest buttery pie crust recipe that is crisp on its own, but even better with the crunch of raw sugar on top! I’ve shared many fruit pies before (apple pie, cherry pie, fresh strawberry pie, lemon meringue pie, passion fruit pie, mixed berry pie, banana cream pie etc.), but this strawberry-rhubarb pie is special because it got me hooked on fruit pies, and I haven’t looked back!
What makes this the BEST strawberry rhubarb pie for me
The filling is sweet but with a lovely tartness from the rhubarb. Fantastic flavor pairing! Strawberries and the rhubarb have a thick, jammy texture in this pie, that’s not runny at all, and holds together beautifully while still being soft and melt-in-your-mouth delicious! The pie crust is buttery, flaky, and crisp! Even with the filling, the bottom crust is still crisp, and the top crust is even more flaky and crisp! It’s easy to make AND this recipe works for both fresh and/or frozen fruits! So you can make this pie during the off season as well with frozen fruits. The liquid from the fruits is cooked down, so that the flavor is intensified in the pie. This also prevents the strawberry rhubarb filling from getting runny. It’s the perfect combination of sweet, tart, thick fruity filling that just melts in your mouth, bursting with summer fruit flavors, all encased in a crisp, buttery flaky pie crust! If you like strawberry pie, you’ll love this so much more!
Strawberry rhubarb pie ingredients
Pie crust
AP flour Chilled unsalted butter Chilled water Chilled vodka (optional) Salt Sugar (optional) Egg (for egg wash)
Strawberry rhubarb filling
Strawberries Rhubarb Sugar Lemon zest and juice Cornstarch Vanilla
How to choose ripe strawberries
Strawberries are obviously super delicious when they are perfectly ripe. But sometimes they may look red and ripe at the grocery store, but end up lacking that sweet strawberry flavor, and may taste bland. This is how I choose strawberries (which almost always guarantees sweet, juicy strawberries!).
Smell the strawberries. They need to smell sweet as well. If there’s no smell, they likely don’t taste sweet either. Preferably should be bright red in color. Buy local. Buying fresh strawberries from local farms generally gives me a better chance of finding sweet strawberries. But if not, look for strawberries at the local supermarket that source their berries from known local growers. Sweet strawberries are ideally red inside as well. This is harder to gauge in the supermarket, and only visible when you cut into them. This isn’t always a clear indicator for sweet strawberries, but it’s a plus!
Since I live in Ontario, Canada, I try to purchase Ontario strawberries whenever possible. These strawberries are slightly smaller than others, but taste super sweet AND they are a beautiful deep red color inside and out too! Plus, I’ve started growing my own strawberries in my backyard now, so that definitely helps too!
How to make strawberry rhubarb pie (step by step)
Pie crust
Most pie crust recipes that I followed growing up (both in books and the early internet) were not at all detailed, nor foolproof or failproof. It resulted in pie crusts that, Usually, fresh rhubarb is available from spring to mid summer. In the northern hemisphere (Americas and Europe), this can vary from end of March to June, depending on where you live. In New Zealand for example, you can get rhubarb even through mid winter to early summer because rhubarb grows throughout the year in the south island. How do I know? Because we had a HUGE rhubarb bush in our backyard, growing up!
How to choose rhubarb?
The earlier stalks are more tender, so they are the best ones to use. If you do have rhubarb in your backyard, then pick the stalks that are at least 10 inch long. But in the supermarket, this job is already done for you. Some people think rhubarb needs to be red when ripe – which is not true. Green rhubarb has the same flavor as red rhubarb, and the color is ONLY due to the variant of rhubarb. Rhubarb adds a lovely sour, slightly sweet flavor that is truly incomparable. Older stalks that are much thicker and longer could be more fibrous. While these are edible, you may need to peel them to remove the tough outer skin to make them more tender.
Can I use frozen rhubarb in the off season?
YES, absolutely! I usually get loads of rhubarb from my friends and neighbors that I freeze and use for pies like this, and to make rhubarb syrup, rhubarb margarita, rhubarb crumble bars etc. So this is absolutely possible. Just make sure to process the rhubarb and slice it before freezing it.
How to prepare rhubarb for this pie? Should I peel the rhubarb?
The first thing to do is to cut the leaves off from the stalk. The leaves are not edible and are poisonous. I add the leaves back into compost. Then wash the rhubarb well. If you’re using early season rhubarb, then you only need to slice them. But if the rhubarb is from later in the summer, and has a more thick and fibrous skin, you can absolutely peel off the outer skin before using it. Remember that the color is not an indicator of ripeness, and the strawberries will be adding the red color to this pie!
Shrank a lot Slid down the sides of the pie pan Were tough Had a raw bottom
I realized that unless you grew up watching pie crusts being made from scratch, it was going to be difficult to learn how to make perfect pie crusts without knowing the consistency and texture of the perfect dough. That’s why I created my detailed guide to making absolutely perfect ALL BUTTER homemade pie crust, that does NOT shrink or slide down the pan, and is tender and super flaky! I break down each step, explain the purpose of the ingredients, and what to look for in your dough to stay on track. It’s perfect for beginners, but with even more tips for experienced bakers too! So, I highly recommend that you check out my post on how to make pie crust. But here’s a summary of the main points.
Mix chilled butter, flour and other dry ingredients. Cut the butter into the flour to create butter clumps (that are about the size of large hazelnuts). I like to use my fingers to flatten the butter pieces as well (image 1). Then add the chilled water and vodka to create even larger wet clumps of dough. Add just enough moisture so that the dough barely holds together when squeezed in your hand (images 2 & 3). Dump the dough clumps on your work surface and gently bring them together to form a dough that holds together, but still has some dry flour spots. Cut in 4 and stack each portion on top of each other. Gently flatten this. This will help create even more flaky layers. Cut dough in half, and form each portion into a disc (image 4). Wrap and chill for at least an hour, or overnight. The butter should be cold throughout the whole process for best results. One portion will be for the bottom crust, and the other will be for the top crust.
Once the dough is chilled, roll out one portion into a circle that is about 3 mm thick (image 5), and line the bottom of a 9 inch deep pie pan with the dough (image 6). Gently lift the dough and let it fit into the pie pan, rather than stretching it out to fit (image 7). Cut the excess dough, leaving a 1/2 inch overhang (image 8). Cover the pan with plastic wrap and let it chill in the fridge until you need it. Roll out the second portion of pie dough into a circle that will cover the surface of the pie dish. Gently fold it in half, wrap in plastic wrap, and place it in the fridge on a flat surface.
Strawberry rhubarb pie filling
I created this recipe so you can make it even with frozen fruits. It’d be a shame to not be able to make this pie year round! Which is why I don’t just mix the fruits with starch and bake in the pie crust. Since frozen fruits release more liquid as they thaw, I prefer to cook down this liquid into a thick, strawberry-rhubarb jam-like consistency first. This concentrates the strawberry and rhubarb flavor, and also adds a lovely thick, fruity, jammy texture to the filling!
Step one – Prepare the fruits
Remove the rhubarb leaves, then wash and dry the stalks. Cut the stalks into thick slices. About 1/2 – 3/4 inch thick. Place this in a large bowl (image 9). Wash and dry the strawberries, and cut them into similar-sized pieces. Medium sized strawberries can be halved. Larger strawberries can be quartered, and small strawberries can be left whole. Add the strawberries into the same bowl with the rhubarb (image 10).
Step two – Macerate the fruits
Add sugar to the fruits and mix well without crushing the fruits (images 11 & 12). Then cover the bowl and let the fruits macerate for about 1 – 2 hours at room temperature.
Step three – Cook down liquid
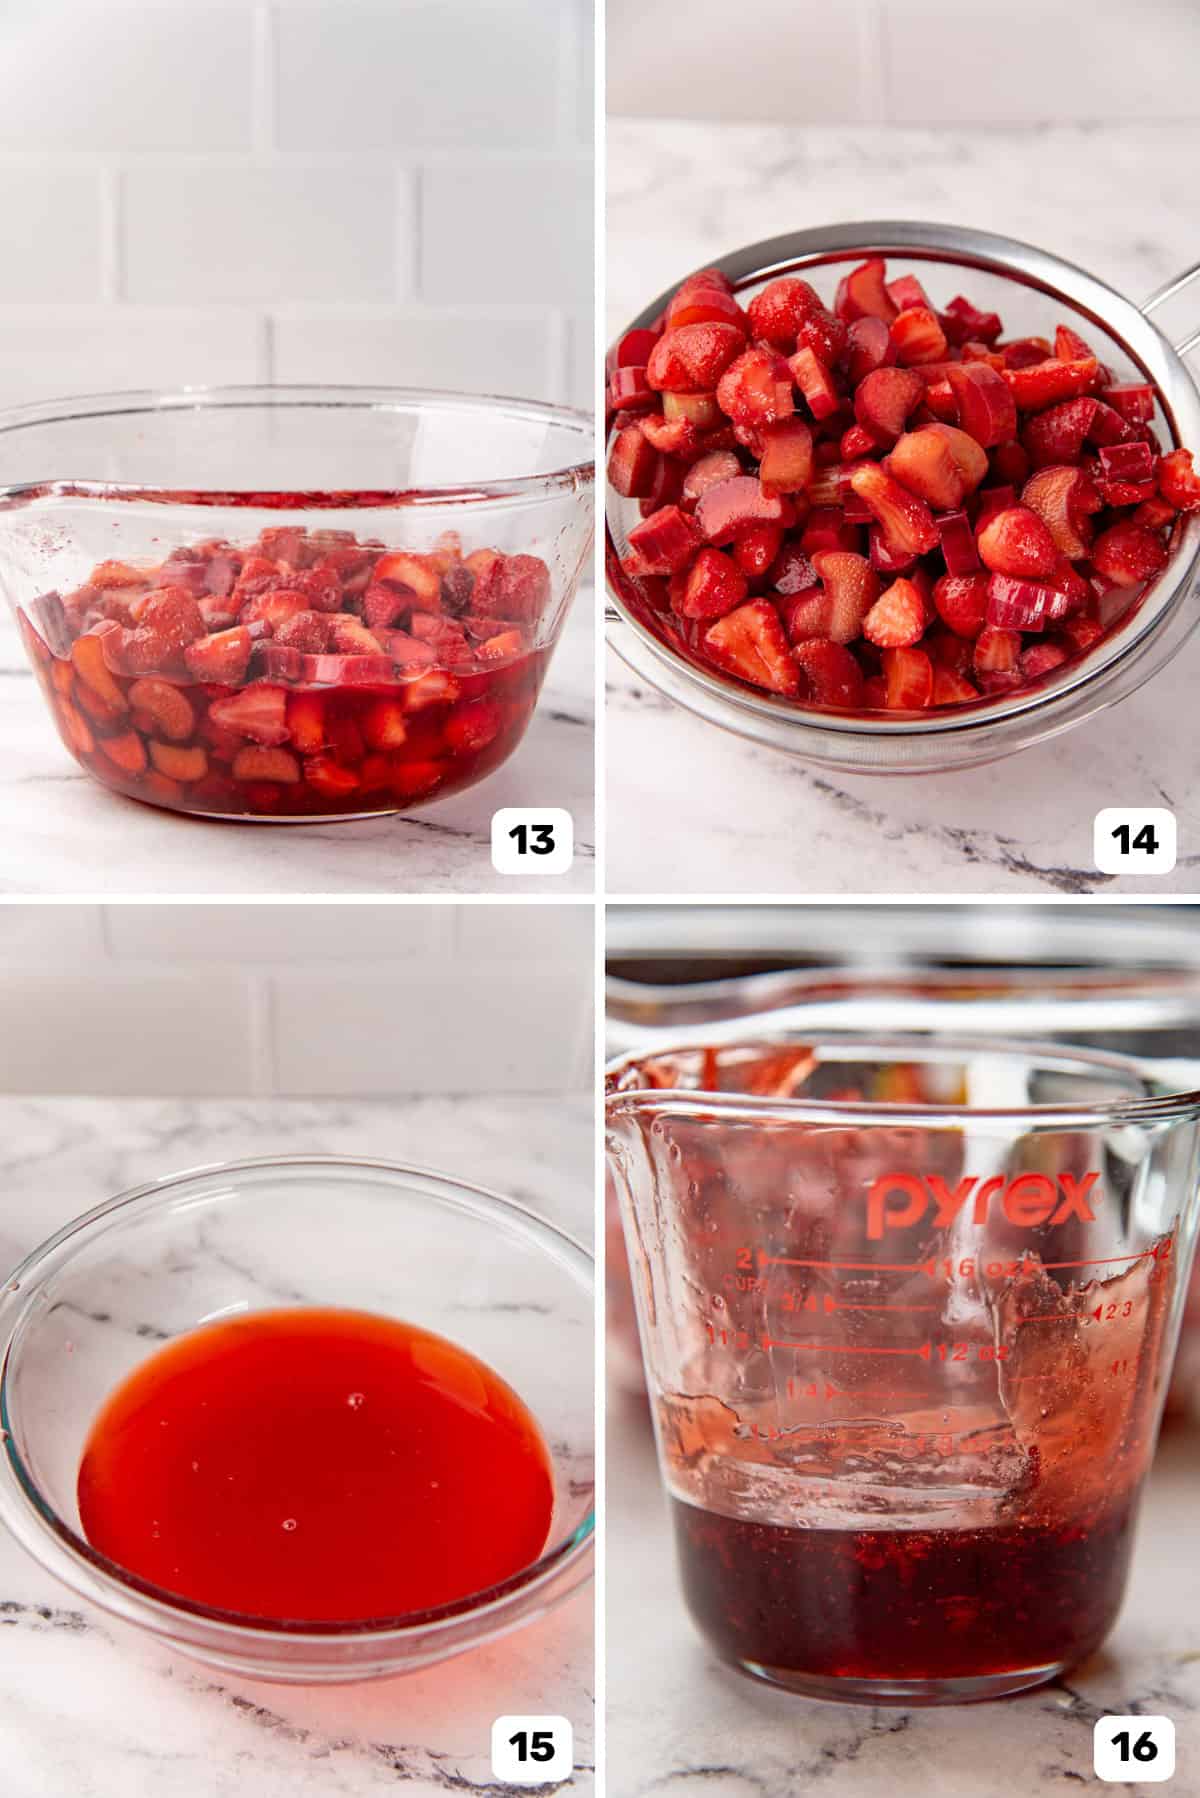
After the fruits have macerated, there’ll be liquid in the bowl WITH the fruits (image 13), and the fruits would have also slightly softened. Place a large sieve or colander (with small holes), over a bowl. Add all the fruits and liquid to the sieve, and allow the liquid to drain to the bowl below (images 14 & 15). DO NOT press down on the fruits. We only want the liquid that will naturally come out of the mixture. Let it sit for about 15 – 20 minutes. Next, put the fruits back in the bowl, and place this bowl in the fridge until you need it again. And put the liquid in a pot. Heat the liquid over medium – medium high heat and bring it to a simmer. Simmer the liquid until it reduces to 3/4 cup. Make sure to frequently stir to prevent the sugar from burning. It should become a thick jam-like syrup. Let it cool down slightly (image 16).
Step four – Prepare the filling and preheat the oven
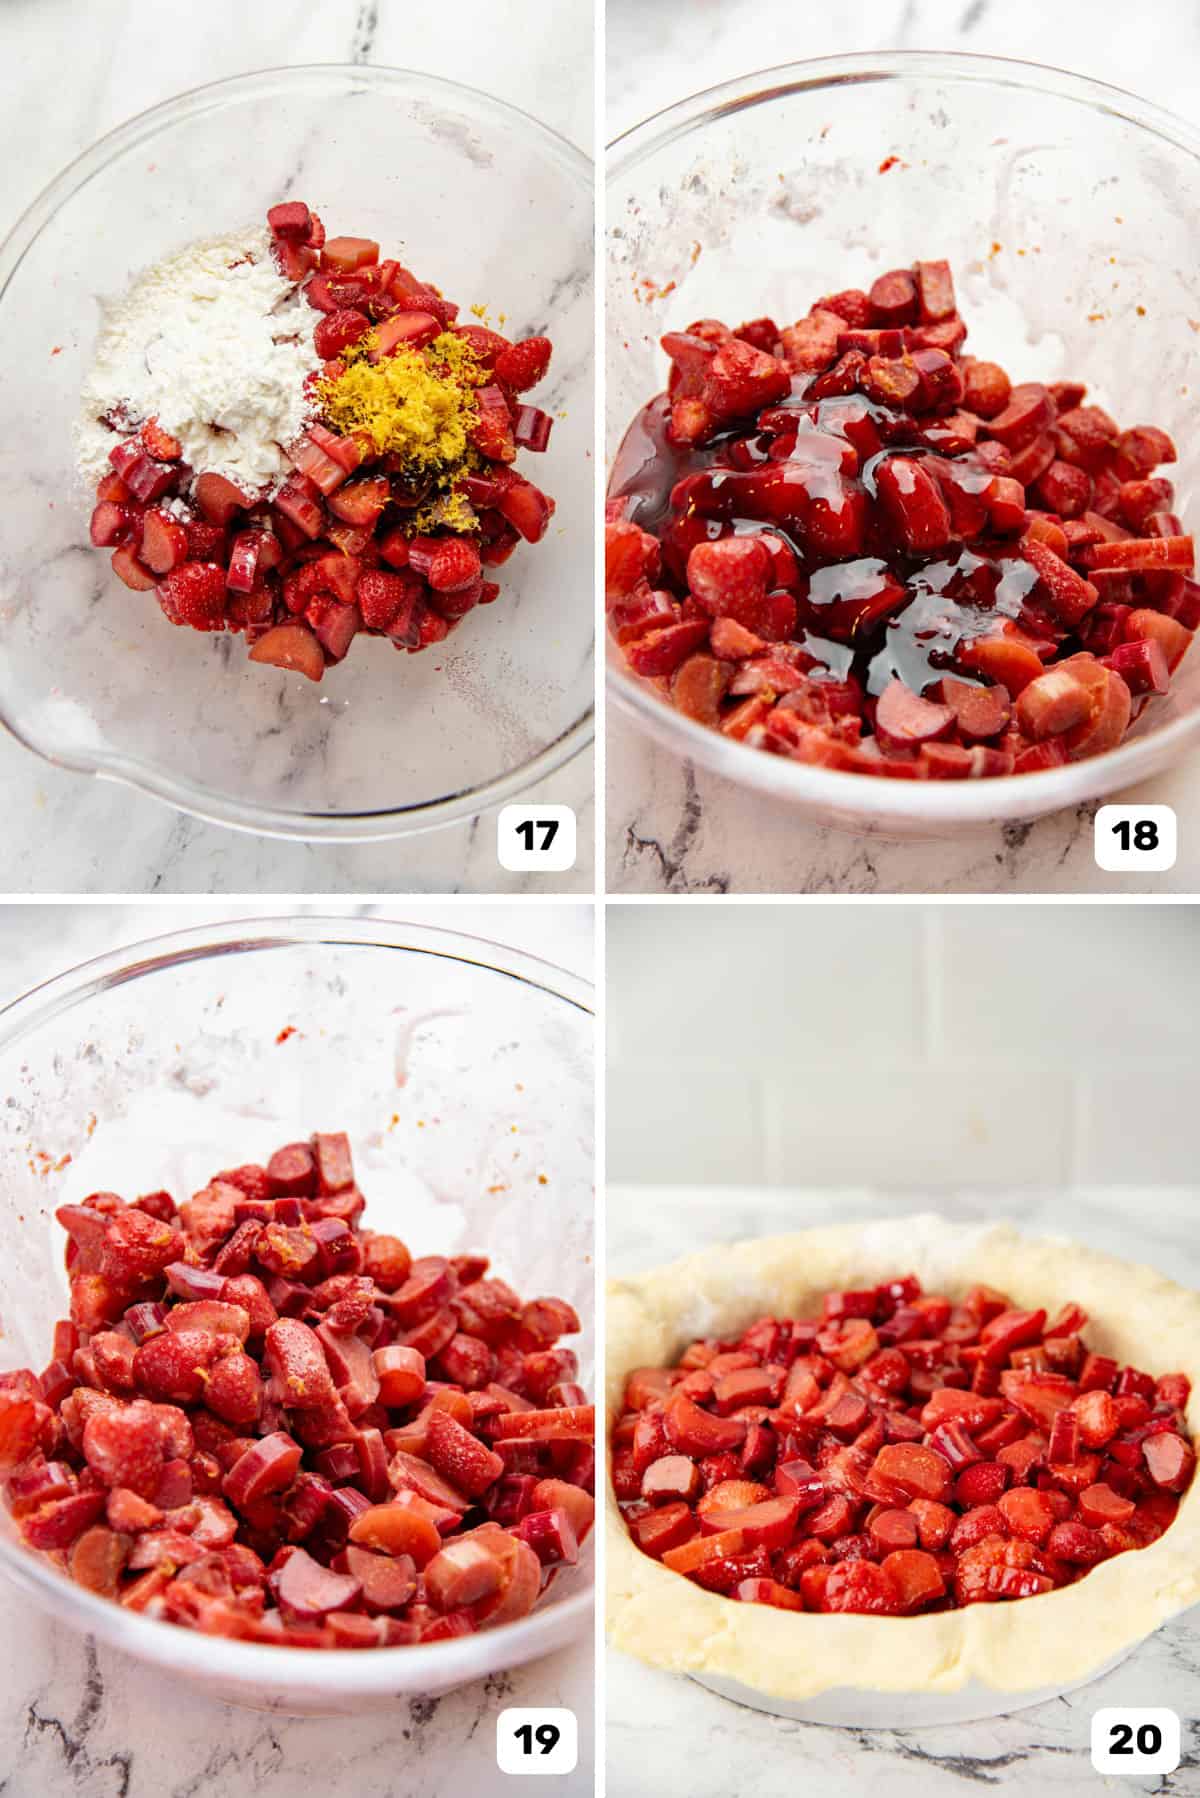
Preheat the oven to 425 F / 220 C. Place a baking tray on an oven rack, which in turn is placed in the bottom third of your oven. This metal tray should preheat for at least 30 minutes before you bake the pie. Into the large bowl with the macerated fruits, add the vanilla, cornstarch, and lemon zest (image 17), along with the thickened fruit syrup (image 18). Gently fold in to mix (image 19).
Assembly
Step five – Assemble the pie
Take out the bottom pie crust that’s in the pie pan and scrape the filling into this pie crust (image 20). Use the second portion of rolled out pie dough to create the top crust. Here, I cut the dough into strips and create a nice lattice crust on top (just like I did in my apple pie recipe) (image 21). But you can also simply cover the whole surface with the dough. Press down the top and bottom crusts together so that they stick together. Trim the excess and fold the overhang under the pie crust to form the pie crust border (image 22). Crimp or flute the edge of the pie to create a nice pattern that will also seal the two pie crusts together. Return the pie to the fridge so that the pie crust is chilled before baking.
Baking
Step six – Baking
Once the pie dough is chilled, brush the surface with an egg wash and sprinkle coarse sugar on top if you like (images 23 & 24). Cut vents in the top crust, if the whole pie is covered on top with the dough. Place the pie on the preheated metal tray in the oven. Reduce the temperature to 350 F / 180 C, and bake for about 60 minutes. The pie is done when the filling is bubbly and the crust is a lovely deep golden brown color. Remove from the oven and let it cool down to room temperature. Do not be tempted to cut the pie while it’s warm because the filling needs to set as it cools down. Then, the pie is ready to be served! Slice the pie when it’s at room temperature.
Serving suggestions
This strawberry rhubarb pie is BURSTING with so much flavor! The tart rhubarb flavor is perfect with the sweet strawberries! The filling is thick, glossy, and delicious. Thanks to cooking down the excess liquid, the flavor is even stronger, while having a stable filling that is not runny at all! You don’t need to serve this pie with anything, but a scoop of vanilla ice cream is always perfect with pie. Whipped cream would also be delicious with this. If you’re feeling fancy, serve this strawberry rhubarb pie with a dollop of creme fraiche.
My best recipe tips for success!
If time is a factor, then I recommend using store-bought pie crust. If you do have the time though, do make your own pie crust. A flaky all butter pie crust makes ALL the difference. Or even a shortening pie crust would be a great compared to store-bought. When making the pie crust, make sure the dough is always cold – especially the butter. If the butter softens, it’ll absorb into the dough and the dough will become sticky and hard to work with. Also, this make the crust rubbery, and will compromise its flakiness. If the butter is softening at any point, return the dough to the fridge or freezer to make the dough cold again. When rolling out the dough, if it starts to shrink, that’s a sign that the gluten is getting overworked. Wrap and place the dough in the fridge to chill for a while to let the gluten relax until it’s easier to roll out again. Do not stretch the dough to fit the pan, as this will cause the dough to shrink as it bakes. Do not skip the step of macerating the fruits. It’s important to let the fruits soften in the sugar so that the rhubarb will also soften even further in the oven. Remember to cook down the liquid to reduce it. This step is important because it has 2 functions. The first is to concentrate the strawberry and rhubarb flavor to add to the base. The second is to make the amount of liquid in the pie as similar as possible, regardless of whether you use fresh or frozen fruits. Because frozen fruits will have more liquid (than fresh fruits) that leeches out as they macerate, the cooking step will reduce that liquid. Otherwise, the pie filling can become runny as it bakes in the oven. Bake the pie in the bottom third of the oven (assuming the center rack is where your baked goods receive even heat). I like to bake my pies in the oven rack that is just above the bottom rack (out of 6). The direct heat from the bottom element and the preheated metal tray will help bake the pie crust on the bottom more evenly. Let the pie cool down to room temperature before cutting into it. The pie filling will thicken more as it cools, and will set properly. If you cut the pie while it’s warm, the filling will be runny.
How to store strawberry rhubarb pie
You can store leftovers in the fridge or freezer.
Fridge
Keep the pie as a large piece as much as possible (without cutting it into slices). This is to reduce the area that’s exposed to air. Then place the pie in an airtight container and store in the fridge for up to 5 days. Since the filling does contain moisture, the crust will become soggy as it sits in the fridge. If you like, you can “heat” the cut slices in a low temperature oven until the crust is refreshed and flaky, and the filling is a little warm.
Freezer
To store leftovers in the freezer, cut the remaining pie into slices (any portion size you prefer). Then wrap each slice in wax paper or parchment paper, and keep the slices close together. The parchment paper will prevent the slices from sticking together once frozen. Then wrap the entire piece (all the remaining slices) well with plastic wrap, or wrap really well with foil, and store in an airtight container and in the freezer. Let the pie thaw out at room temperature, or overnight in the fridge. Reheat the slices in a low temperature oven (about 200 – 250 F), until the crust is fairly hot and flaky, and the filling is warmed through (does not need to be hot).
Make ahead tips
This pie can be made ahead of time and frozen. Wrap the pie well with plastic wrap and foil, and then freeze. Let the pie thaw out in the fridge over 24 hours. To make the pie crust taste fresh and flaky again, reheat in a low heat oven (about 200 F since it’s a large pie), until the crust is flaky and crisp, and the filling is warm (or room temperature).
Frequently asked questions
More pie recipes you’ll love
Apple pie Cherry pie Lemon meringue pie Passion fruit pie Mixed berry pie Pumpkin pie Crustless pumpkin pie Banana cream pie S’mores brownie pie No bake chocolate pudding pie