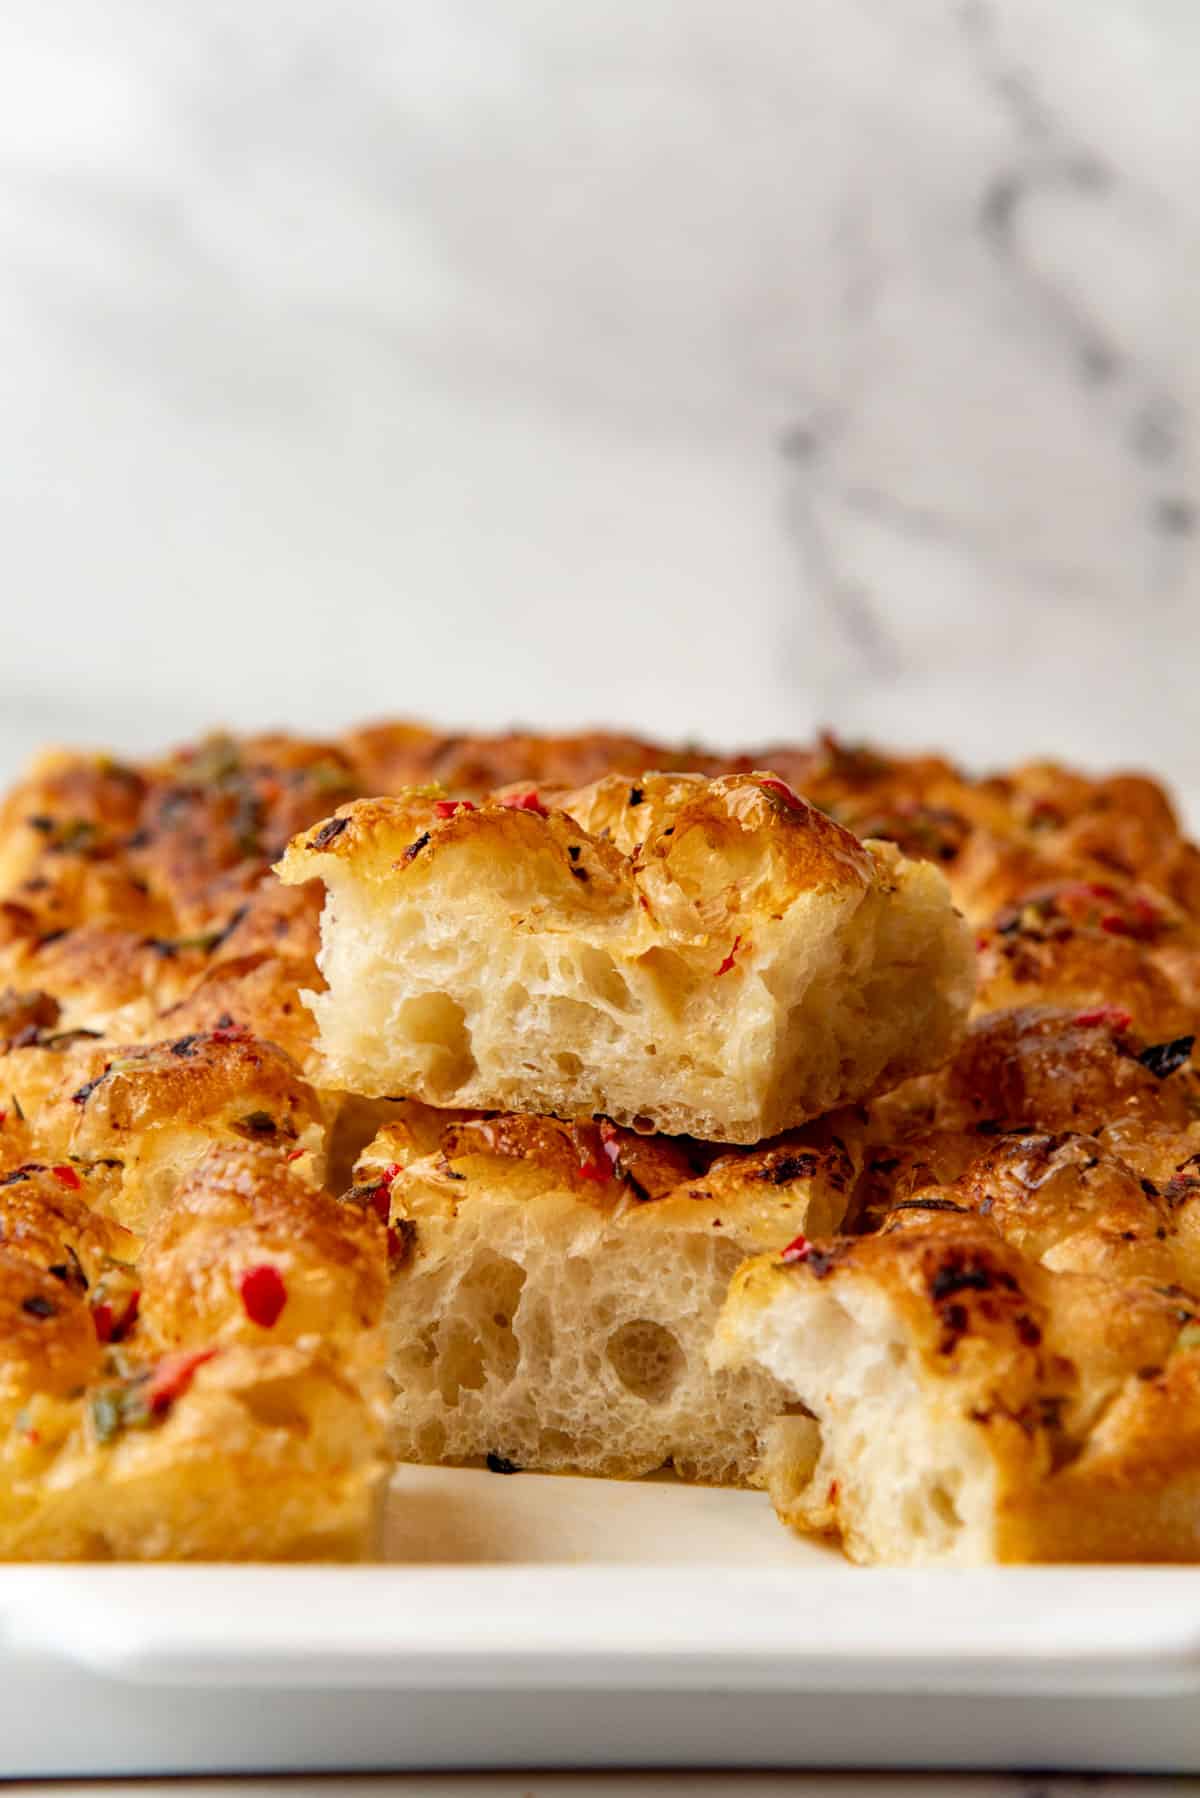
Here, I show you with step by step instructions how to make the most glorious, perfect high hydration focaccia bread that is drenched in flavor, with big bubbles on top, large air pockets inside, and irresistibly crispy throughout! While it’s known as a “flat bread”, it’s not a traditional flat bread at all (unlike roti canai, coconut roti or this whole wheat naan). It is flat compared to other breads, because it’s baked in a shallower pan and spread out thinner. In reality, focaccia is a super fluffy bread that is about 1 inch thick, with lovely crisp edges (sides, bottom, and top), all thanks to the generous amount of olive oil it’s baked in. Dimples created in the focaccia hold extra olive oil along with salt and other herbs, resulting in pockets of fantastic flavor. Focaccia is easy, quick, and a very forgiving and adaptable bread. And I love that it’s a literal canvas in a baking pan for a lot of creativity (i.e. focaccia art!).
What makes the best focaccia (for me!)
This Italian focaccia bread is pretty much an obsession in our family! Ridiculously easy to make, versatile, with an unforgettable flavor and texture. This is one of our favorite homemade bread recipes! Focaccia dough hydration can vary from 65% all the way up to 100% hydration! The crumb for focaccia can range from large open crumb with big holes to a small even crumb. My ideal focaccia has,
High hydration – between 80 to 90%. Has big bubbles on the surface and large air pockets inside. Crispy on top AND bottom. SO MUCH flavor, so that I can snack on it just on its own, without any spreads or dips. I like taking my time to develop the flavor and the crumb of my focaccia bread.
But you can easily adjust this recipe so that it,
Has a smaller, more even crumb (perfect to make focaccia sandwiches). Results in a focaccia with a firmer crumb and more structure with slightly lower hydration. Is faster to make, so you can make your focaccia all in one day!
I’ve been making focaccia for SO LONG, resulting in lots of lessons learned throughout the years. All the years of experience has resulted in my focaccia bread being so incredibly loved and popular among my friends and family. I love breads of any kind. From my brioche bread and brioche buns to homemade white bread, Japanese milk bread, hot dog buns etc., are all so loved by my readers, and that’s because I develop these recipes after a lot of research and experimentation and attention to detail. This focaccia recipe has so much flavor! Instead of using plain olive oil, I share how I make an unforgettably flavorful infused olive oil that sends the flavor of this bread soaring above any bread you’ve ever tasted! The dimples in the dough, hold this wonderfully flavorful spices and oil providing explosive pockets of flavor in your focaccia! More interesting than standard olive oil and salt focaccias. I show you how to make no knead focaccia as well, so you don’t have to use a mixer, and you can still develop tons of flavor in your dough. But, if you MUST have your focaccia right away, I got you! I share all the small adjustments you can make so that your can bake your focaccia on the same day, and still have plenty of flavor (it’s all in that infused olive oil!). I share a very short, summarized version on what is going on inside your dough when making focaccia, so that you have a better understanding of how to adapt the recipe to your liking AND help with troubleshooting as well. Using the baker’s percentages I provide, you can adapt the focaccia recipe to fit any pan!
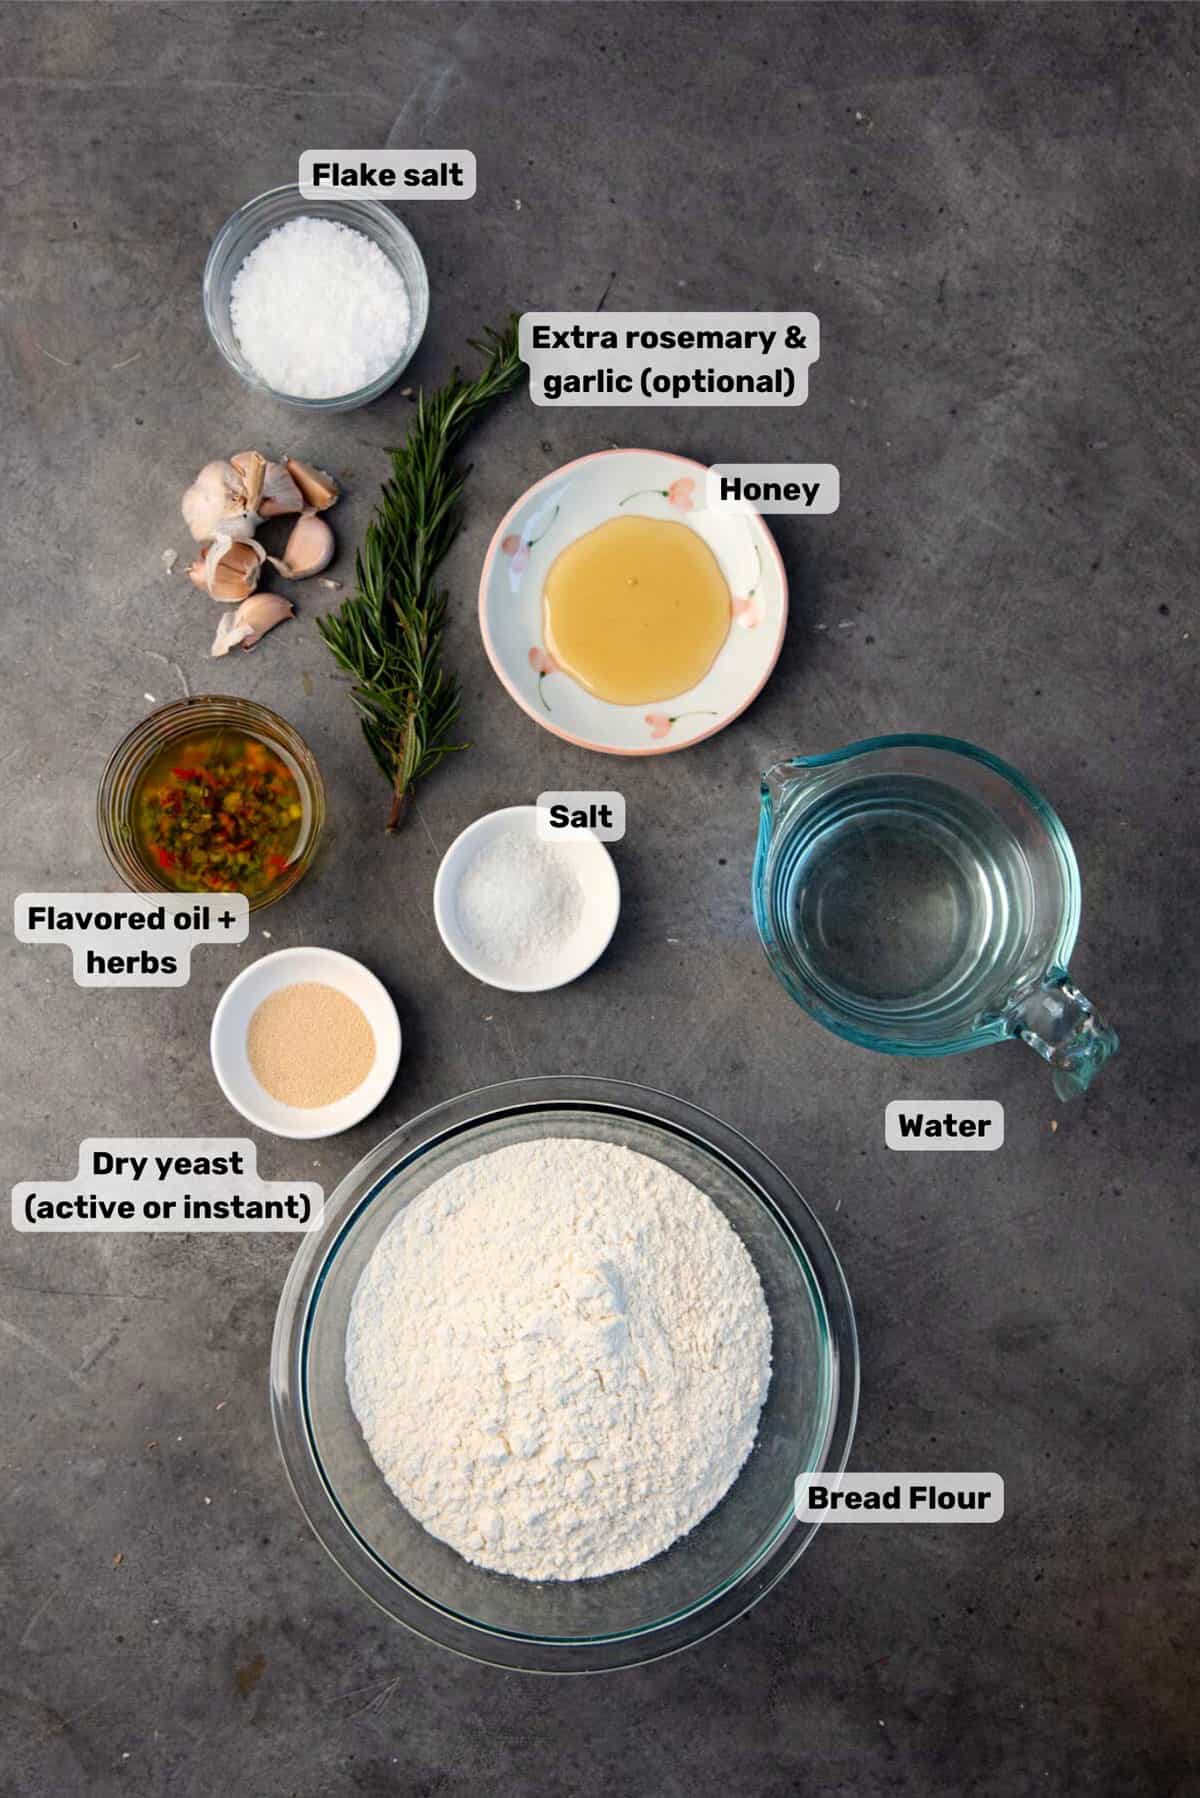
With bakers percentage, the amount of flour is always 100%, and other ingredient percentages are calculated in relation to this. When in doubt, a quick google search will tell you the protein content in the flour that you’re using. The higher protein content in bread flour will help with gluten formation, and also result in a chewier focaccia. Yeast – you can use active dry yeast OR instant yeast. Instant yeast is usually more active than active dry yeast, so technically you need to use less of it. However, the consensus is that it can be used as a 1:1 substitute for active dry yeast. Technically however, the precise weight ratio is 1: 1.33 between instant yeast and active dry yeast. If you’re using fresh yeast (not sourdough starter), then use double the amount in weight. Honey – Added as food for yeast to kickstart its activity. The longer fermentation period results in much of the sugars being consumed by the yeast, but I like the subtle sweetness honey adds to the focaccia, if I add a little extra. You can substitute this with regular sugar, or reduce the amount, or even leave it out if you want. The topping is made by heating the oil and then using the hot oil to “fry” or cook the chopped herbs and spices. This technique is used to make chili oil, and I’m using this method to make a wickedly flavorful infused olive oil that will be used to,
oil the baking pan, to add on top of the focaccia, and even be used as a dip to serve with the focaccia.
Roasted garlic – This caramelized garlic adds an incredibly wonderful depth of flavor. I’ve previously shared a detailed tutorial on how to roast garlic. But if you don’t want to make roasted garlic, or don’t have time, you can simply use finely minced garlic instead.
A stand mixer
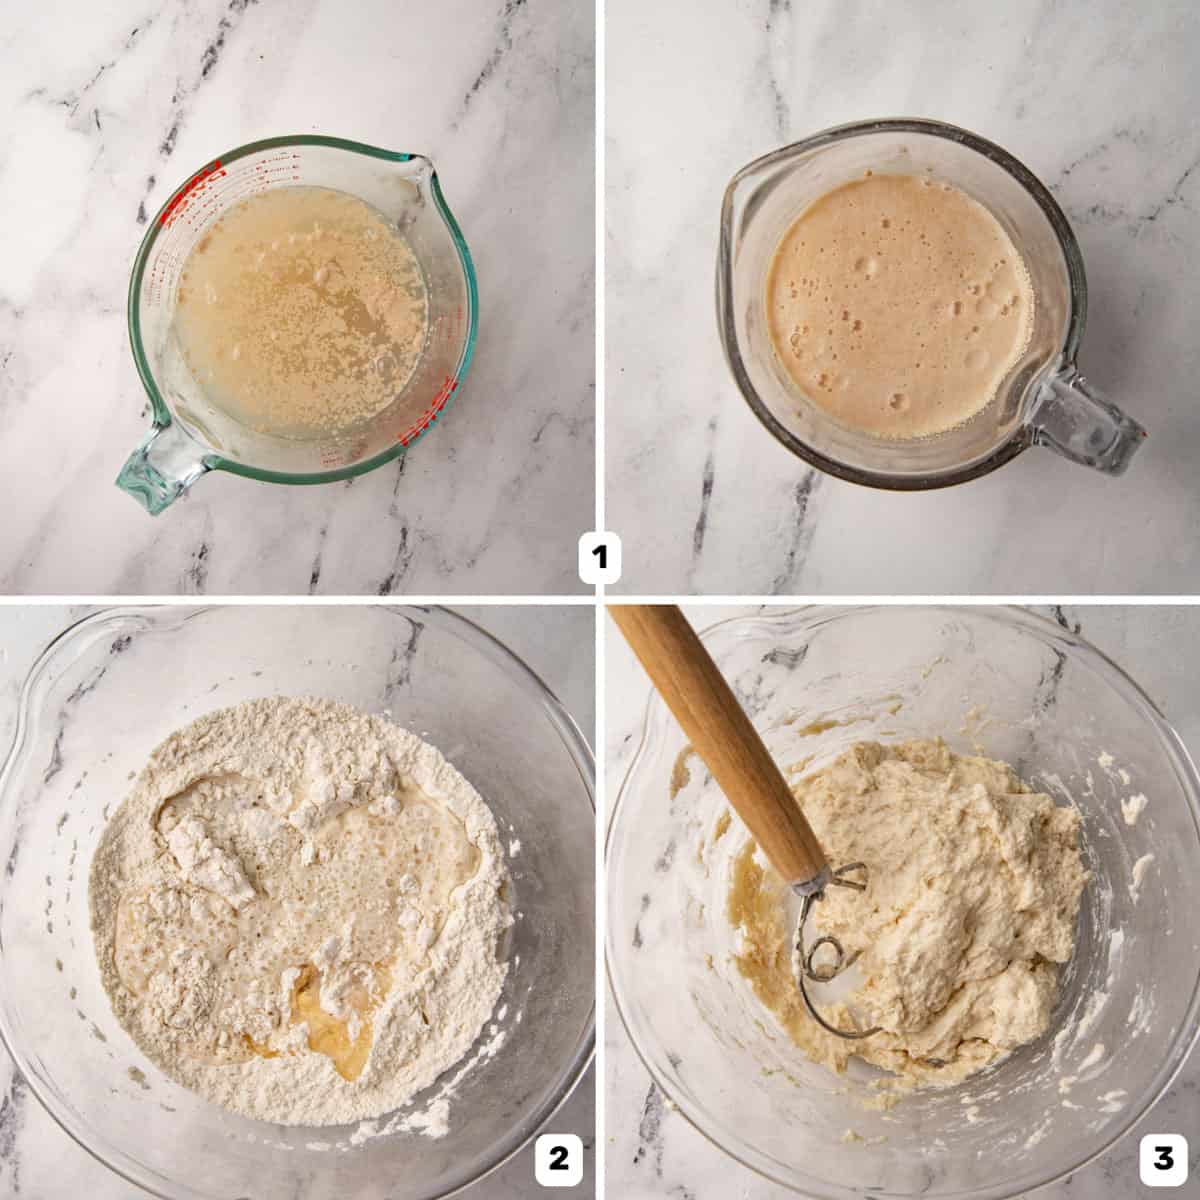
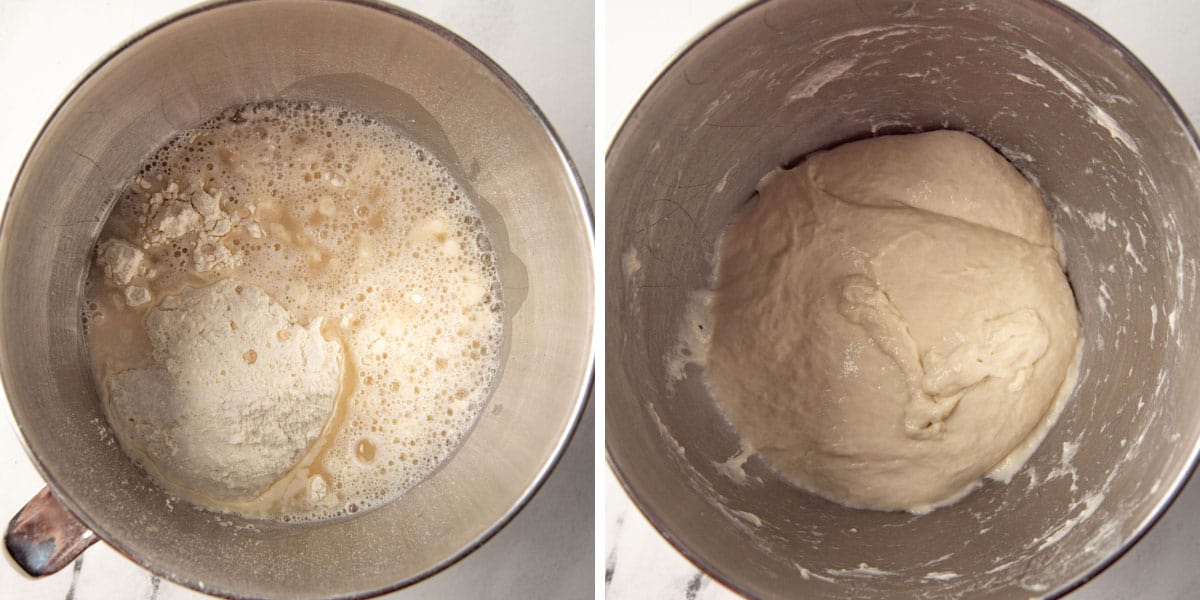
Add the flour to the yeast and water. Follow this with the salt (image 2). Mix the dough with a spoon / spatula or dough whisk till it comes together and all the flour is hydrated (image 3). Let the dough fully hydrate. Cover the bowl with plastic wrap and let it rest for at least 15 minutes. This will allow the water and flour to “mingle” and distribute evenly, hydrating the flour fully. Yes, the dough will be super soft and sticky! This is absolutely normal.
Step 3 – Stretch and fold to develop gluten
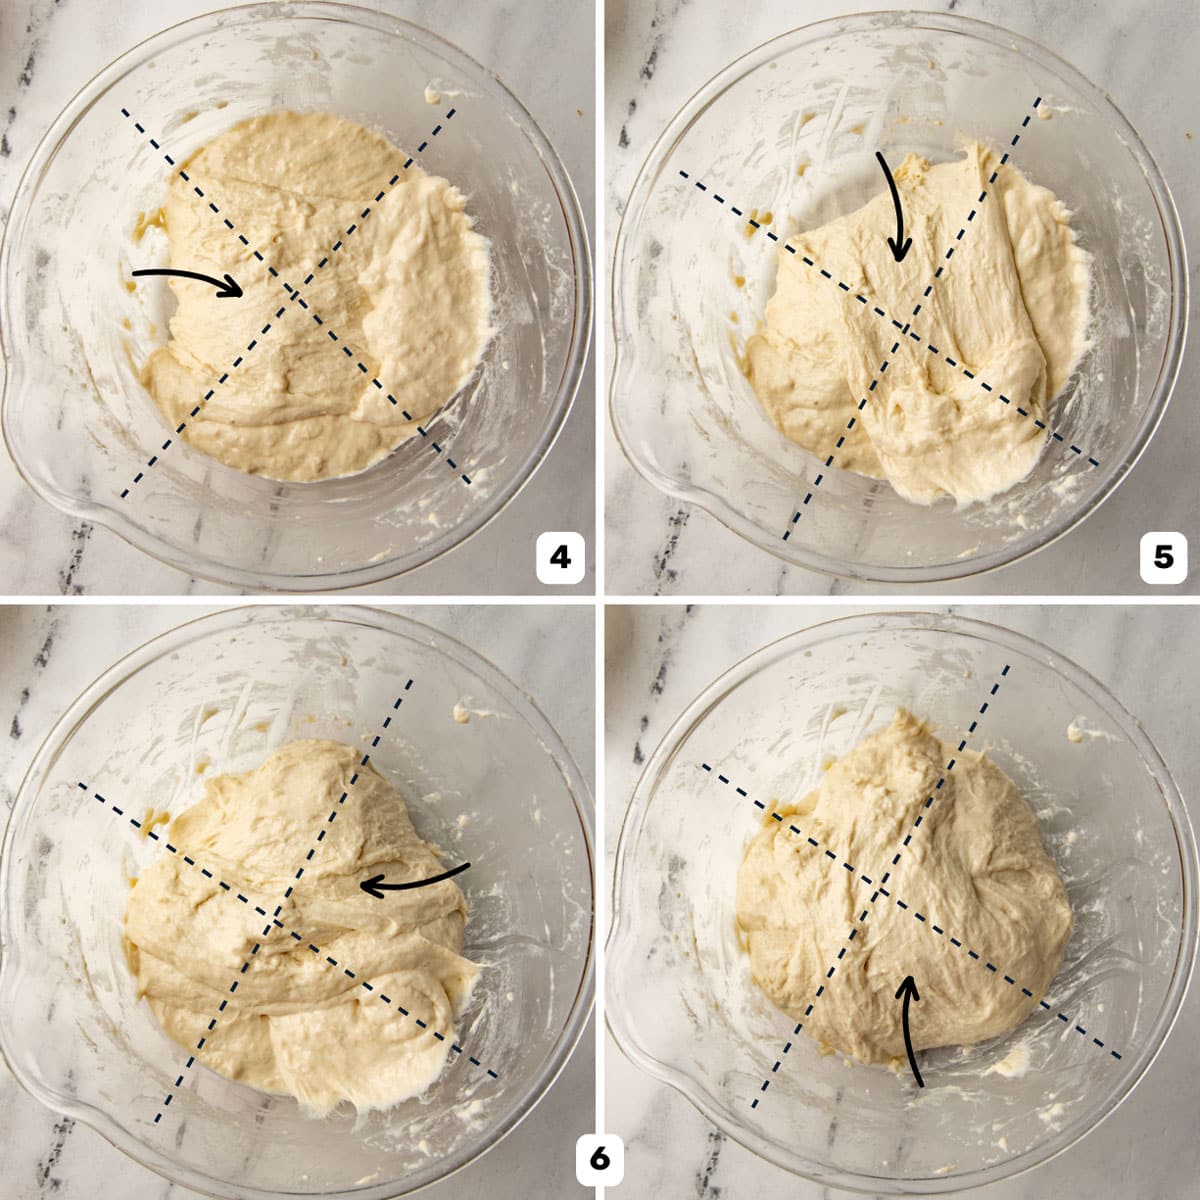
Ideally, stretching and folding the dough should happen over 3 – 4 hours. This is because the yeast is producing gases to expand the dough (which adds air bubbles), and the stretching and folding helps to develop the gluten to form lovely big bubbles in your dough. But we’re going to cut down this time for convenience. Every 15 minutes (for up to 1 hour), stretch and fold the dough. Make sure you have a bowl of cold water next to you, and dip your hands in the water so that your hands are very wet. Wet hands will prevent the dough from sticking. Visually, divide the dough into 4 quadrants in the bowl (image 4). Grab the dough at the end in one quadrant (make sure your hand is really wet). Lift it while gently shaking it, and fold that segment over the rest of the dough as shown in pictures (image 4). Repeat with each quadrant for a total of 4 stretches and folds, along the perimeter of the dough (images 4 – 6). Repeat this step 3 more times at 15 – 30 minute intervals. In total, this should take 1 – 2 hours. The dough will also proof during this time, but don’t actively knock out the air.
Step 4 – Bulk fermentation in the fridge (or a bulk cold proof)
During this process, some recipes call for the addition of oil so that the dough won’t stick to the bowl. But I don’t add any oil and have never had any issues with the dough sticking. Make sure the dough is in a bowl or container that is large enough to handle double or tripling in size. Cover with plastic wrap and let the dough proof in the fridge for at least 12 hours, or up to 2 days. However, if you don’t want to use plastic wrap, and prefer to use a damp towel, then make sure the top of the dough is gently coated with oil (to prevent the dough from drying out in the fridge).
Step 5 – Make the topping
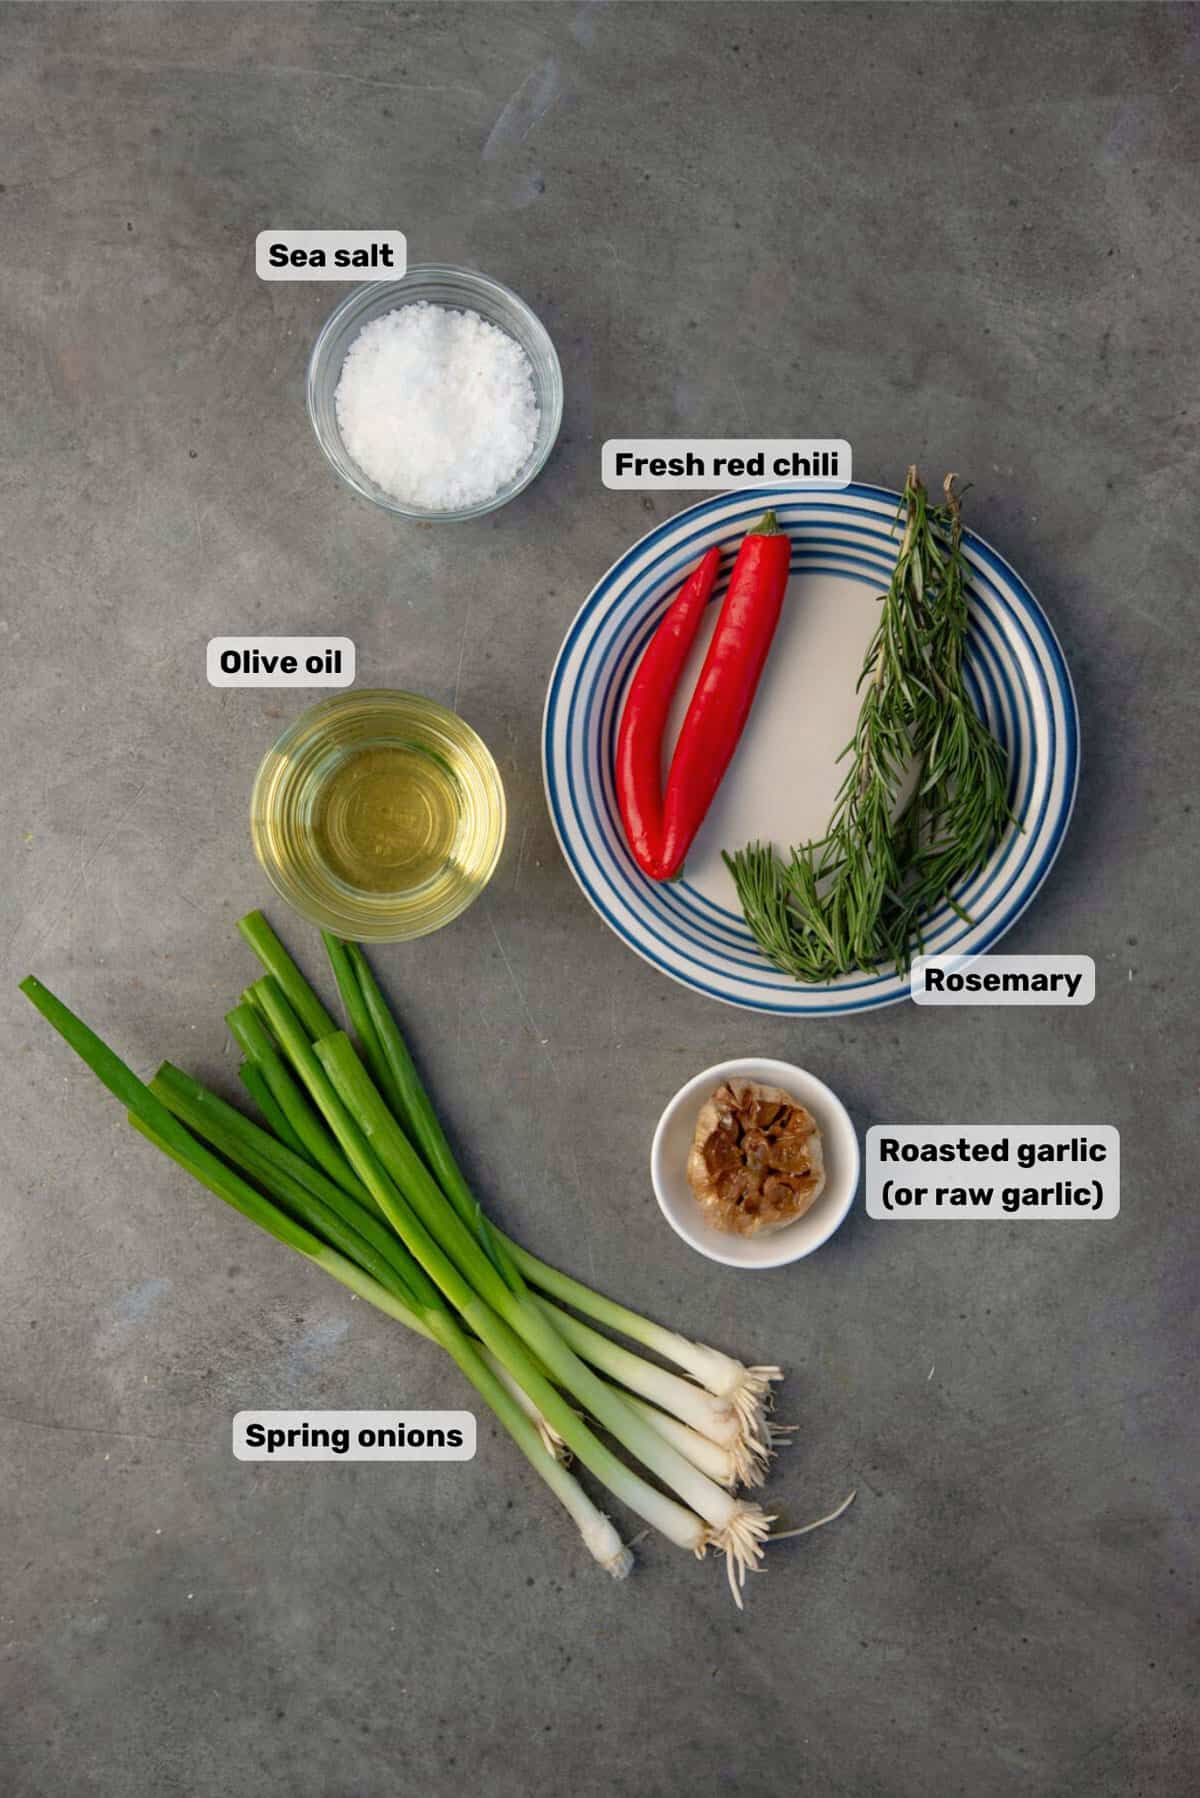
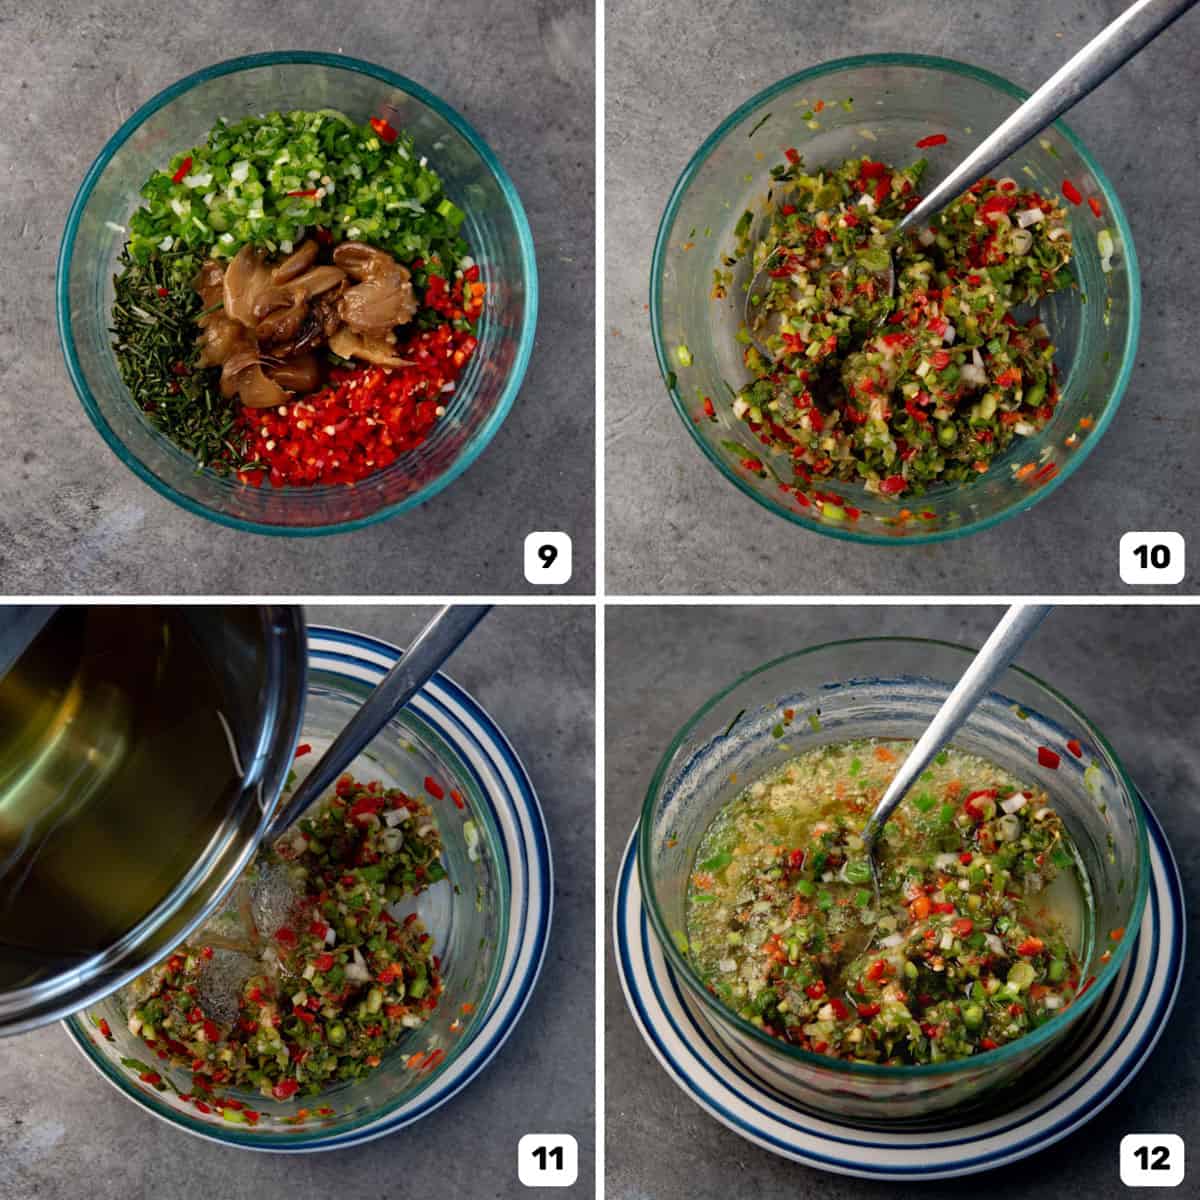
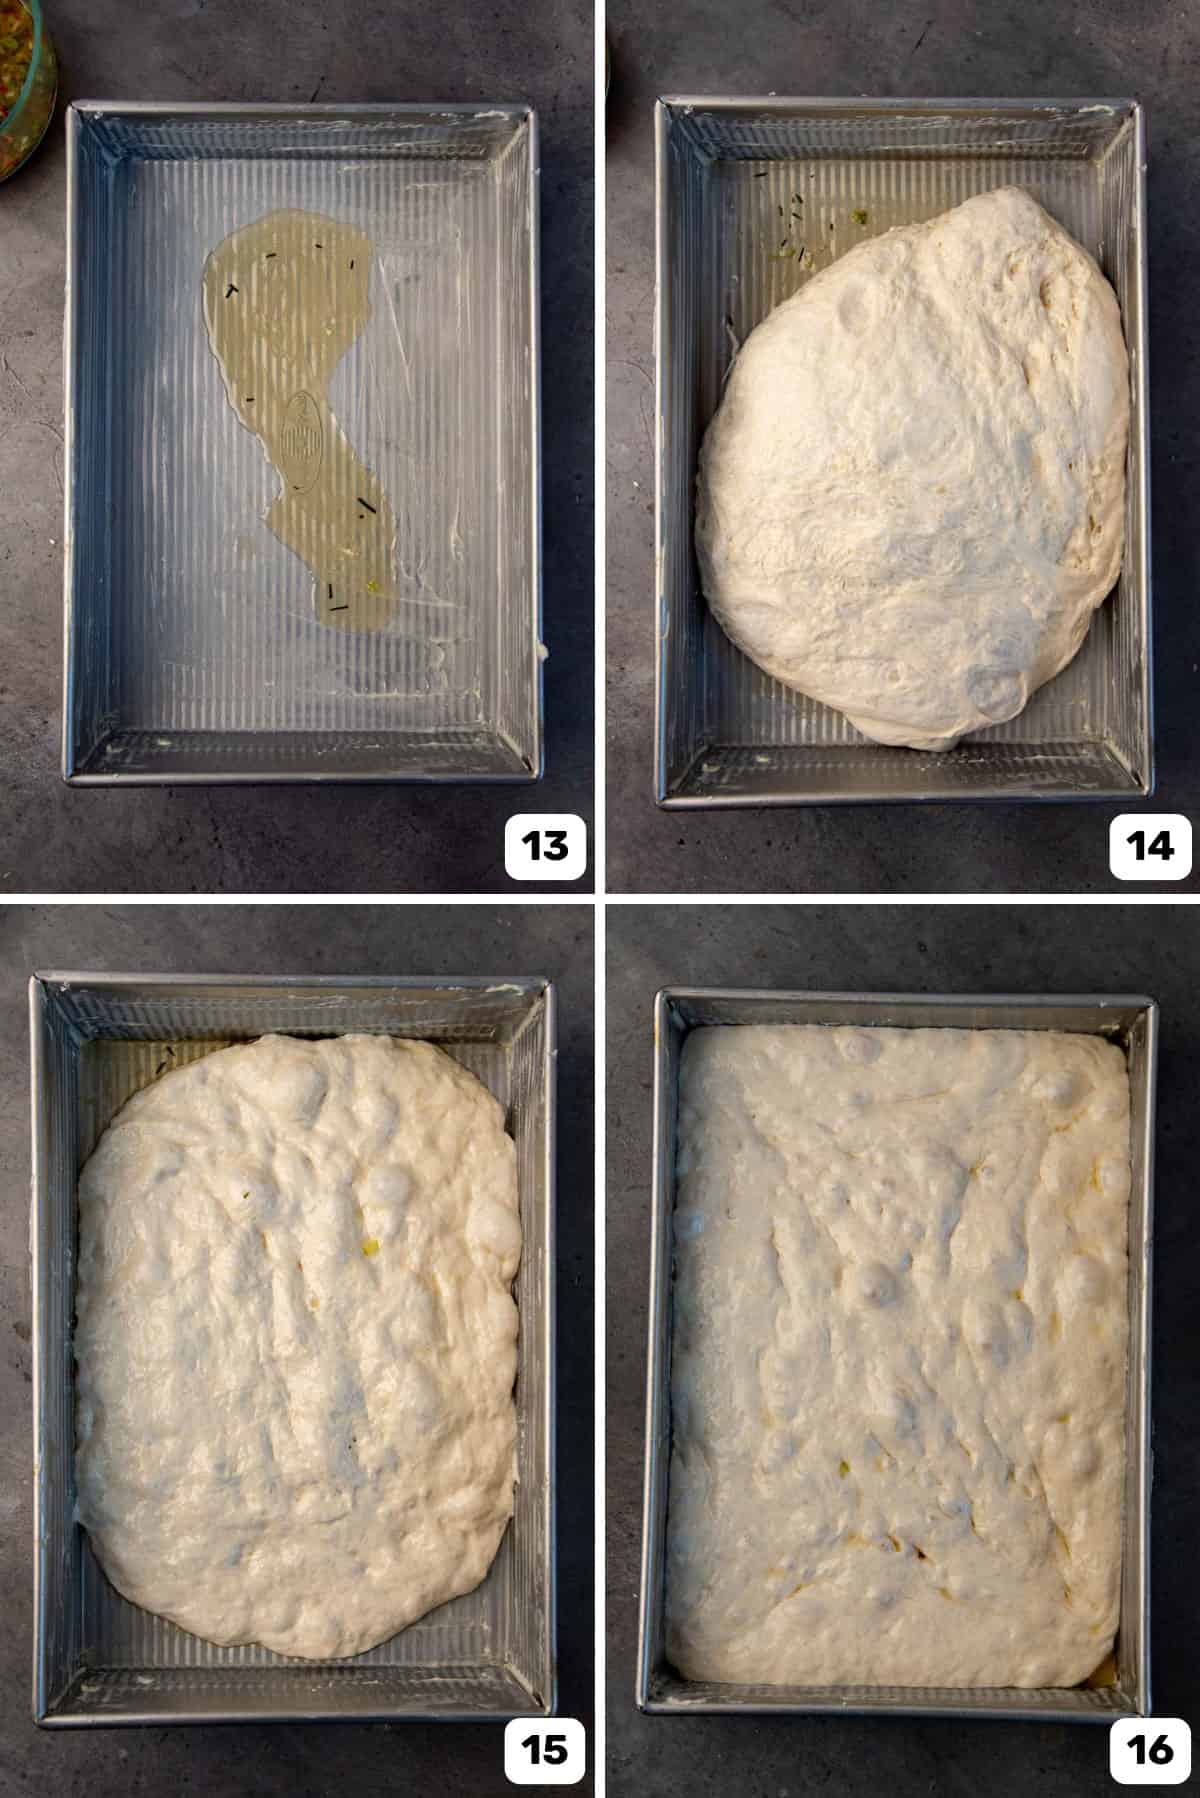
While the focaccia is proofing, start making the flavored oil and topping. Make roasted garlic if you have time. Heat up the olive oil in a small pot over medium heat. While the olive oil is heating, finely chop the spring onions, chili, and rosemary, and place it in a bowl (image 9). Squeeze out the roasted garlic cloves into the bowl, or finely chop fresh garlic. Mix to combine (image 10). Once the oil is heated (about 300 – 350 F), remove from the heat and pour it into the chopped herbs, while stirring (image 11). The herbs should sizzle as you add the oil! Add some salt at this point if you like, but you can keep it unsalted too. Set it aside to cool down (image 12) and let it chill in the fridge until you need it the next day. Alternatively, you can apply a thin layer of butter first and then add the flavored oil. It is absolutely OK if some of the chopped herbs get into the pan with the oil. Hold the dough bowl over the baking pan and give it a little shake to transfer the dough. The dough should slowly pop out of the bowl and into the oiled pan. Gently flip the dough over in the pan, so that the entire dough gets lightly coated with the oil (image 14). Stretch or fold the dough to form a rough rectangle (image 15). It doesn’t have to fit the whole pan, but should be in the shape of the bottom of the pan. Cover the pan with plastic wrap and let it come to room temperature. During this time, check on the dough every 15 – 20 minutes, and gently stretch the dough so it fits the bottom of the pan (image 16). Once the dough is stretched to fit the pan, AND it’s at room temperature, let the focaccia proof in a warm place until the surface looks bubbly, and wobbles like jello when you shake it. This can take anywhere from 1 – 3 hours, depending on room temperature. Preheat the oven to 425 F.
Step 7 – Add the flavoring and dimple the dough.
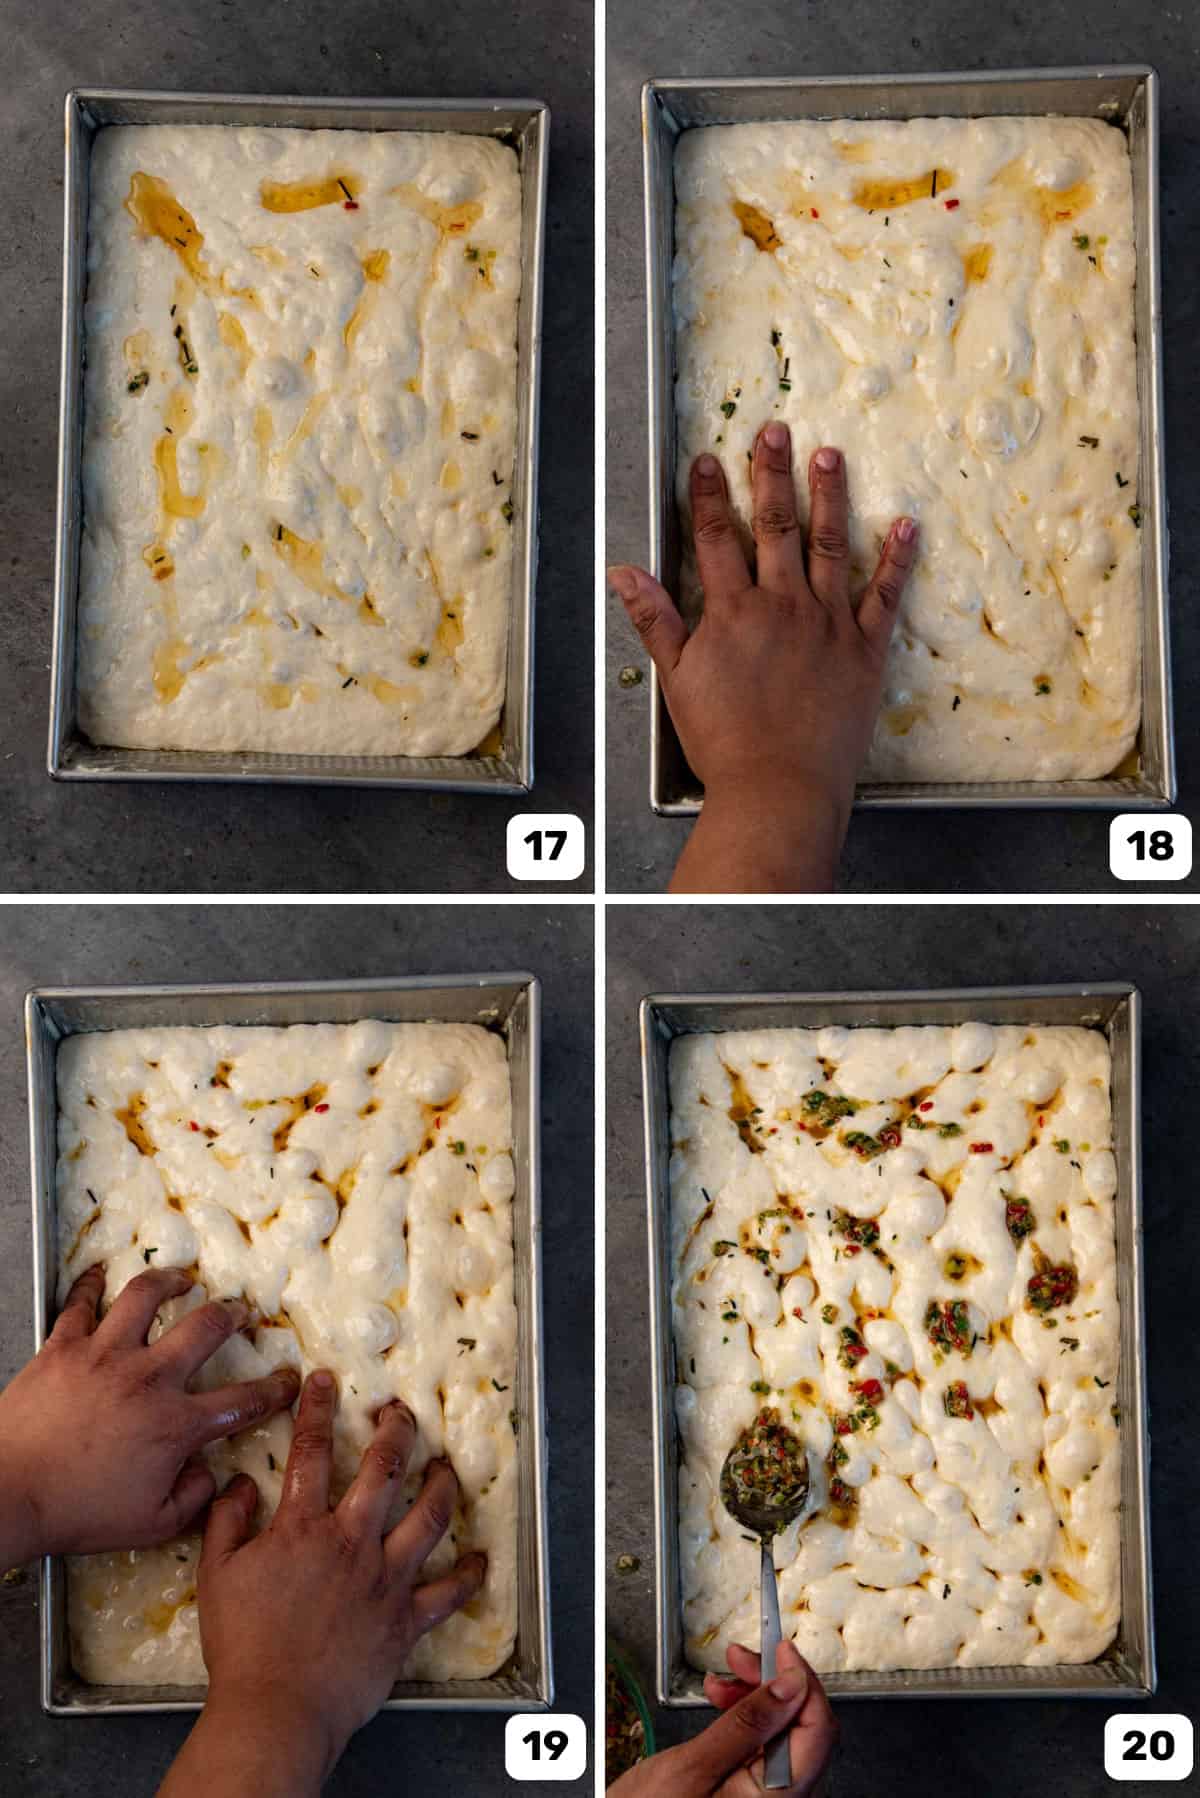
When the focaccia has proofed, drizzle 1 – 2 tablespoons of the infused oil and gently spread it over the surface of the dough (images 17 – 18). Take some of the chopped herbs in the infused oil and dot the surface of the focaccia too. You can add more before it goes into the oven. Next is the fun part – dimpling the dough! Make sure your hands are clean and dry, and coat them with some oil. Press into the dough using your fingers (image 19). It’s OK for your fingers to go right to the bottom of the pan without breaking the bottom of the dough, but it’s ok if you accidentally pierce through as well, as it will all be covered once baked. This dimpling action causes some of the air pockets to puff up, causing an even more bubbly surface. If you made a low hydration dough, the dimpling will create noticeable dimples in the dough. But with high hydration focaccia, the dimples won’t be as visible, because of the larger air pockets formed around them. Drizzle more of the chopped herbs on top, if any spots are missing them (image 20). If you did not add salt to the herb and oil mix, then sprinkle the top of the focaccia with flaky sea salt as well.
Step 8 – Bake and serve.
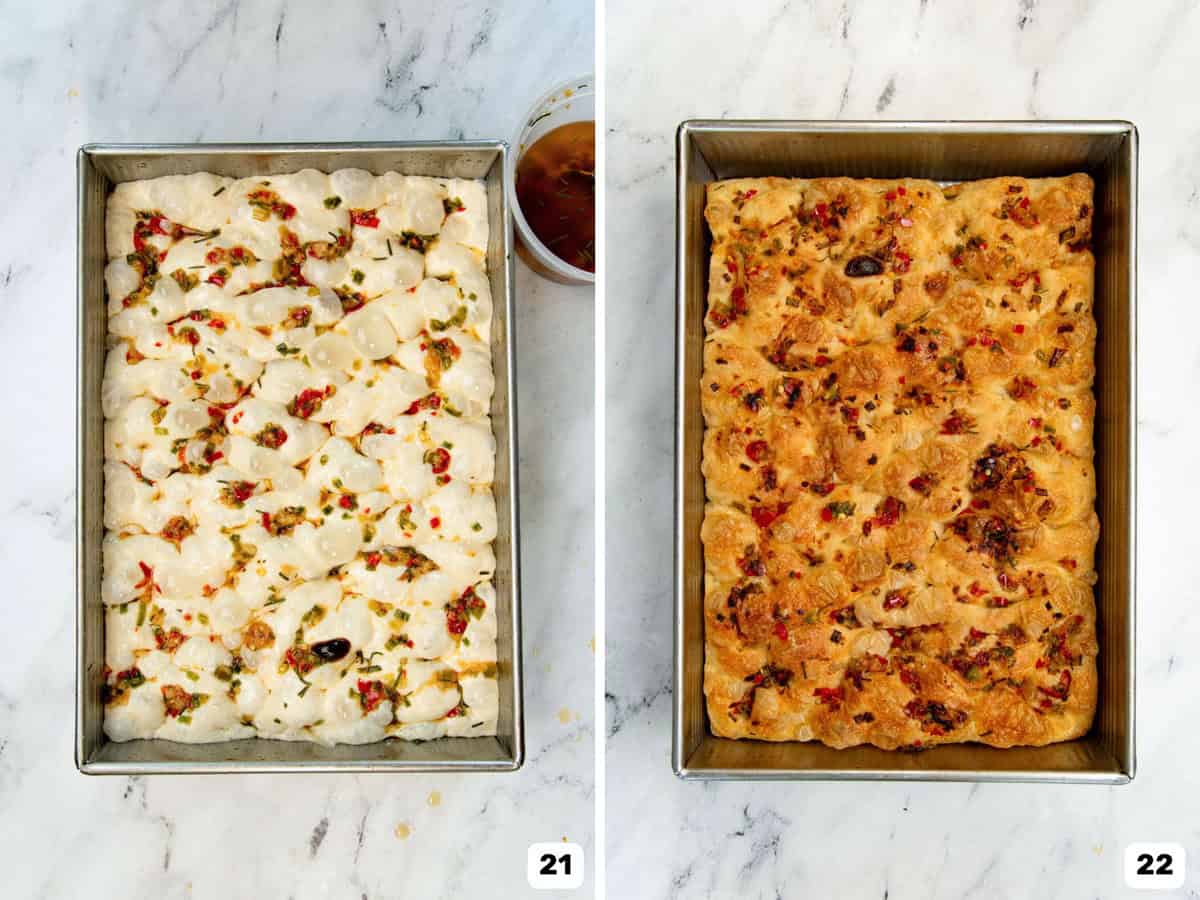
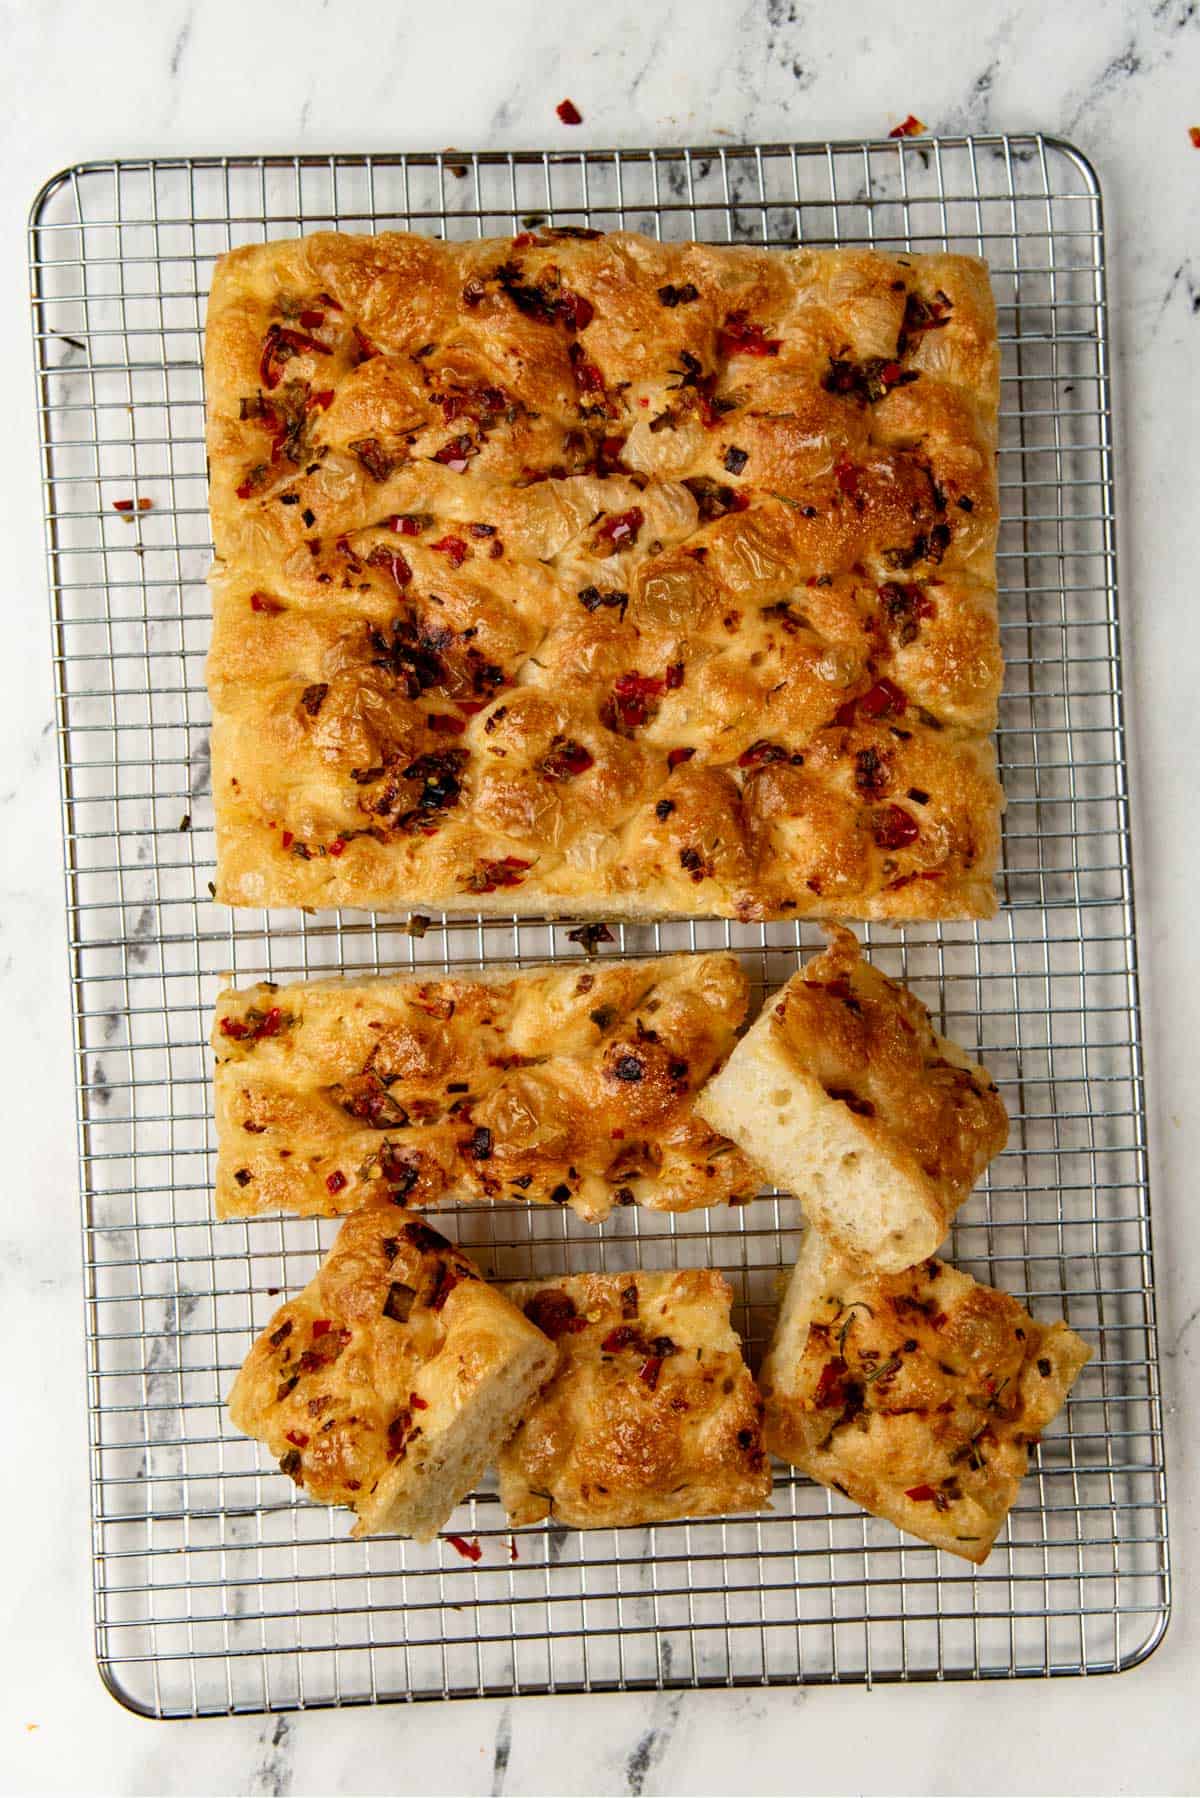
Once the focaccia has been dimpled and the spice and herb mix has been dolloped all over, it is ready to be baked (image 21). Bake the focaccia in a preheated oven for about 20 – 25 minutes. The time will very much depend on your oven. These instructions are for a conventional oven, one that has heat elements from the top and bottom. Place the focaccia in the bottom rack of your oven. In my oven, I place it on the rack that is at the lowest position. Bake for at least 15 minutes, or until the bottom of the focaccia is nice and golden in color. Once the bottom has caramelized, switch the pan to a higher rack to caramelize the top. Once the focaccia is baked, and has become golden brown, remove the pan from the oven (image 22). Let it cool down just enough so that you can handle it comfortably with gloves. But in other ovens, I have had to move the baking pan up to the upper third rack to properly caramelize the top. Transfer the warm focaccia onto a wire rack. I like to eat it while it’s still warm, but you can serve it at room temperature too. Serve it just as is, OR with a small bowl of the infused oil and chopped herbs as a dip. Activate the yeast and add the rest of the dough ingredients in the mixer bowl of your stand mixer. Mix the dough until all the flour is hydrated. Then knead the dough on medium high speed (speed 6 on my kitchen aid), for about 15 – 20 minutes. Once the dough is kneaded, cover the bowl with plastic wrap and let it proof until it’s at least twice the initial size, but no more than triple. Do not let it overproof because this will make the focaccia taste like beer! After this stage, follow steps 6 – 8 (i.e. next day procedure) as indicated above. However, the final proofing time will be shorter (compared to the no knead dough), because the dough is already at room temperature and the yeast will be more active.
Tips for success
Use a scale to weigh the ingredients. The dough is very sticky and loose. This is totally normal. When handling the dough, make sure your hands are coated in water or oil (if the dough has already been oiled). Plan ahead. Yes, you can make homemade focaccia within hours, but for the best flavor and texture, give your dough time to develop flavor and to develop the right texture. It’s a simple recipe, so don’t rush it. Adjust the baking time to suit your oven! The goal is to have a lovely crispy bottom and a golden brown crust on top. That’s why we bake the focaccia close to the bottom element and finish off the baking near the top element. You can also bake the focaccia in the middle rack, but you may need to bake it longer to get the crispy crust and this might result in a drier focaccia. Be patient and observant with letting the focaccia proof before baking. We want the dough to proof so that there will be big bubbles, but not let it overproof. This will cause the focaccia to collapse. Look for visual cues to know if the focaccia is done proofing. Because of the high hydration, it’s hard to perform the indentation test here like some other breads. But like with croissants, just shake the pan gently to see if the dough surface is jiggly like jello. Focaccia is very versatile, and you can top it with ANYTHING you like! To make the focaccia as flavorful as possible, use an infused oil that will complement the toppings. For even more flavor, add herbs, parmesan cheese, and spices to the dough!
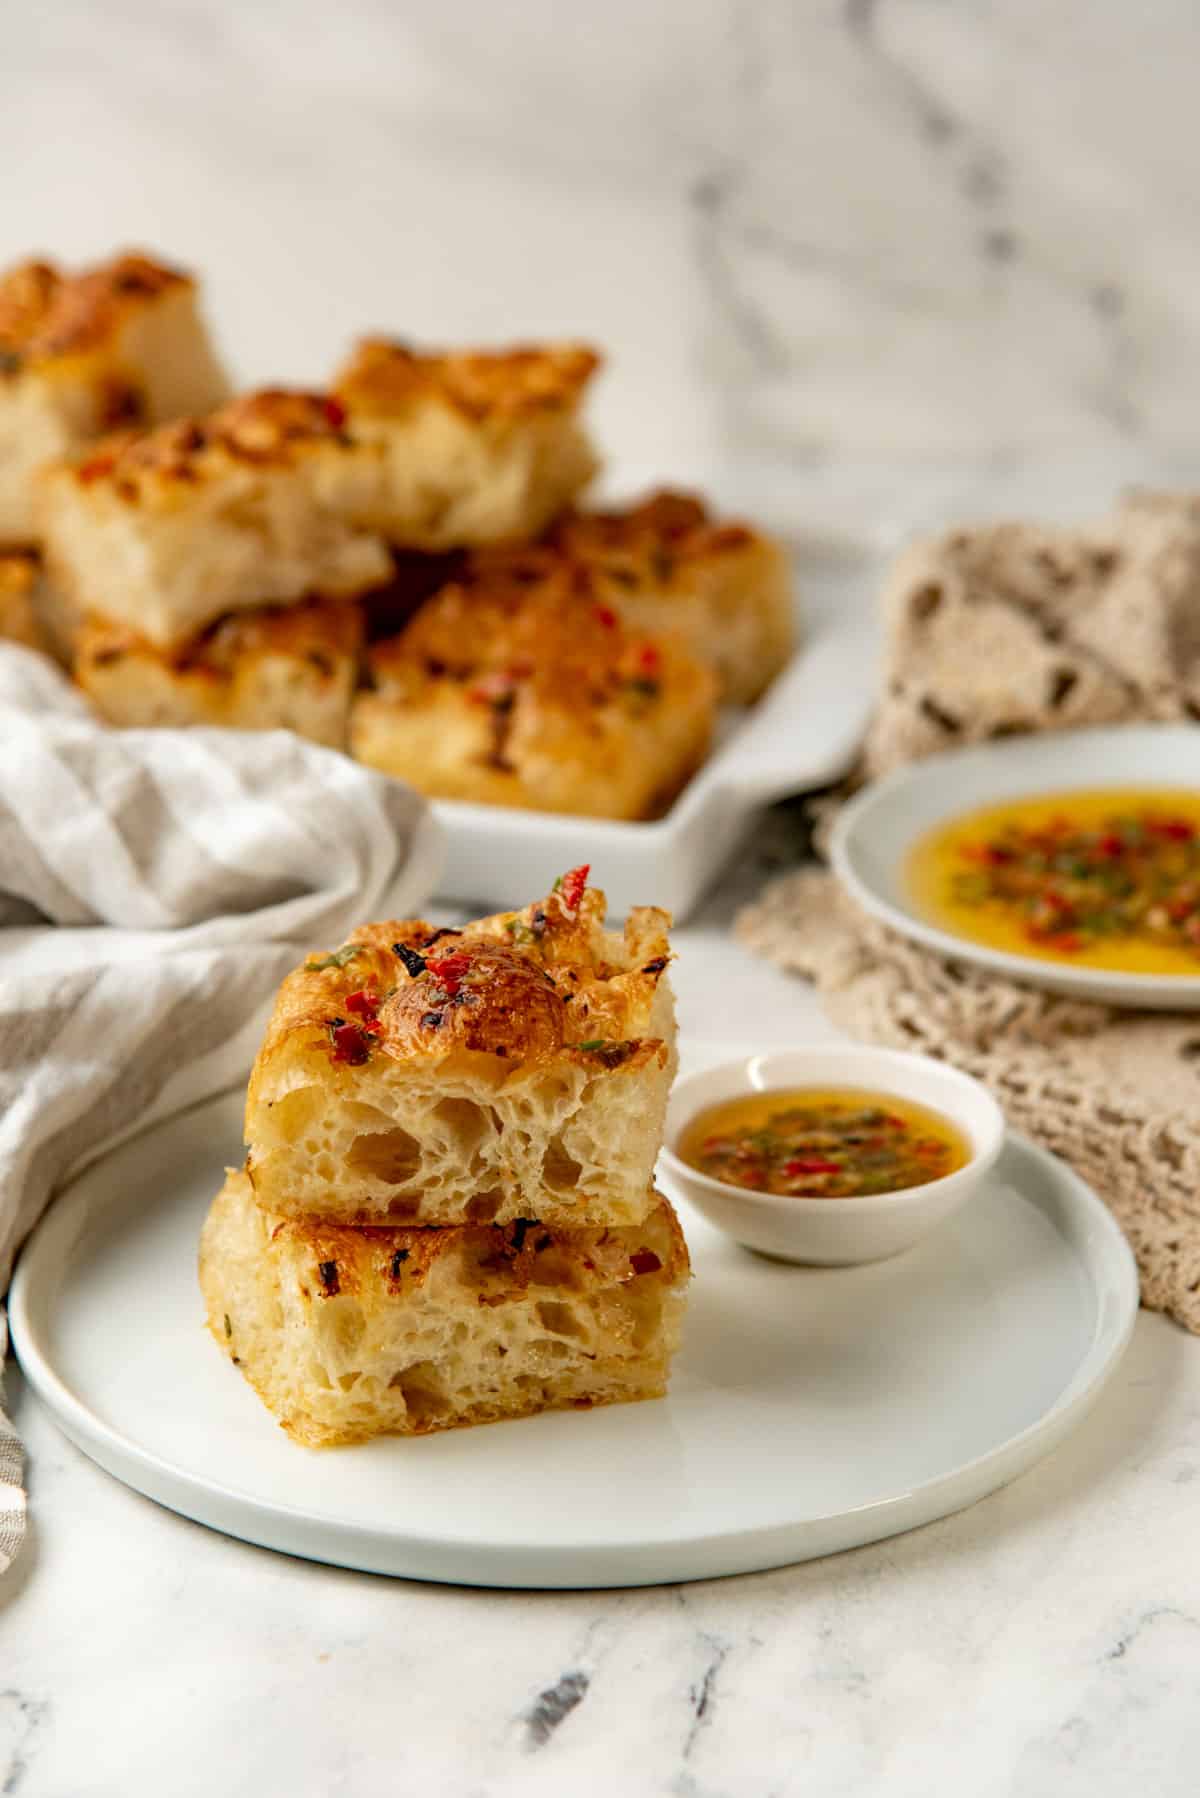
Since we add a little extra yeast, this also contributes to the dough being more active. Since we must keep an eye on the dough as it kneads, the active time is longer as well. However, the flavor might be a little less here because the fermentation process isn’t able to develop as much depth of flavor in the dough. The risk of overproofing is also high because of the high yeast activity. But this method is faster, and the resulting crumb is more even, and less bubbly. Overnight focaccia obviously takes more time from start to finish. The active time is very little, and it’s more spread out throughout the processing time. Since the gluten is developing slowly here (through stretching and folding, and just by letting the dough rest), the activity of the yeast is slowed down, so that the dough can develop the gluten while it’s proofing. Overnight proofing also helps to slow down yeast activity, and develop more flavor in the dough. While slower, this method is also less involved. It does produce a lofty focaccia that has a bigger crumb with airy pockets, and a more complex flavor! Garlic focaccia – Mince the garlic cloves and mix with the olive oil. Then use the olive oil with the minced garlic to drizzle on the bottom of the pan and on top of the focaccia. You can also use roasted garlic cloves instead of raw garlic for a more complex and delicious garlic flavor. You can also add rosemary to this to make rosemary garlic focaccia (or any other herb too). Focaccia appetizers – Cut the focaccia into smaller squares and serve with a dipping sauce or flavored olive oil (like the remaining infused oil and herb mix in this recipe), vinegars, olives, and other antipasti. You can also make a low hydration focaccia for a more dense and even crumb, and make mini focaccia skewers where you’ve got tomatoes, cheese, cold cuts topped on small pieces of focaccia with a skewer holding it all together! Focaccia sandwich – This airy and bubbly focaccia can be used to make sandwiches too! But if you prefer to make focaccia sandwiches with a more bread like focaccia, adapt this recipe to make it more dense, by lowering the hydration to 65 – 75%. Then once baked and cooled, split the focaccia in half to make two thin focaccia layers. Fill the middle with your choice of filling and cut it into portions. I love a good ham and cheese focaccia sandwich! Olive focaccia – On top of other herbs and spices, you can also gently press in olives into the bread. Herb focaccia – Mince a mix of your favorite herbs and mix it with olive oil. Then use this olive oil to spread on top of the focaccia, along with the finely chopped herbs. Some of my favorite mixes are,
Rosemary and sage Rosemary and thyme Sage and shallots Basil and oregano Cilantro and basil Parsley and cilantro
Tomato focaccia – If you want to use fresh tomatoes, cherry tomatoes or grape tomatoes would be perfect for this! Evenly press some cherry tomatoes into the dough, leaving at least 3 inches in between. Remember that tomatoes have water in ’em, and baking will release all that moisture. This can lead to a change in the baking times to avoid soggy focaccia. My favorite way to make tomato focaccia is to use chopped sun dried tomatoes instead! More intense tomato flavor and no soggy focaccia. Vegan focaccia – This recipe for focaccia is vegan as is. However, I do mention adding parmesan IF you want to add more flavor to the focaccia. Instead of parmesan, I like to add a little bit of nutritional yeast to make a vegan option instead. Gluten free focaccia – This recipe is not gluten free, BUT I have made a gluten free focaccia that is SO good that no one could actually tell it was gluten free! I used the same infused olive oil, herb, and spice mix to get all the flavor, but followed this recipe for gluten free focaccia. The hydration is higher and the dough will feel different, but trust the process. The key is to use this gluten free dough.
Thin spring onions as stalks Tomatoes Chili peppers such as banana pepper, anaheim, jalapeno, or pencil chili (like I used here). Cut crosswise for little circles or flowers. Bell pepper cut into cross sections can create beautiful flowers. Chives can be used as grass Red onion or shallots Sliced mushrooms Olives
Remember that the top of the focaccia should not caramelize too much as it can burn the vegetables and herbs on top. If needed, cover the top loosely with foil if it’s caramelizing too much.
Olive oil (flavored or unflavored) The roasted garlic and herb olive oil dip in this recipe A good quality balsamic vinegar and olive oil mixed together as a dipping sauce Any chili oil with chili crisp for a spicy dip Cold cuts Olives, vegetables in vinegar or oils, other pickles, and other antipasti Cheese trays Tapenade, pate, pesto, chutney, caramelized onions Or serve focaccia as a side with soup
Storage
Focaccia will last in the fridge for about 5 days, but it will become stale the longer your keep it. I like to warm up the focaccia in a toaster oven at a low heat after refrigeration. You can also store focaccia in the freezer! Cut up the focaccia into portion sizes that you prefer. Then layer the pieces in an airtight freezer friendly container, making sure to place wax paper or parchment paper between layers to prevent them sticking together. When you’re ready to serve the focaccia, heat the focaccia from frozen in your oven or toaster oven, on low heat till heated through and crisp on top. The dough for the focaccia can be bulk fermented in the fridge for up to 2 days. I would not keep it any longer than that, as the dough can overproof as well. Even if you knead the dough with a mixer, you can still bulk ferment the focaccia in the fridge for up to 2 days!
Commonly asked questions