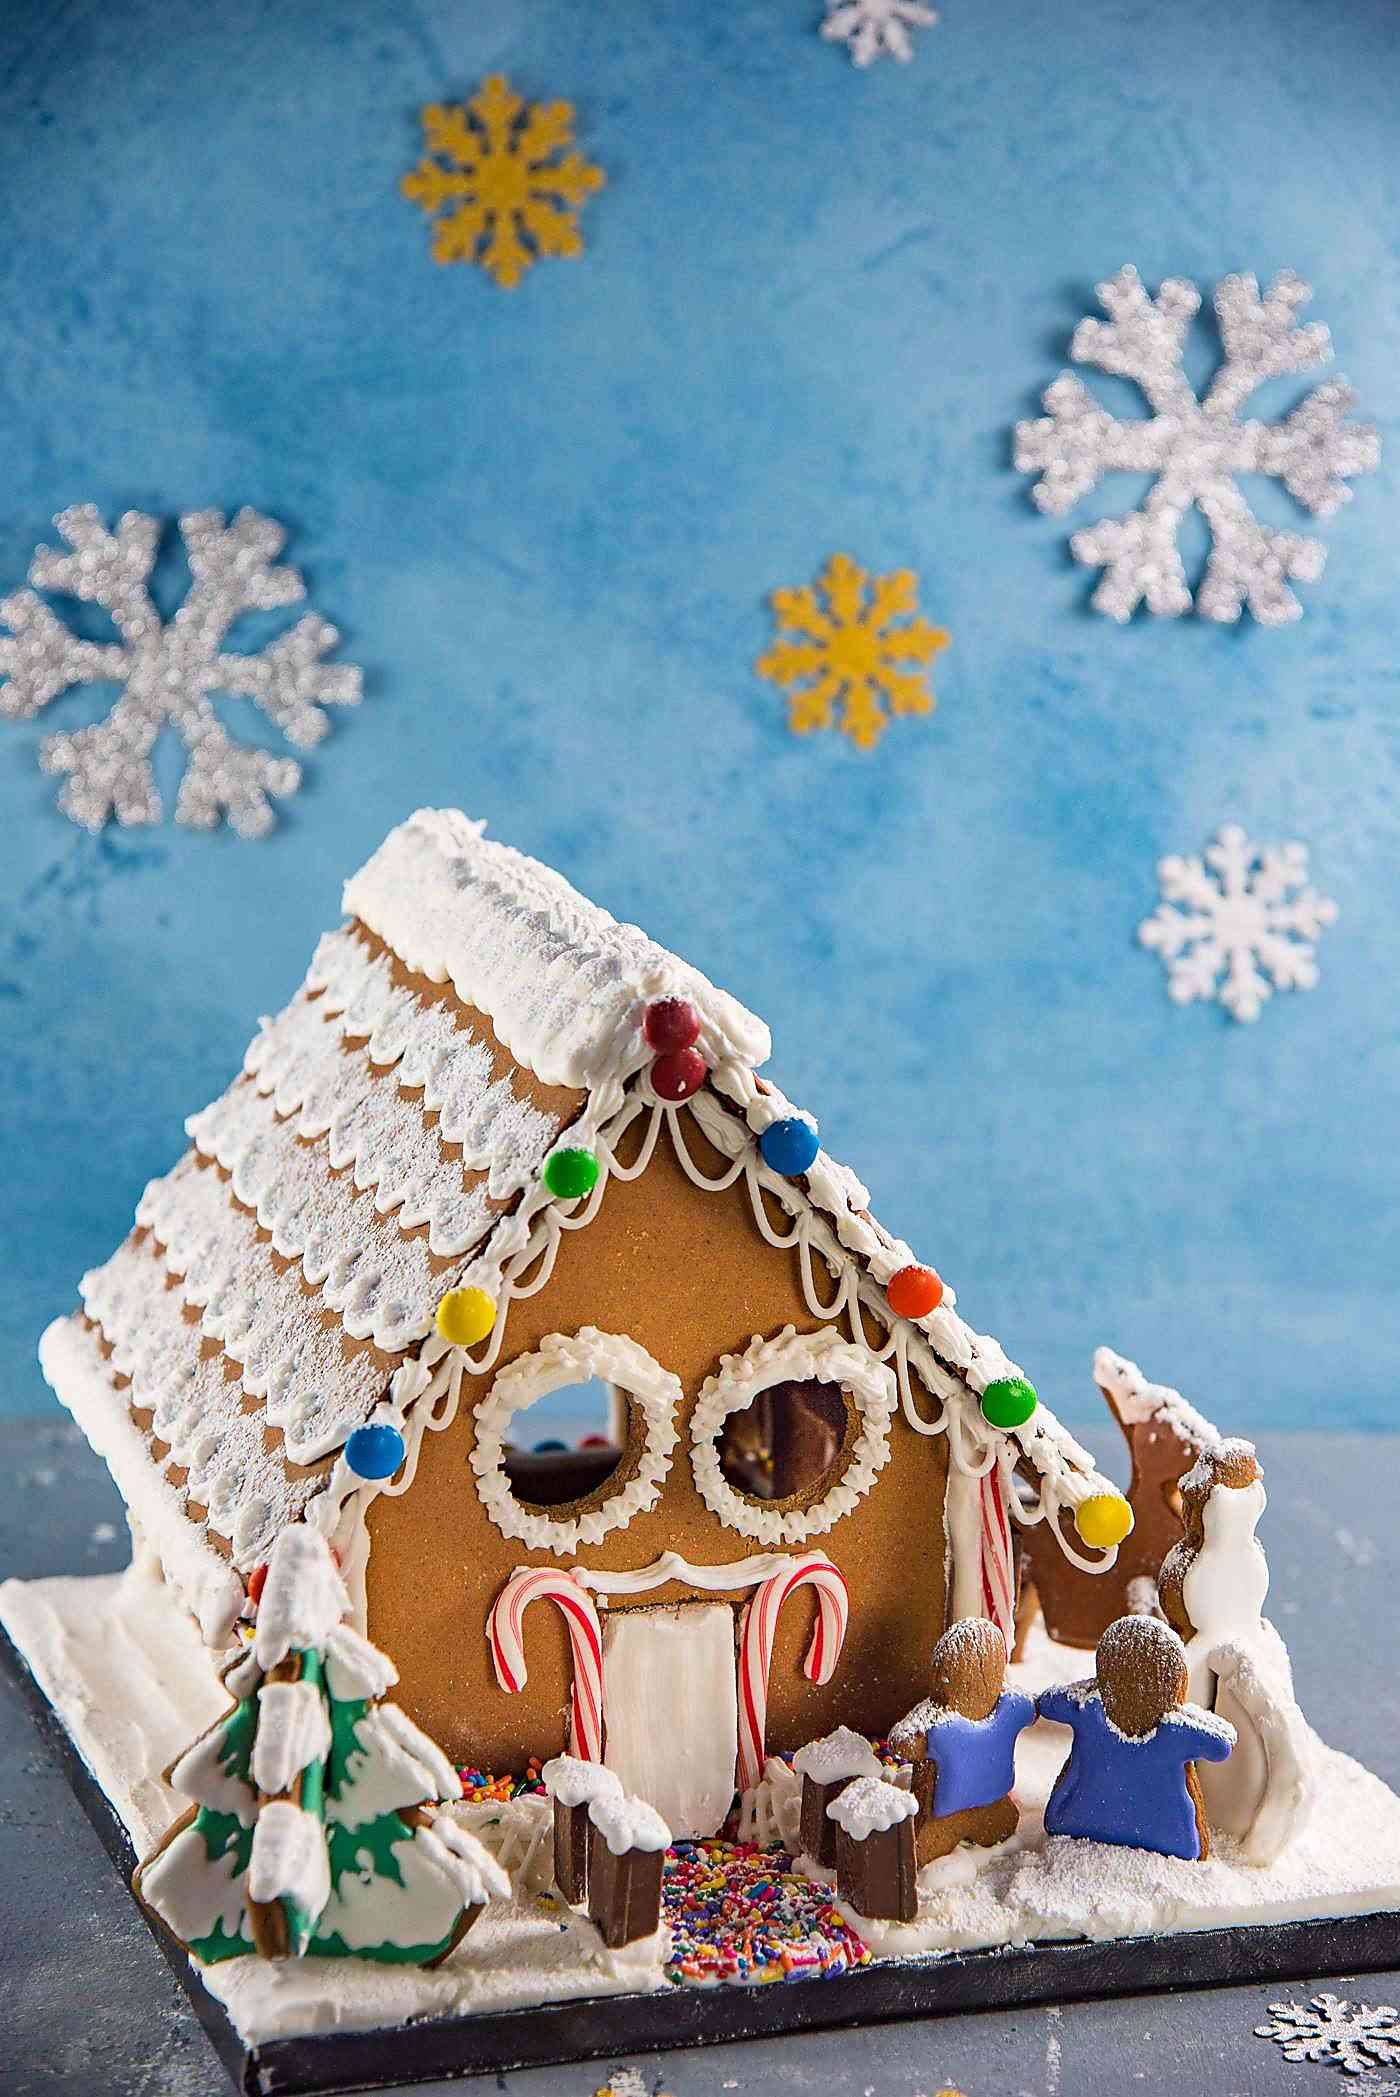
Christmas gingerbread house is a holiday tradition in our household and it’s always so much fun to frost and decorate it! There’s something exciting and quintessentially holiday-worthy about making and decorating a Christmas gingerbread house with kids and all the people you love! Yes, it’s much easier to bake some ginger cookies or thumbprint cookies or linzer cookies or shortbread cookies and just stuff your face with them for the holidays! But assembling and decorating a gingerbread house (especially your first gingerbread house) just seems like a jolly experience that any kid would love around the holiday season!
Why this gingerbread house recipe works
This is a detailed guide on how to make a gingerbread house with a well-tested gingerbread house template! It’s a simple design that is easy to follow and make with kids as well. I’ve been making this gingerbread house recipe for years, and I’ve streamlined my workflow so that I can make it within a couple of days, or over a few days. And I show you how to do that. I even provide ways to personalize the design of your gingerbread house, while still using the same template. Not only is the gingerbread dough easy to make, it’s also absolutely delicious to eat! The gingerbread cookies have a lovely spice and flavor without any overpowering sweetness. So, it’s perfect to eat with royal icing and other candy that will be stuck to it! The royal icing for gingerbread house is safe to eat as it contains no raw egg whites, and is easy to make! There are so many ways to decorate this gingerbread house, and you even eat all that at the end as well! Win-win.
Gingerbread house recipe ingredients
For the gingerbread dough
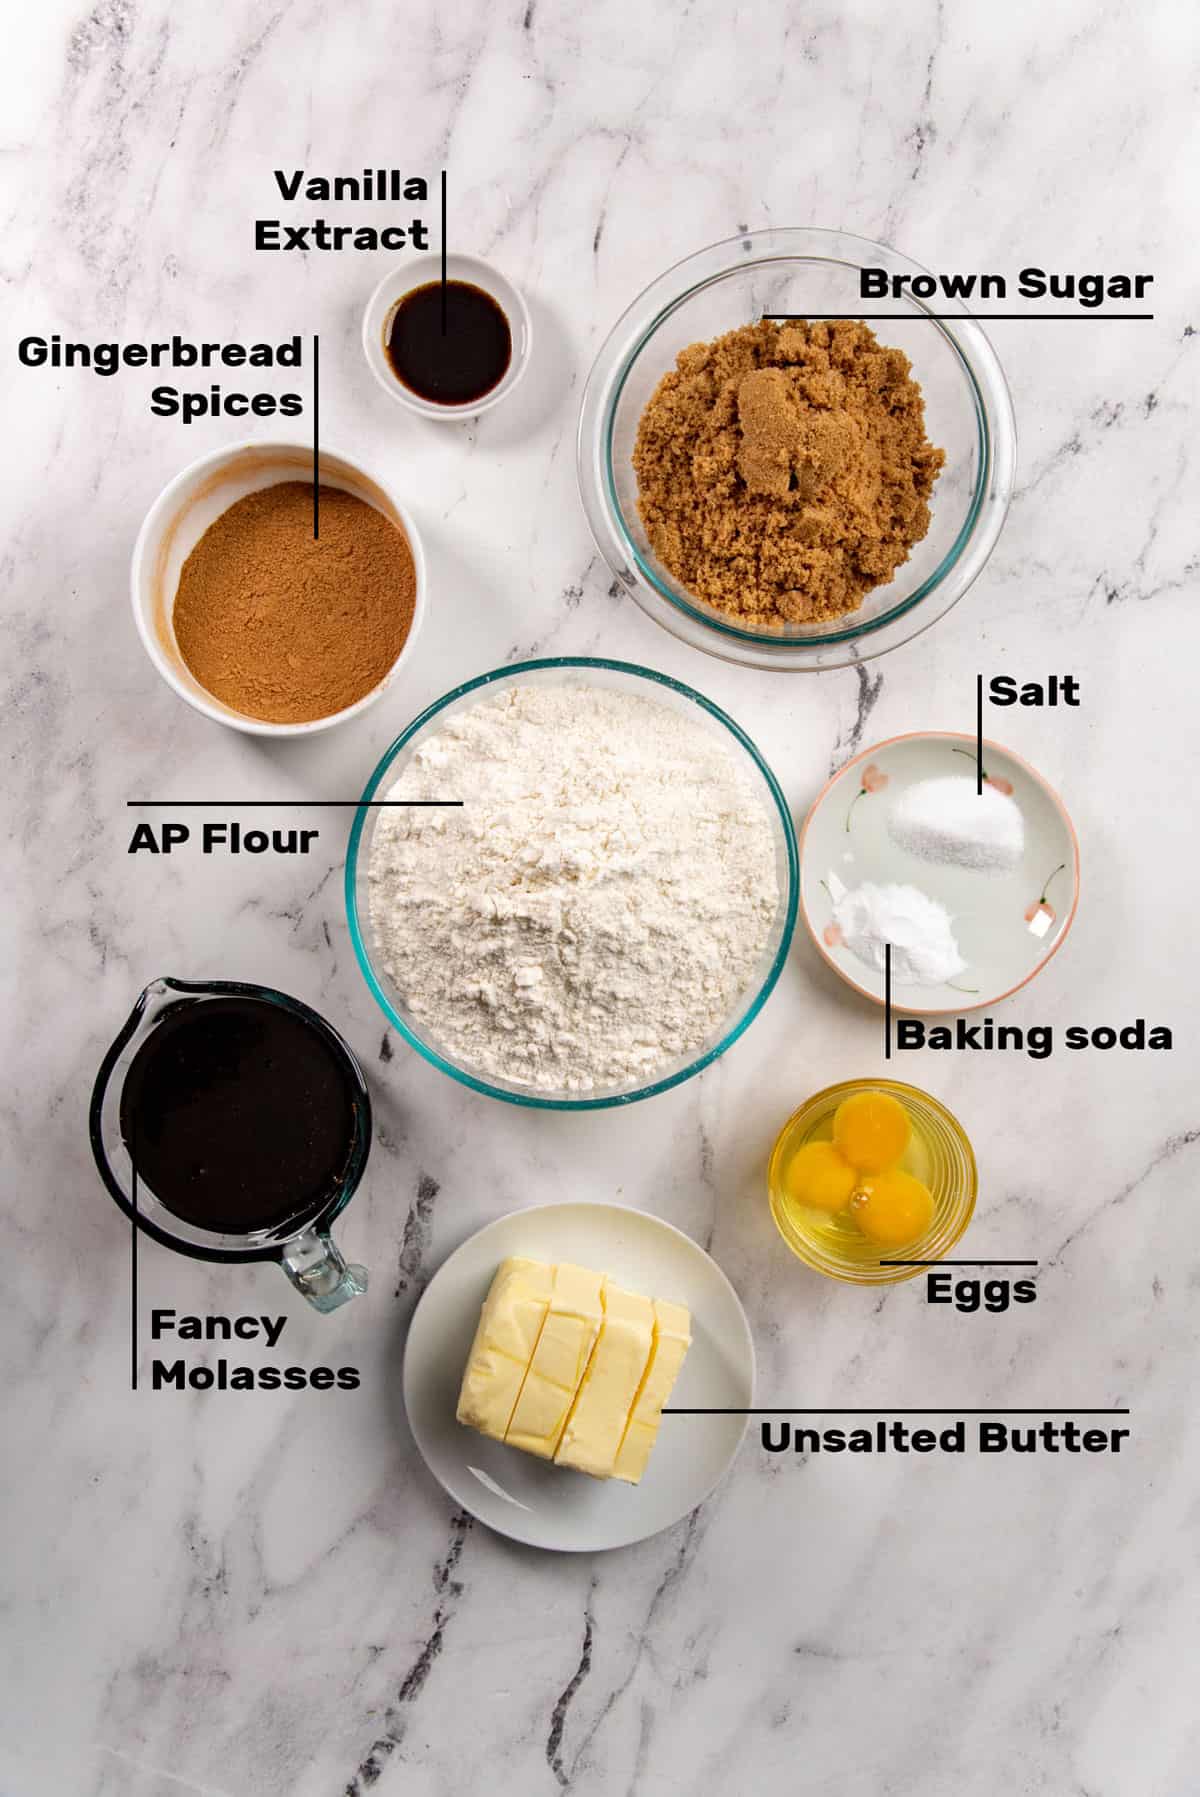
AP flour
Easily accessible flour and perfect for many purposes. Including making these gingerbread cookies. I do not recommend using bread flour, as it has a higher protein content, and can make the cookies rubbery and tough.
Gingerbread spices
I prefer to make my own because I can adjust the spices to my taste. I use a mixture of ground ginger, cinnamon, allspice, nutmeg, and cloves. I use less cloves because I find ground cloves can easily overpower the gingerbread house flavors.
Baking soda
Baking soda is the chemical leavener for the cookies. It reacts with the acidity of fancy molasses and brown sugar, and helps to puff up the cookies. It does cause the cookies to spread a little, but without it I find that the cookie texture is too dense and heavy. Baking soda makes the cookies a little lighter and crisp. You can read more about the role of baking soda as a chemical leavener in my baking 101 article on chemical leaveners.
Butter
Butter provides the fat for the cookies. It binds the dough, while also preventing the flour from forming too much gluten. So, butter adds flavor to the cookies and also helps to keep it tender.
Brown sugar
Adds sweetness to the dough. These cookies are certainly not overly sweet. So, anyone who loves the spice and warmth of gingerbread cookies will love this gingerbread house recipe! But if you do love a sweet gingerbread cookie, then decorating the cookie with royal icing will add that extra layer of sweetness to it. You can use white sugar instead of brown sugar, but I love the additional molassey flavor and dark brown color it lends to the dough.
Molasses
This is such a key ingredient for a classic gingerbread dough! Make sure to use “fancy molasses”, as it has a sweet flavor with deep molassey and slightly acidic flavors. However, you can use unsulphured blackstrap molasses as well. But the taste will be different with blackstrap molasses, as it’s more bitter and salty with a potent molassey / mineral flavor. If you live in New Zealand or Australia, you can use treacle instead of fancy molasses, if you don’t like the flavor of blackstrap molasses.
Eggs
Eggs act as a binder for the dough, but provides structure as well. Without eggs, the dough will be more crumbly.
Vanilla and salt
Both are added for flavor for the gingerbread cookie. However, vanilla is optional. Due to the strong flavors in gingerbread dough, vanilla isn’t necessary. But salt is highly recommended.
Royal icing for the gingerbread house
To stick the gingerbread cookies together and construct the gingerbread house, you will need a type of “cement”. You can either use a thick royal icing or melted chocolate for this. I use meringue powder so this makes it safer for anyone to eat. However, you can also use egg whites instead of meringue powder and water.
Meringue powder Water Cream of tartar or lemon Confectioner’s sugar / powdered sugar
Equipment you’ll need to make this gingerbread house
Stand mixer (minimum 5 qt bowl) with a paddle attachment – This is a big batch of dough, so you may need a stand mixer to make the dough. Large bowls Sifter Dough cutter or bench scraper Parchment paper Rolling pin Plastic wrap or ziploc sandwich bags (or equivalent, to store the dough) Dough thickness guides Cardboard and glue (to stick the template) Craft knife (to cut the template and the gingerbread dough) Sharp knife and cookie cutters Baking pans A cake board or base – To build the gingerbread house on Piping bags or ziploc bags
If you don’t have a stand mixer, you can make this with a hand mixer as well. However, you will need to make half a batch at a time and be gentle with incorporating the flour to make the dough.
How to make a gingerbread house (and all the tips!)
Making the dough
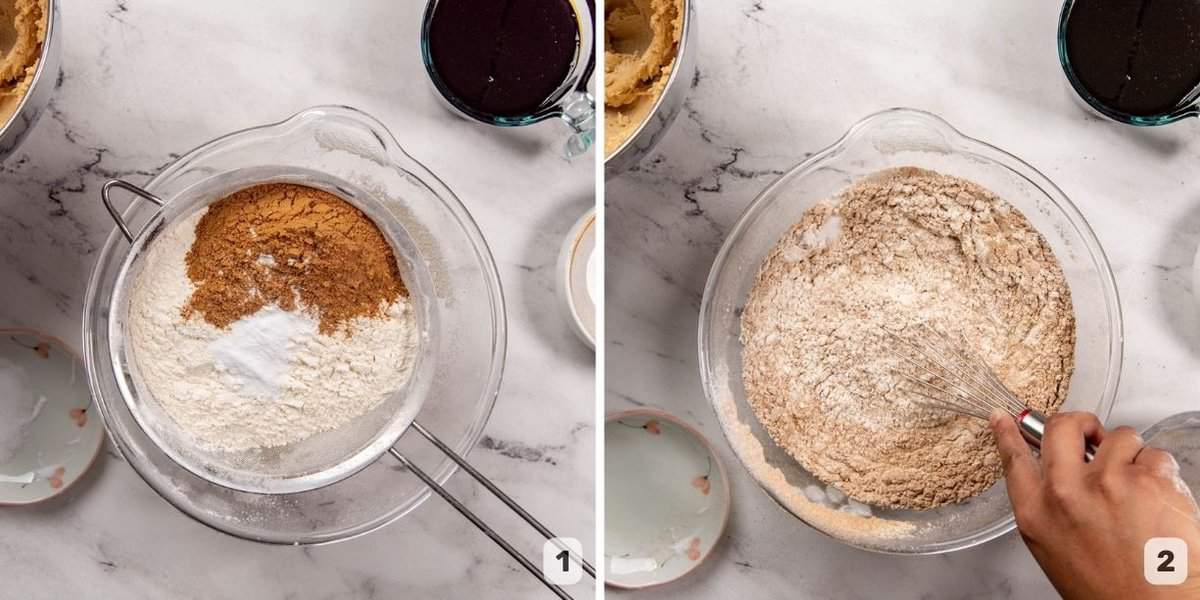
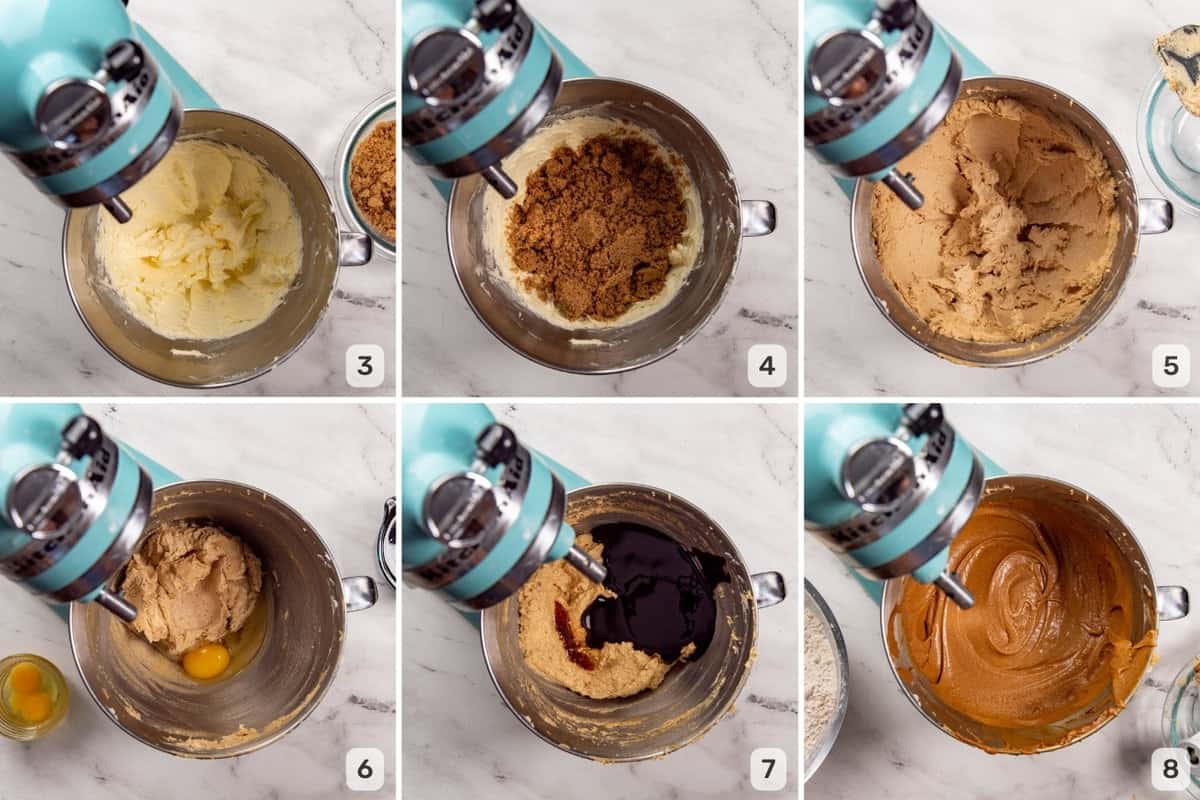
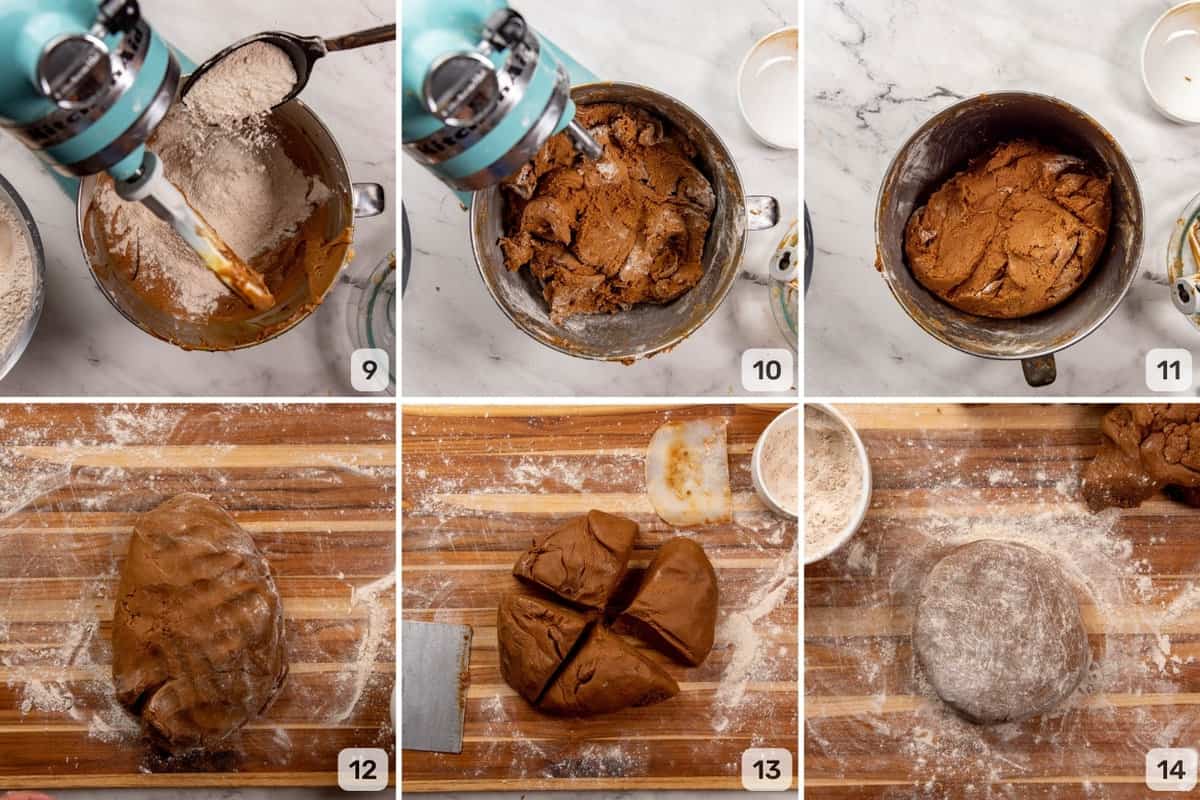
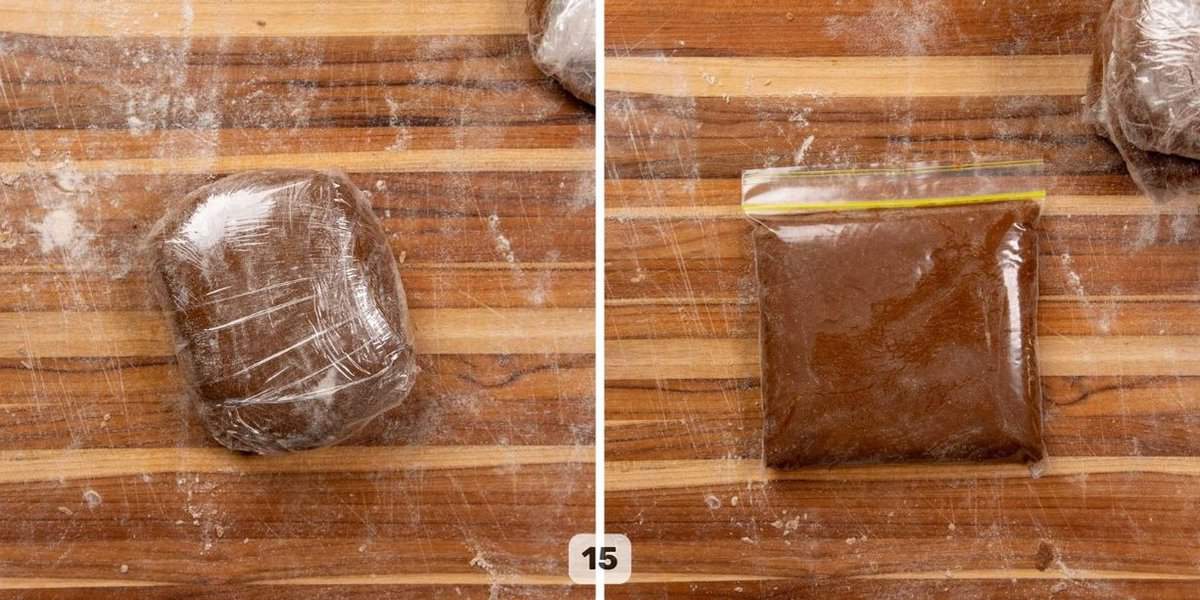
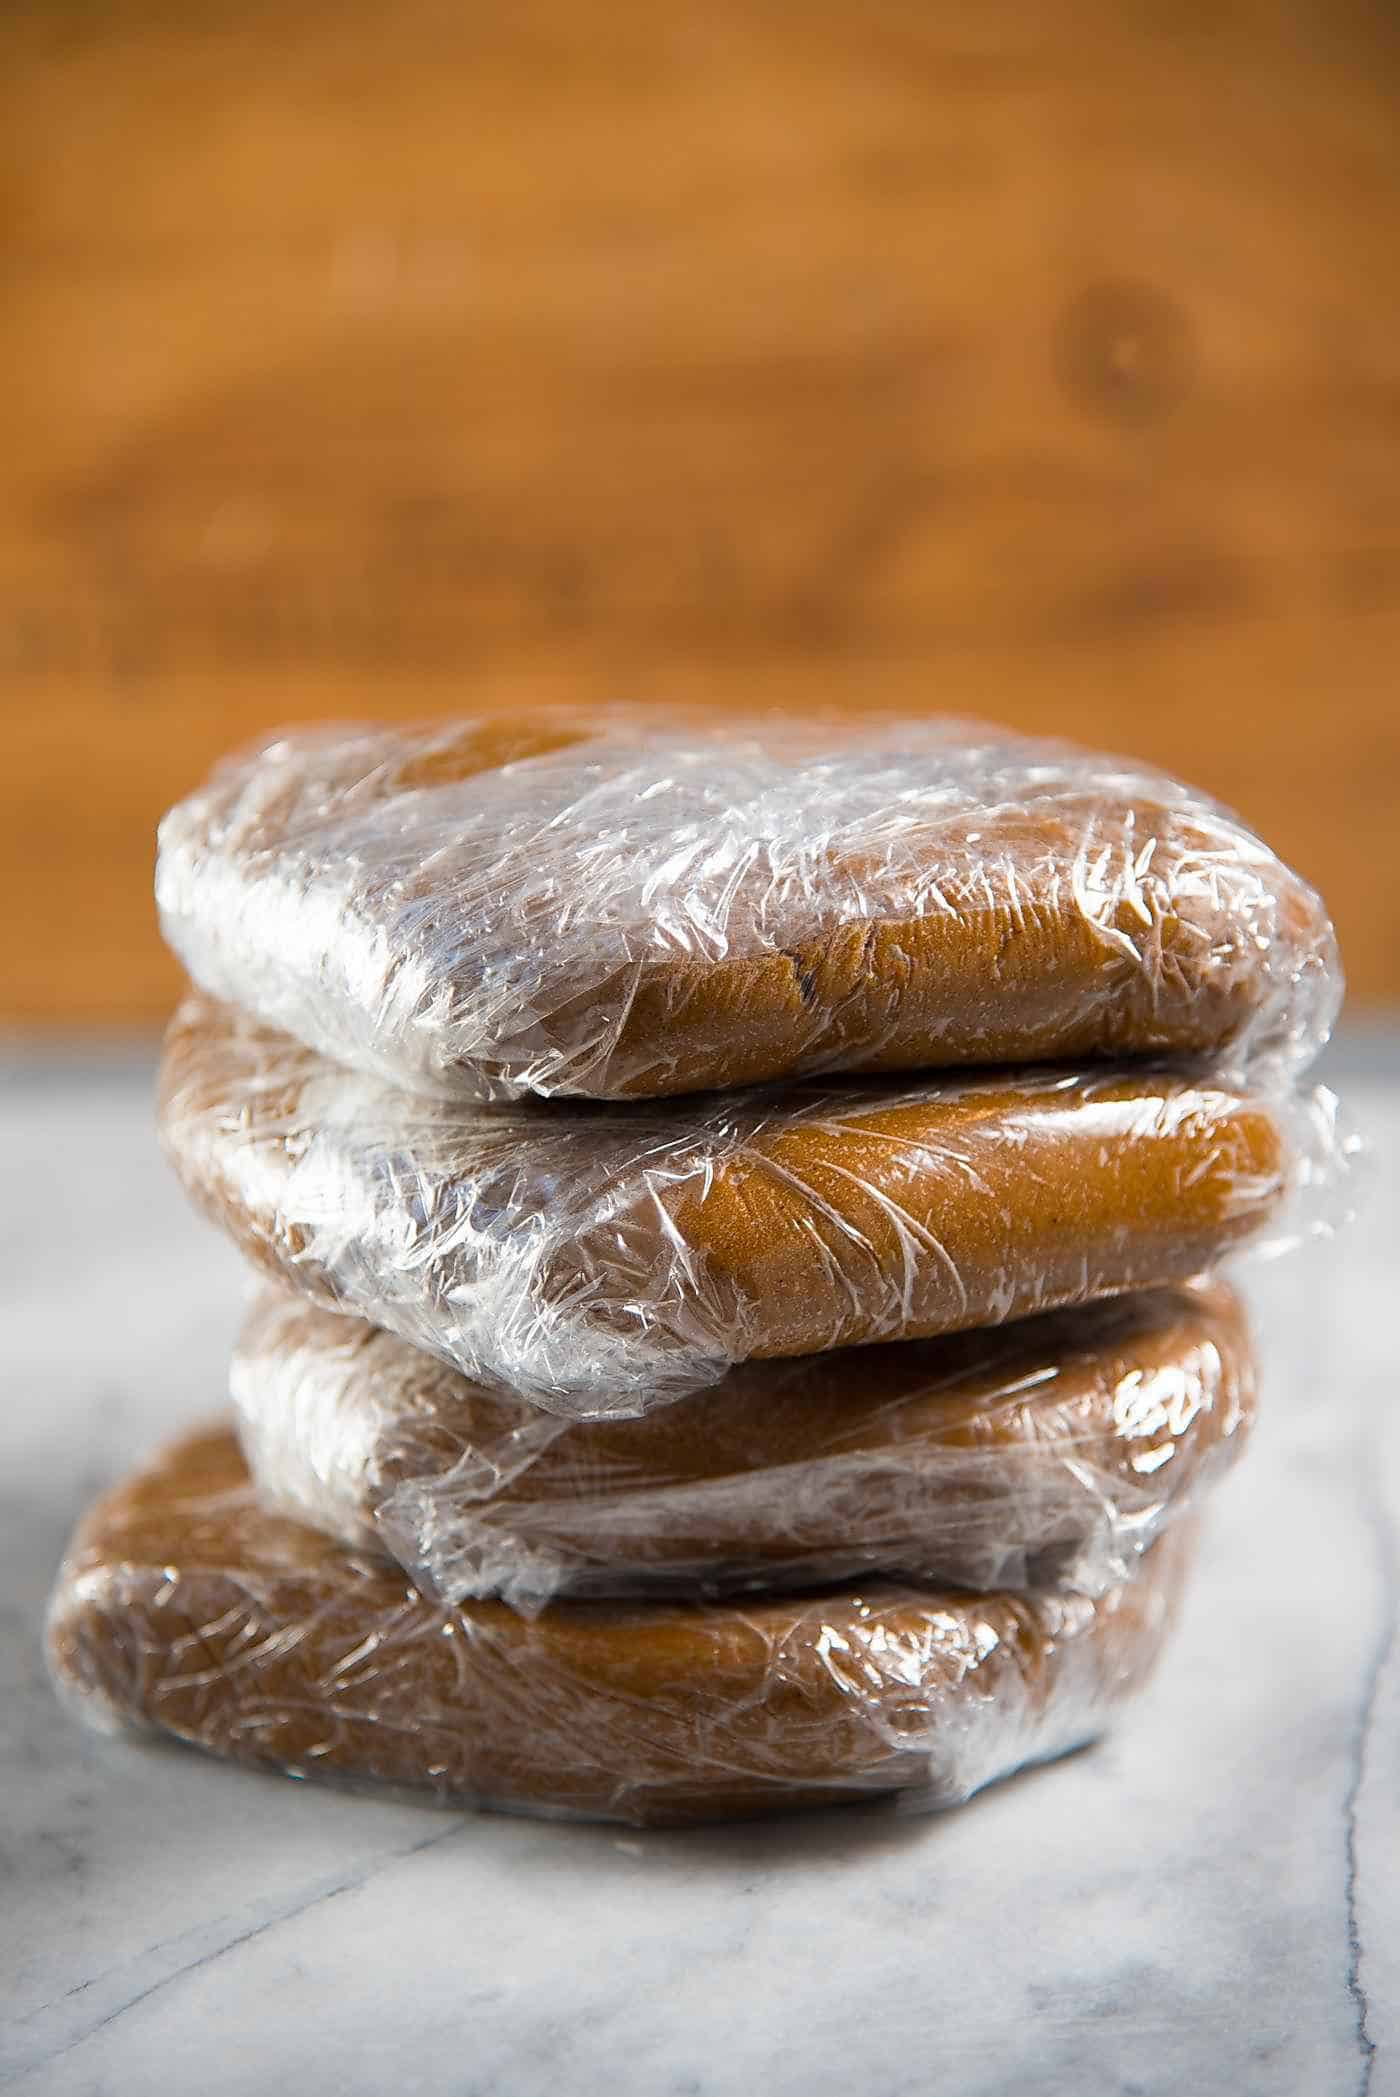
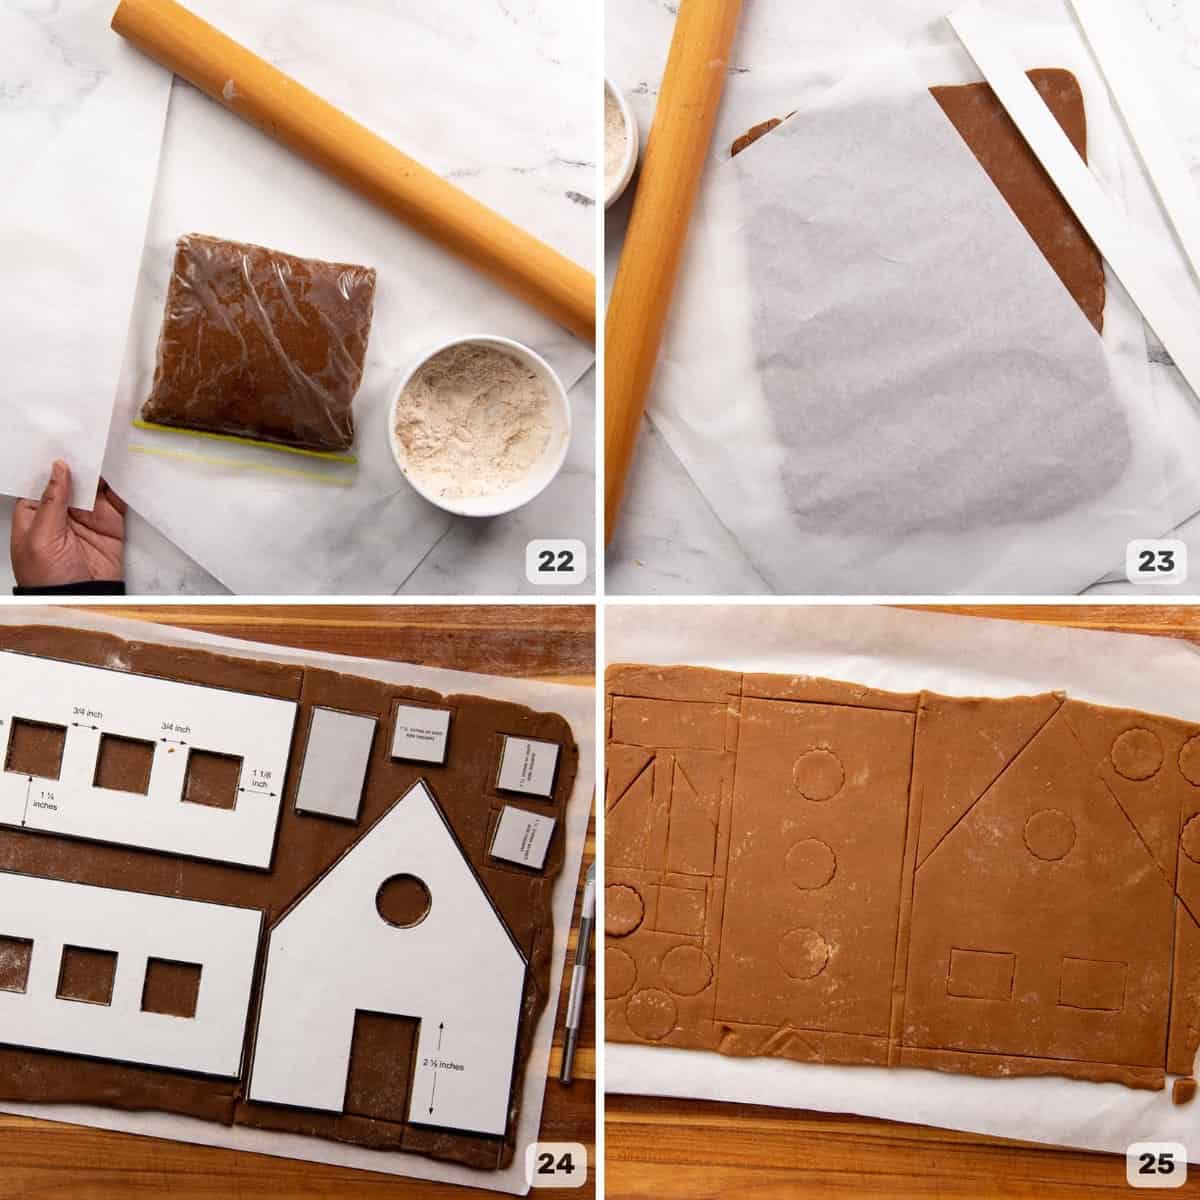
Make sure all the ingredients are at room temperature. In winter, the butter might still be too cold, so you can keep it in a warmer area to let it warm up and soften more. Step 1 – Prepare the dry ingredients. Remove about 100 g of the flour and set aside. Sift the rest of the flour with the spices and baking soda into a large bowl. Add the salt and whisk to combine well (Images 1 and 2). Step 2 – Start creaming the butter and sugar. If your butter is not as soft, then place the butter in your mixer and mix it for about 5 minutes with a paddle attachment to make it soft and creamy (Image 3). Next, add the sugar, and cream the butter and sugar together until the mixture is creamy (Images 4 and 5). Make sure to scrape the sides of the bowl so that the butter and sugar mix well. It’s important that the butter and sugar are creamy at this stage, but the mix doesn’t have to be too fluffy. The next step is to add the eggs (Image 6). Add the eggs, one at a time, mixing in between. This will ensure that the eggs mix in properly. The mixture might look curdled at this stage and that’s OK. Temperature differences in the ingredients can lead to this, but the dough will come together when the flour is added. Next mix in the vanilla and molasses (Images 7 & 8), until mixed through. Step 3 – Add the dry ingredients. Finally, add the flour mixture. Add the flour a little at a time, and mix it in by “pulsing” (turning on the mixer in short bursts) the stand mixer on low speed (Image 9). This will prevent the flour from flying everywhere, and the dough from being overmixed. Add the next amount of flour, while there are still white streaks in the dough (Image 10). You don’t have to wait until one portion of flour is completely mixed in before adding the next. Scrape down the bowl as much as possible to prevent the flour from settling at the bottom of the bowl. Once all the flour is added, mix the dough on the lowest speed until it’s almost mixed through (Image 11). The dough might be reaching the top of your bowl, but that’s OK. Step 4 – Form the dough. Turn the dough out onto your work surface, and gently knead it a few times to make sure all the flour is incorporated in the dough. Do not knead the dough – the way you would with bread dough. Instead, simply fold the dough over itself a few times. The dough might be fairly sticky, so use the remaining flour to flour the dough and your work surface (Image 12). Step 5 – Divide and store the dough. Divide the dough into four portions. I like to weigh the dough and divide it equally (Image 13). Form each dough portion into a smooth disc, while dusting it with flour to prevent it from sticking (Image 14). Place the dough in a ziploc bag, and spread the dough evenly inside while removing excess air. You can also wrap the dough in plastic wrap. I like to keep it as a square so that it’ll be easier to roll out later (Image 15). Refrigerate the dough for at least 1 hour, or up to 48 hours. While the dough is chilling, prepare the gingerbread house template. You can even do this the day before, to save time.
Gingerbread house template
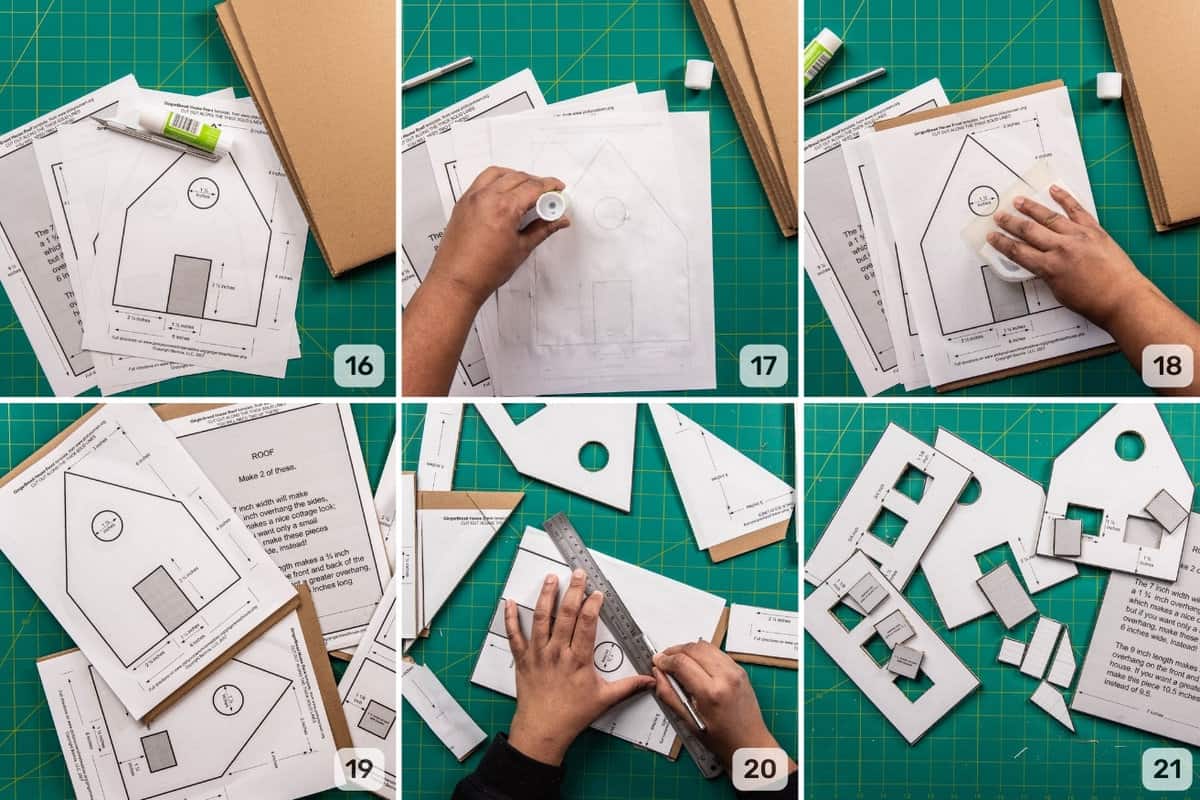
Here’s the template that I used for the gingerbread house from pickyourownchristmastree.org. You can change the shape and positions of the windows and doors however you like! Step 6 – Print out the gingerbread house template and get the tools ready. Such as a glue stick, cardboard, and craft or utility knife (Image 16). Step 7 – Stick the template onto the cardboard. Use slightly thick cardboard and non-toxic glue like a glue stick. Apply the glue on the back of the printed template. Remember to apply the glue outside of the template line AND inside (Image 17). Place the template on the cardboard and use a bench scraper to make sure that the template is stuck to the board with no bubbles or wrinkles (Image 18). Let it dry for a few minutes (Image 19). Step 8 – Cut out the templates using a ruler and your craft knife. Be careful and precise when you do this. Try to keep the lines as straight as possible. I like to make several shallow cuts over the same line until I cut through the cardboard (Image 20). Cut out the doors and windows from the template as well, and then keep all of template pieces ready to be used (Image 21).
Rolling and cutting
Step 9 – Rolling out the dough. Once the dough is chilled, it’ll be easier to roll out. Remove the dough from the package and place it on your work surface (Image 22). I like to roll the dough out between two pieces of parchment paper, so I don’t have to use too much flour, but you can roll out the dough on a floured surface as well. If the dough is soft, then I recommend rolling it out between two pieces of parchment paper (Image 23). Use dough thickness guide to make it easier to roll out the dough to an even thickness. I use a guide that is about 5 – 6 mm thick for most of the dough. For smaller parts of the house (chimney, doors, window shutters), I use dough guide that is thinner, about 3 mm. The rolled out dough should fit inside a half sheet baking sheet. The rolled out dough is easier to cut if it’s frozen, so you can choose to freeze it for about 30 minutes before cutting it. Step 10 – Place the gingerbread house templates on the dough, and cut the shapes using a craft knife or a small sharp kitchen knife (Images 24 and 25). There will be four portions;
1st portion – The front of the house + 1st side of the house. 2nd portion – The back of the house + 2nd side of the house. 3rd portion – Half of the roof. 4th portion – Other half of the roof.
Any remaining space can be used to cut out the chimney parts, and other gingerbread shapes you like. Refrigerate the gingerbread dough for about 30 minutes before baking so that it’s firm.
Baking and prepping
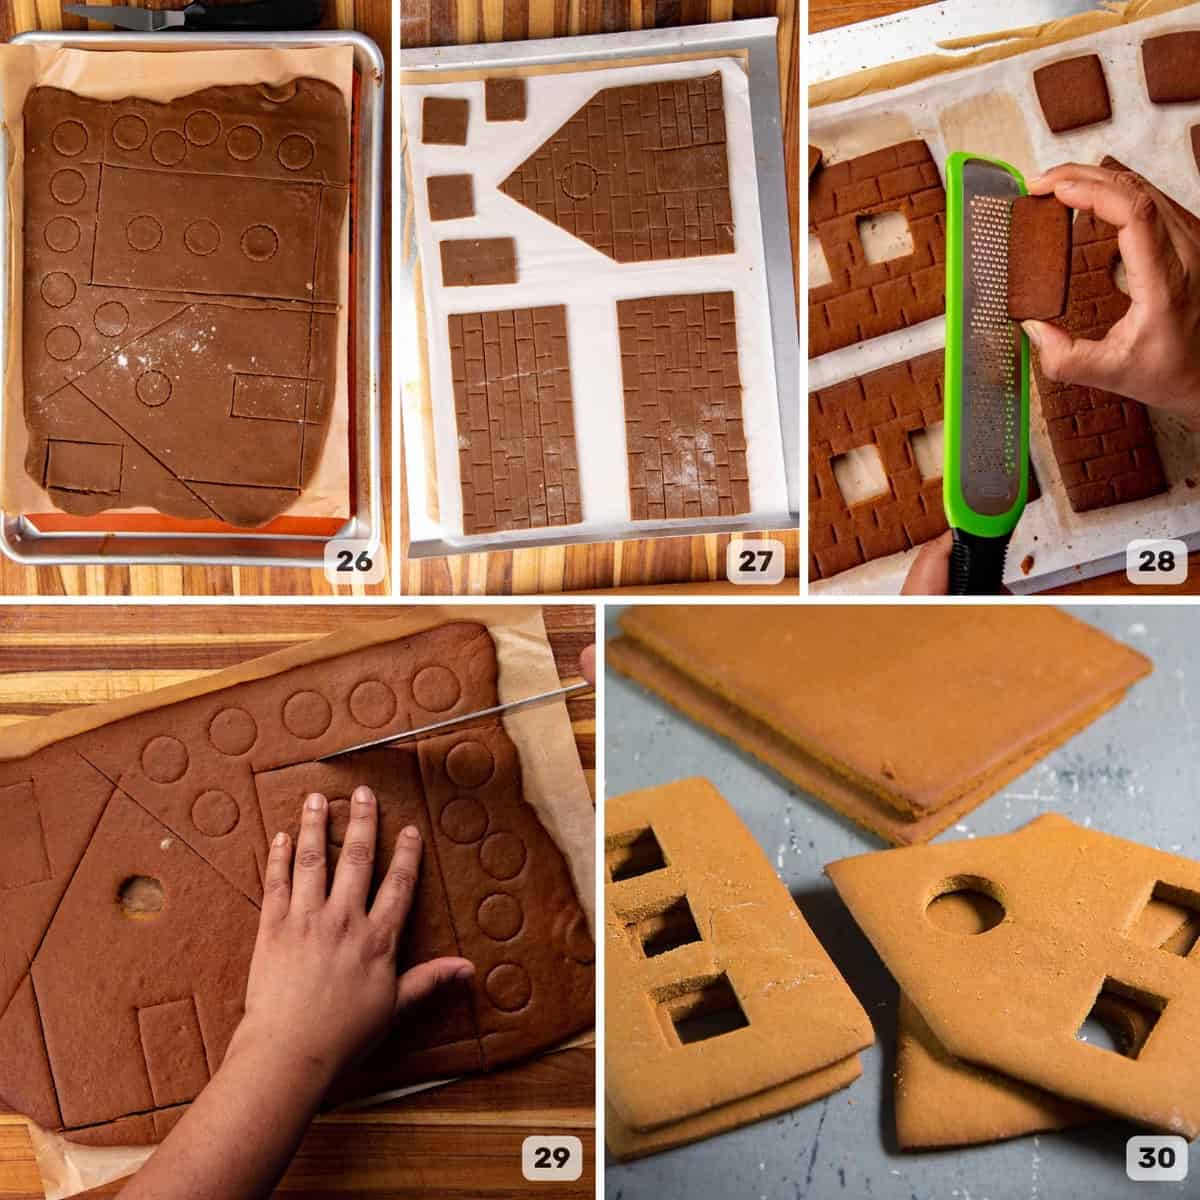
Step 11 – Preheat your oven to 325 F (while the dough is chilling). Step 12 – Bake the cookies. The rolled out dough should fit within a half sheet baking pan. Make sure that the dough is placed on a parchment paper or silpat. You can either bake the gingerbread without removing the scraps, and then cut out the shapes after (Image 26), OR, you have the option of removing the scrap dough, and baking just the shapes you need (Image 27). There are pros and cons to both methods as discussed below.
Baking the cut out cookies
The baking time will be a little shorter here. Since the cookies are already shaped, you only have to cut out the windows and doors. You have dough scraps leftover to re-roll and cut into more shapes and cookies if you like. However, the cut outs have a tendency to spread a little as they bake, so the edges may not be as straight. The edges may also be slightly darker in color.
Cutting out the cookies after baking
The cookies will have a more even color to them, and the edges are not darkened either. The cutouts have a straighter and neater edge because they are cut from the baked cookies. However, the baking time is slightly longer as the entire cookie is larger than individual cut outs. Once the gingerbread is baked, it takes longer to cut out the shapes. This should also be done fairly fast before the cookies cool down and harden. The scraps are also baked, so you cannot make extra cookies. Unless extra cookie shapes were pre-cut before baking. But you could use the baked cookie scraps to make gingerbread truffles.
Bake the gingerbread (maximum of 2 trays at a time), for about 15 – 20 minutes (cut out pieces) or 20 – 25 minutes (without removing scrap dough). The gingerbread should just start to darken at the edges, and then you know it’s done. Step 13 – While still warm, cut out the shapes out for the gingerbread house, including the doors and windows (Image 29). Let the cookies cool on a wire rack. If there are any edges that are not straight, don’t worry! You can use royal icing to fill and straighten the edges, or you can use a micro planer to carefully shave off excess cookie on the sides (Image 28). Set all the cooled gingerbread cookies aside until ready to use (Image 30). Place them in an airtight container if you want to store them for longer.
Royal icing for gingerbread house
How to make it and store it
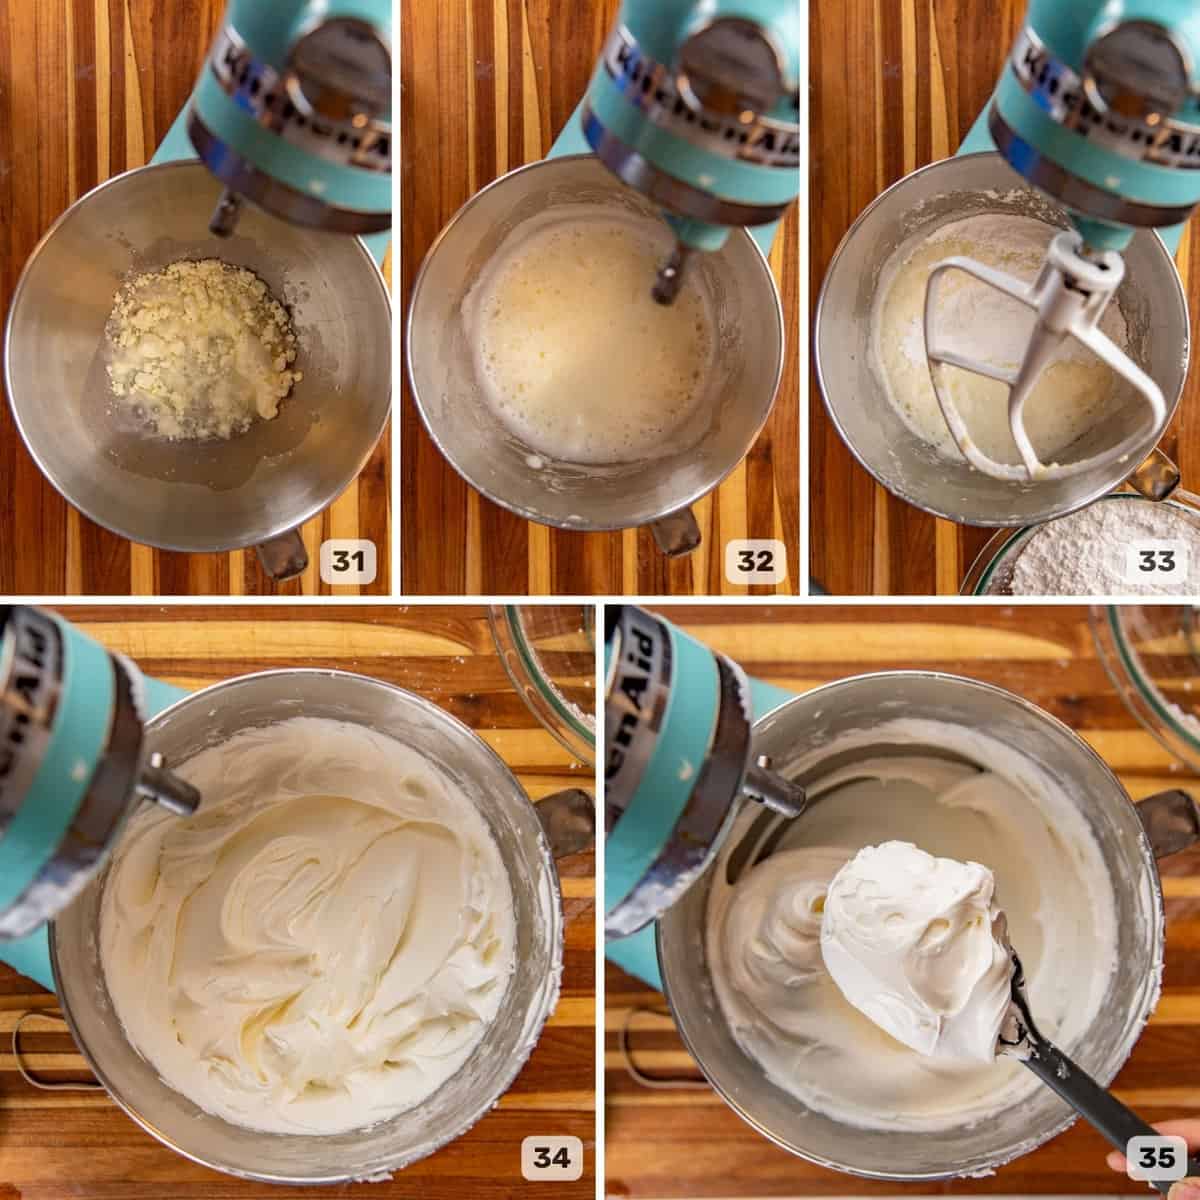
You will need two types of royal icing when making the gingerbread house. The first type is the thick royal icing that’ll be used as the “cement” to hold the cookies together and to glue candy and other gingerbread house decorations onto the house. The second type of royal icing will be a little thinner, and will be used to decorate the finer details on your gingerbread house. Step 14 – Preparing the egg white base. The first step is to whisk the meringue powder and water together until there are no lumps, and it’s frothy. Add the cream of tartar as well and whisk until you have a foamy mixture. If you’re using egg whites, whisk the egg whites and cream of tartar until you have a foamy mixture (Images 31 and 32). Step 15 – Using a paddle beater, or a hand mixer, add the confectioner’s sugar to the meringue base and mix. Add the sugar a little at a time, on the lowest speed, to prevent the sugar from flying off while mixing. Mix until you get a smooth, thick royal icing mixture (Image 34). The correct consistency should be spreadable but stiff, so that the royal icing will not “run” or spread, but still easily pipeable (Image 35). Step 16 – Storing the royal icing. Place the royal icing in a large piping bag or a ziploc bag (Image 36). Seal the opening of the piping bag or ziploc bag, making sure to remove as much air as possible. Exposure to air will cause the royal icing to harden.
Gingerbread house construction
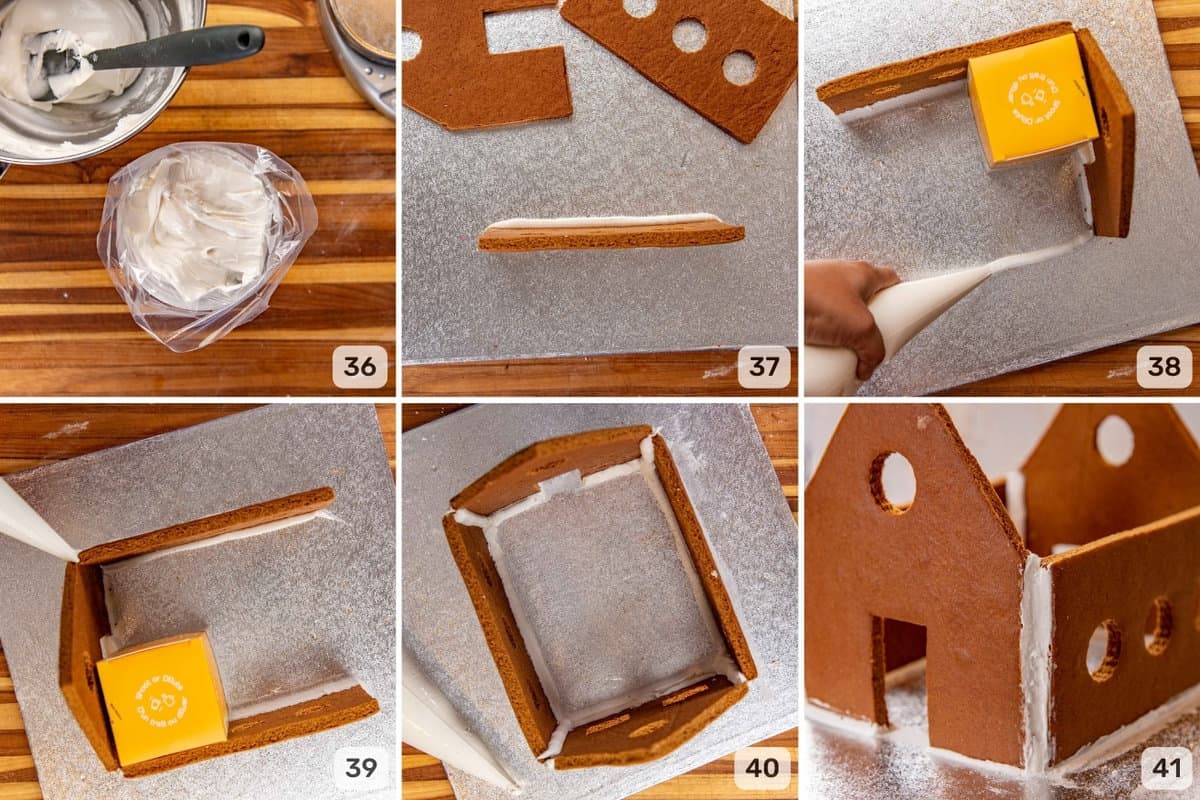
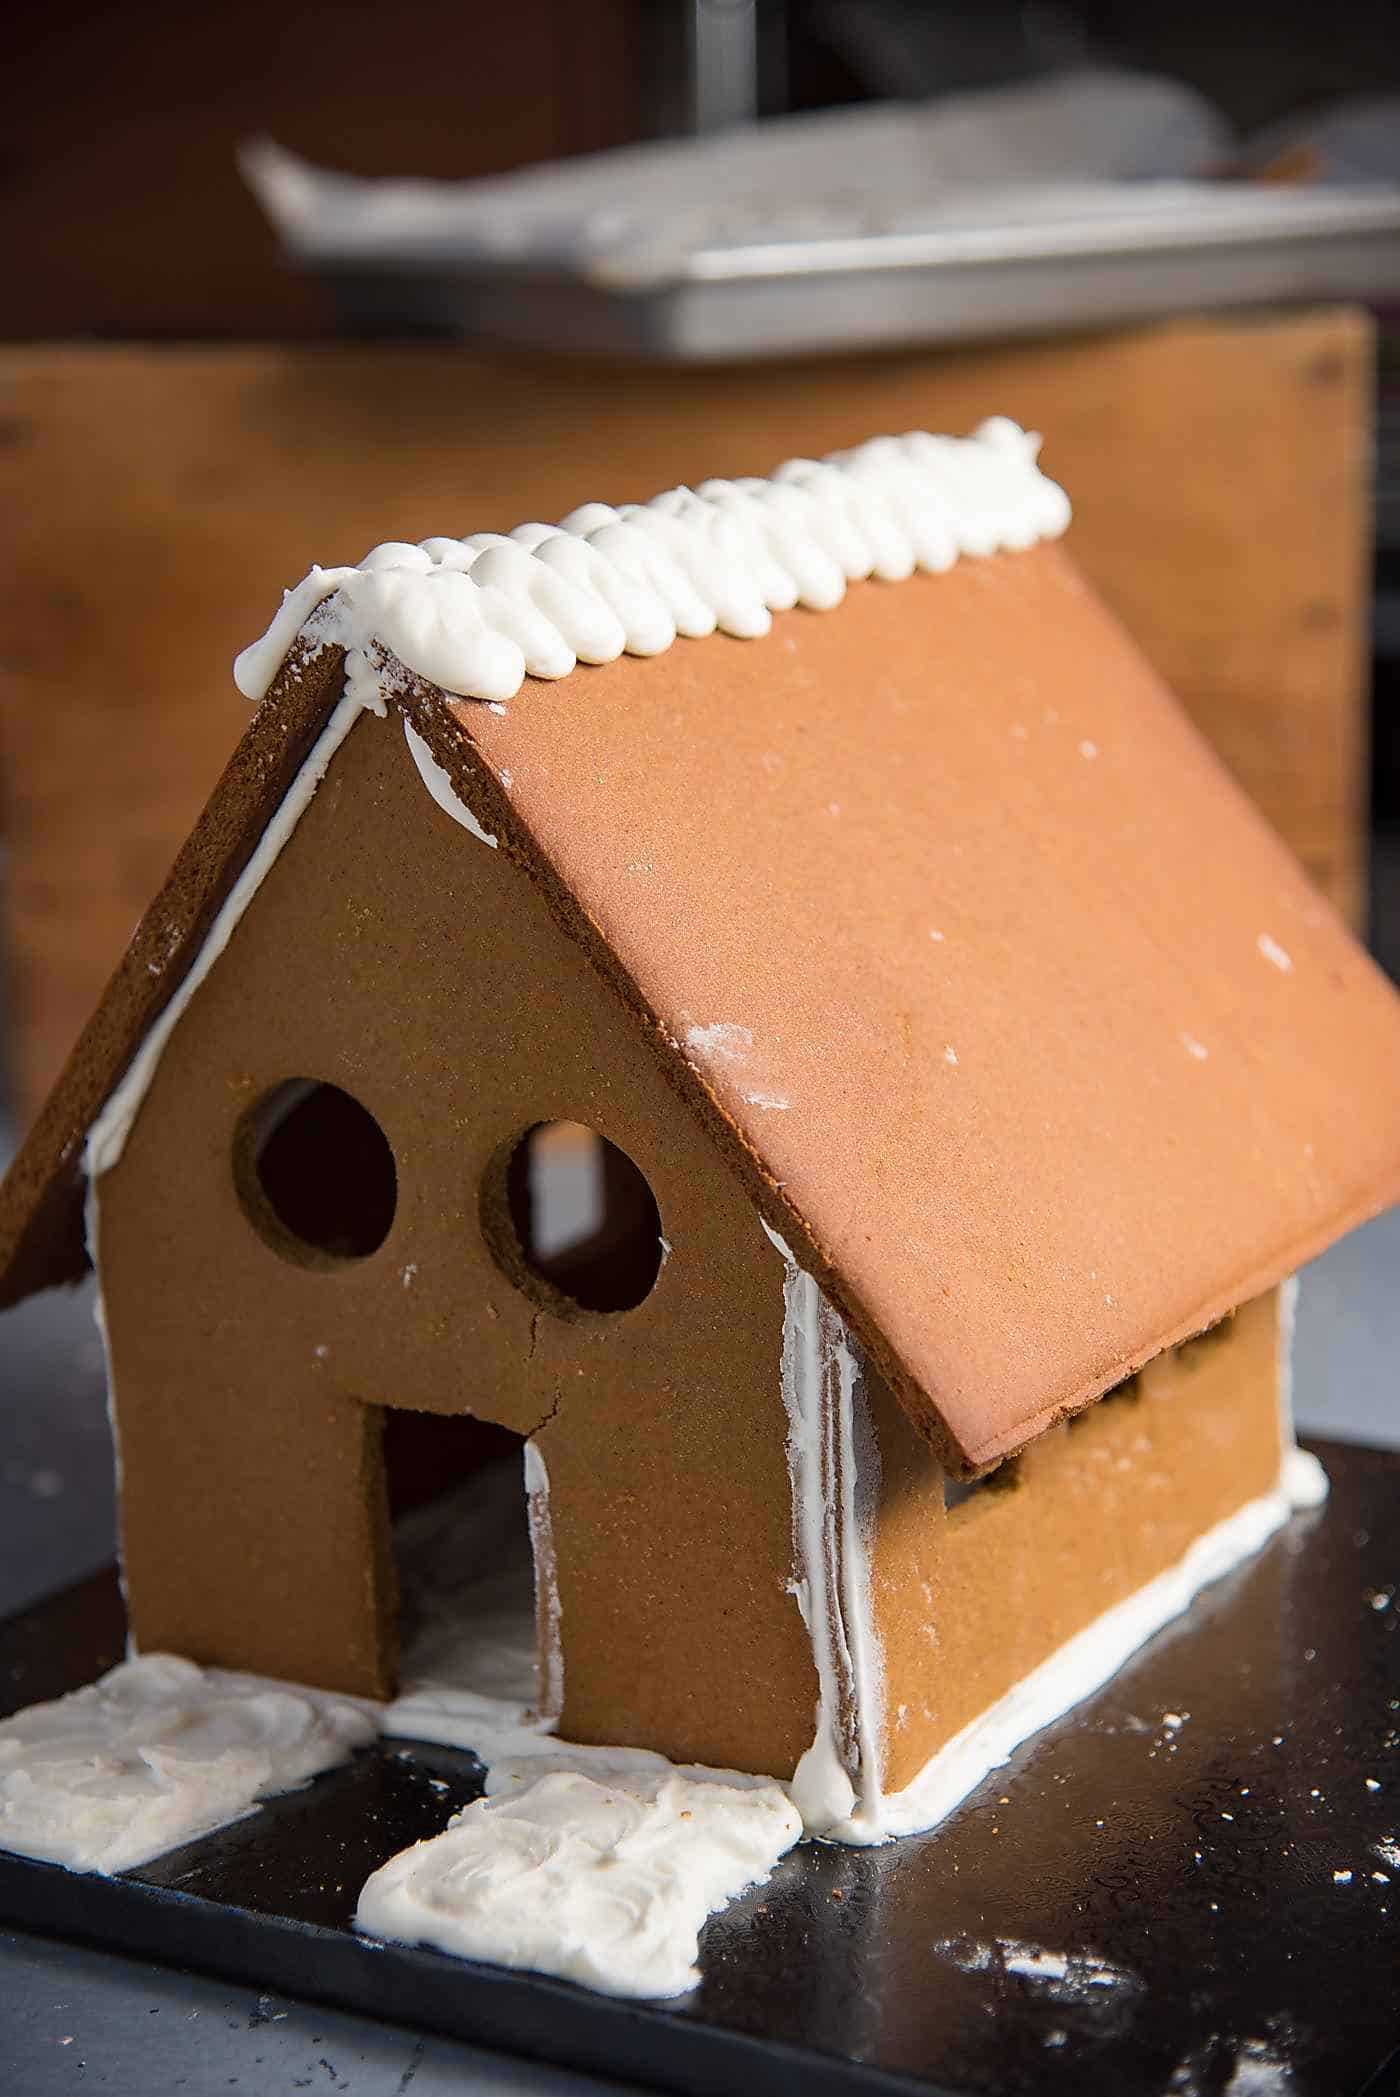
Step 17 – Assembling the side walls of the gingerbread house. Choose the base on which you will build the gingerbread house. A cake board works well, but you can also use anything else that is food-safe and flat for a flat surface. Snip off the end of the piping bag (about ½ cm opening) with royal icing. Pipe a line of royal icing on the base to stick the wall (Image 37). Pipe more royal icing on the base to stick the front (or back) of the house, perpendicular to the wall (Image 38). Once two pieces are stuck to the base, pipe icing along the border where they join, to cement the two pieces together (Image 39). Once all the walls are “cemented” on to the base, and to each other, pipe more royal icing on the inside to reinforce the joints (Image 40). Allow the royal icing to completely set and harden before adding the roof (Image 41). Stick together the parts of chimney separately, and let them harden. NOTE – Royal icing will harden over time. It can take as little as 1 hour (depending on how thick the icing is). But if your kitchen is warm and is very humid, it may take longer. My advice is to find a cooler part of your home and allow the icing to harden there. To speed things up, use a hair dryer on its cool setting and on high speed and use the cool air to dry out the royal icing. Do not use warm air as this will melt the royal icing. Alternatively, you can use melted chocolate to stick the gingerbread house pieces together. Chocolate will harden faster than royal icing, but it might be a little more messy to work with. Step 18 – Assembling the roof. Pipe royal icing along the top of the walls and top edges of the front and back of the house panels. Place the roof pieces, making sure one edge is lined up with the top of the roof. There will be an overhang off the side of the wall. If needed, place an item to prop up the overhang while the icing hardens and the roof sticks securely. Repeat with the other side of the roof and provide support as it dries as well. Also pipe royal icing along the middle to join the two parts of the roof. Let the royal icing completely harden. Now the gingerbread house is ready to be decorated!
Gingerbread house workflow
Day 1
Make the dough. Roll out the dough. Cut out the templates. Place the dough between two pieces of parchment paper and place in the freezer. You can stack them as well. Bake the cookie pieces and cut out the doors and windows and/or the whole templates (if you bake the whole sheet). Let the cookies cool and store in an airtight container.
The work on day 1 can also be split into 2 days for convenience. The dough can be wrapped and stored in the fridge for up to 2 days. Or once the cookie dough is rolled up, it can be stored in the freezer overnight (or up to 2 days if wrapped with plastic wrap).
Day 2
Make the royal icing. Assemble the gingerbread house walls and let it dry (can take about 2 hours, but more if your kitchen is warm and humid). Assemble the gingerbread house roof and let it dry.
Day 3 (or late day 2)
Prepare candy for decorating, and different-colored royal icing. Keep the royal icing in containers or piping bags or small ziploc bags, making sure that the icing is not in contact with any air. Decorate the house with candy, either on the evening of day 2 or next day.
Easy gingerbread house decorations
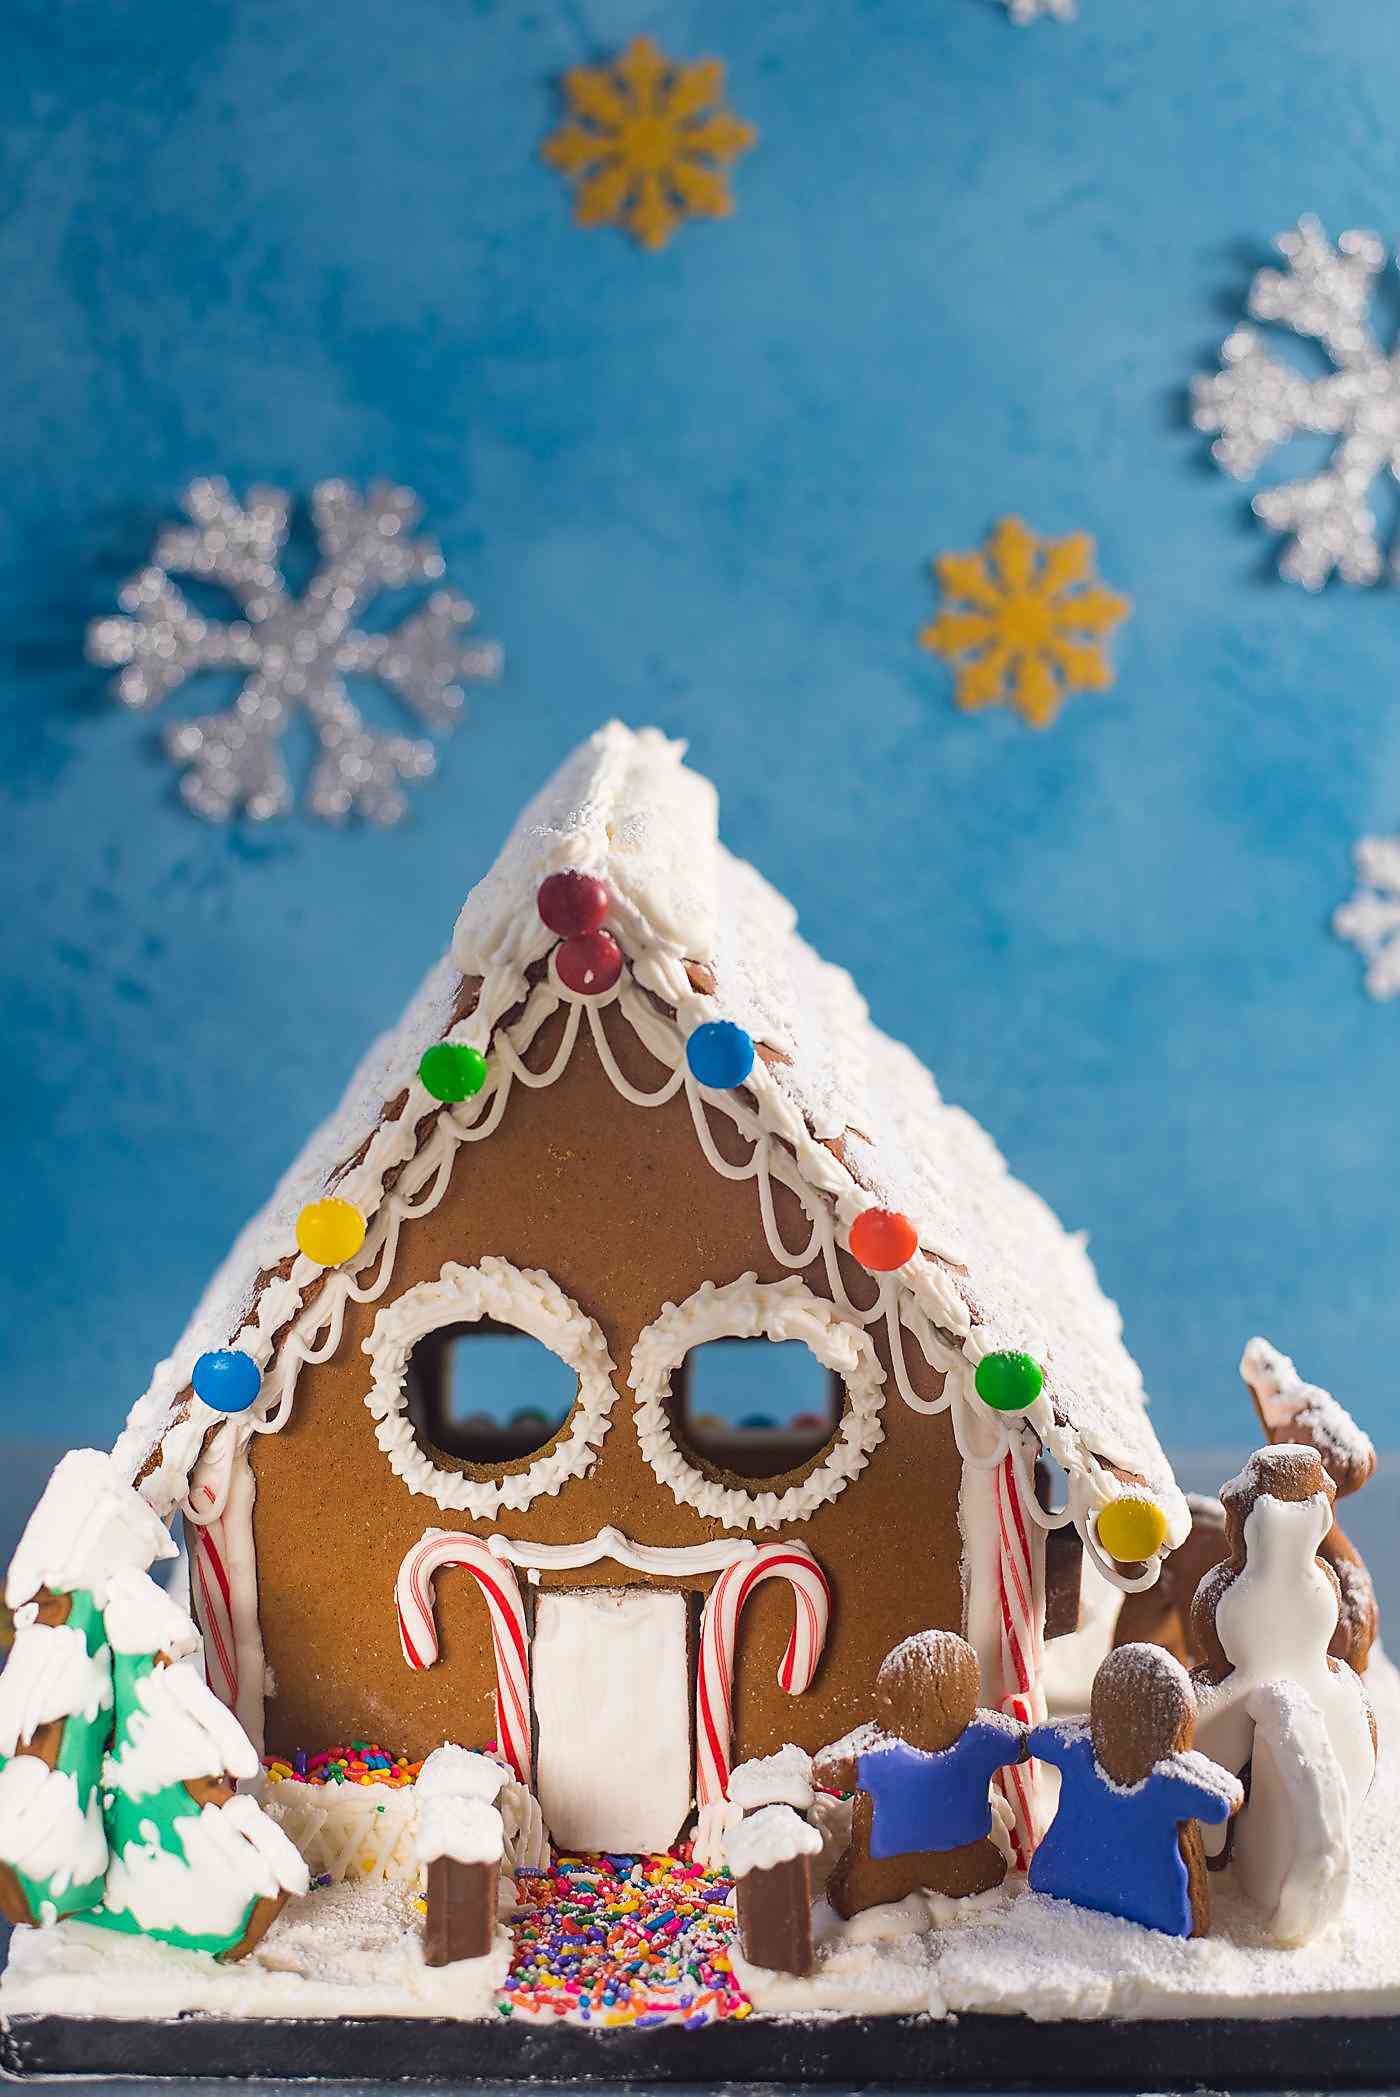
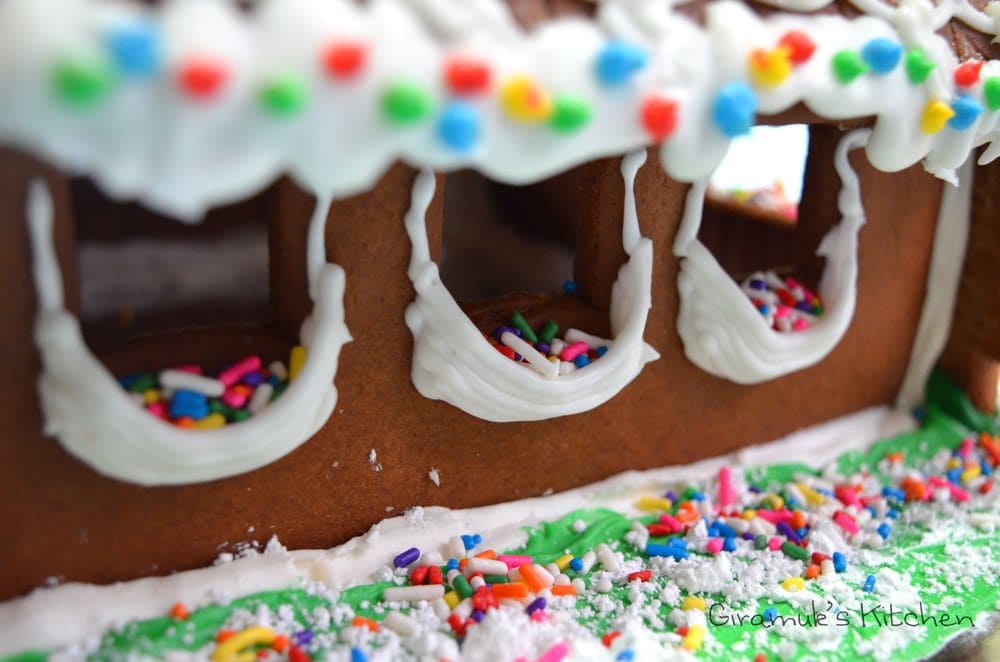
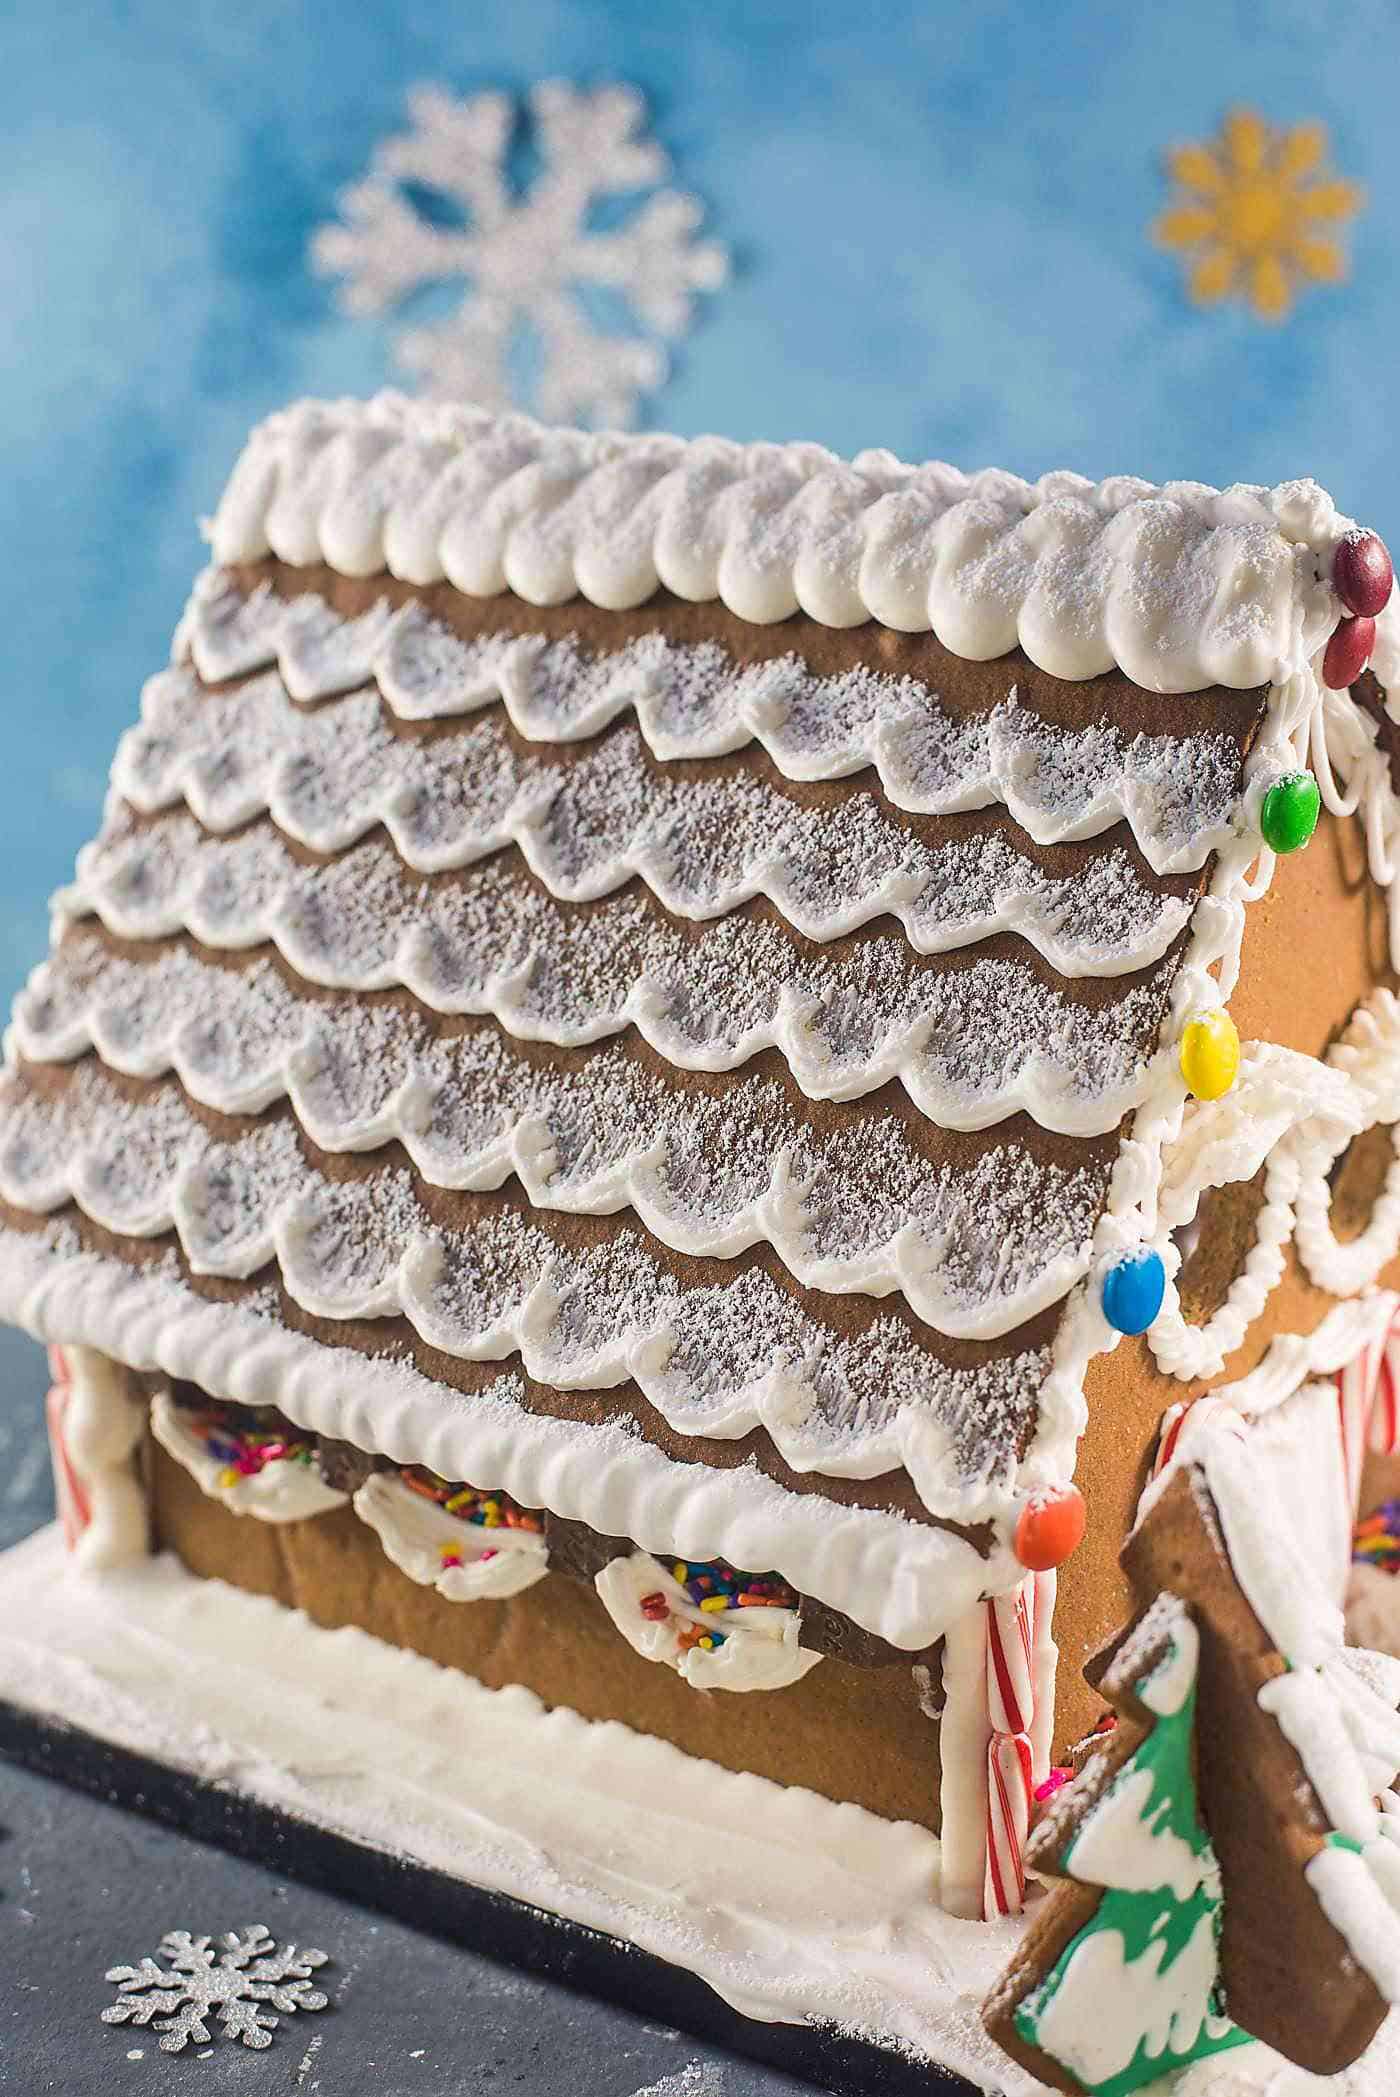
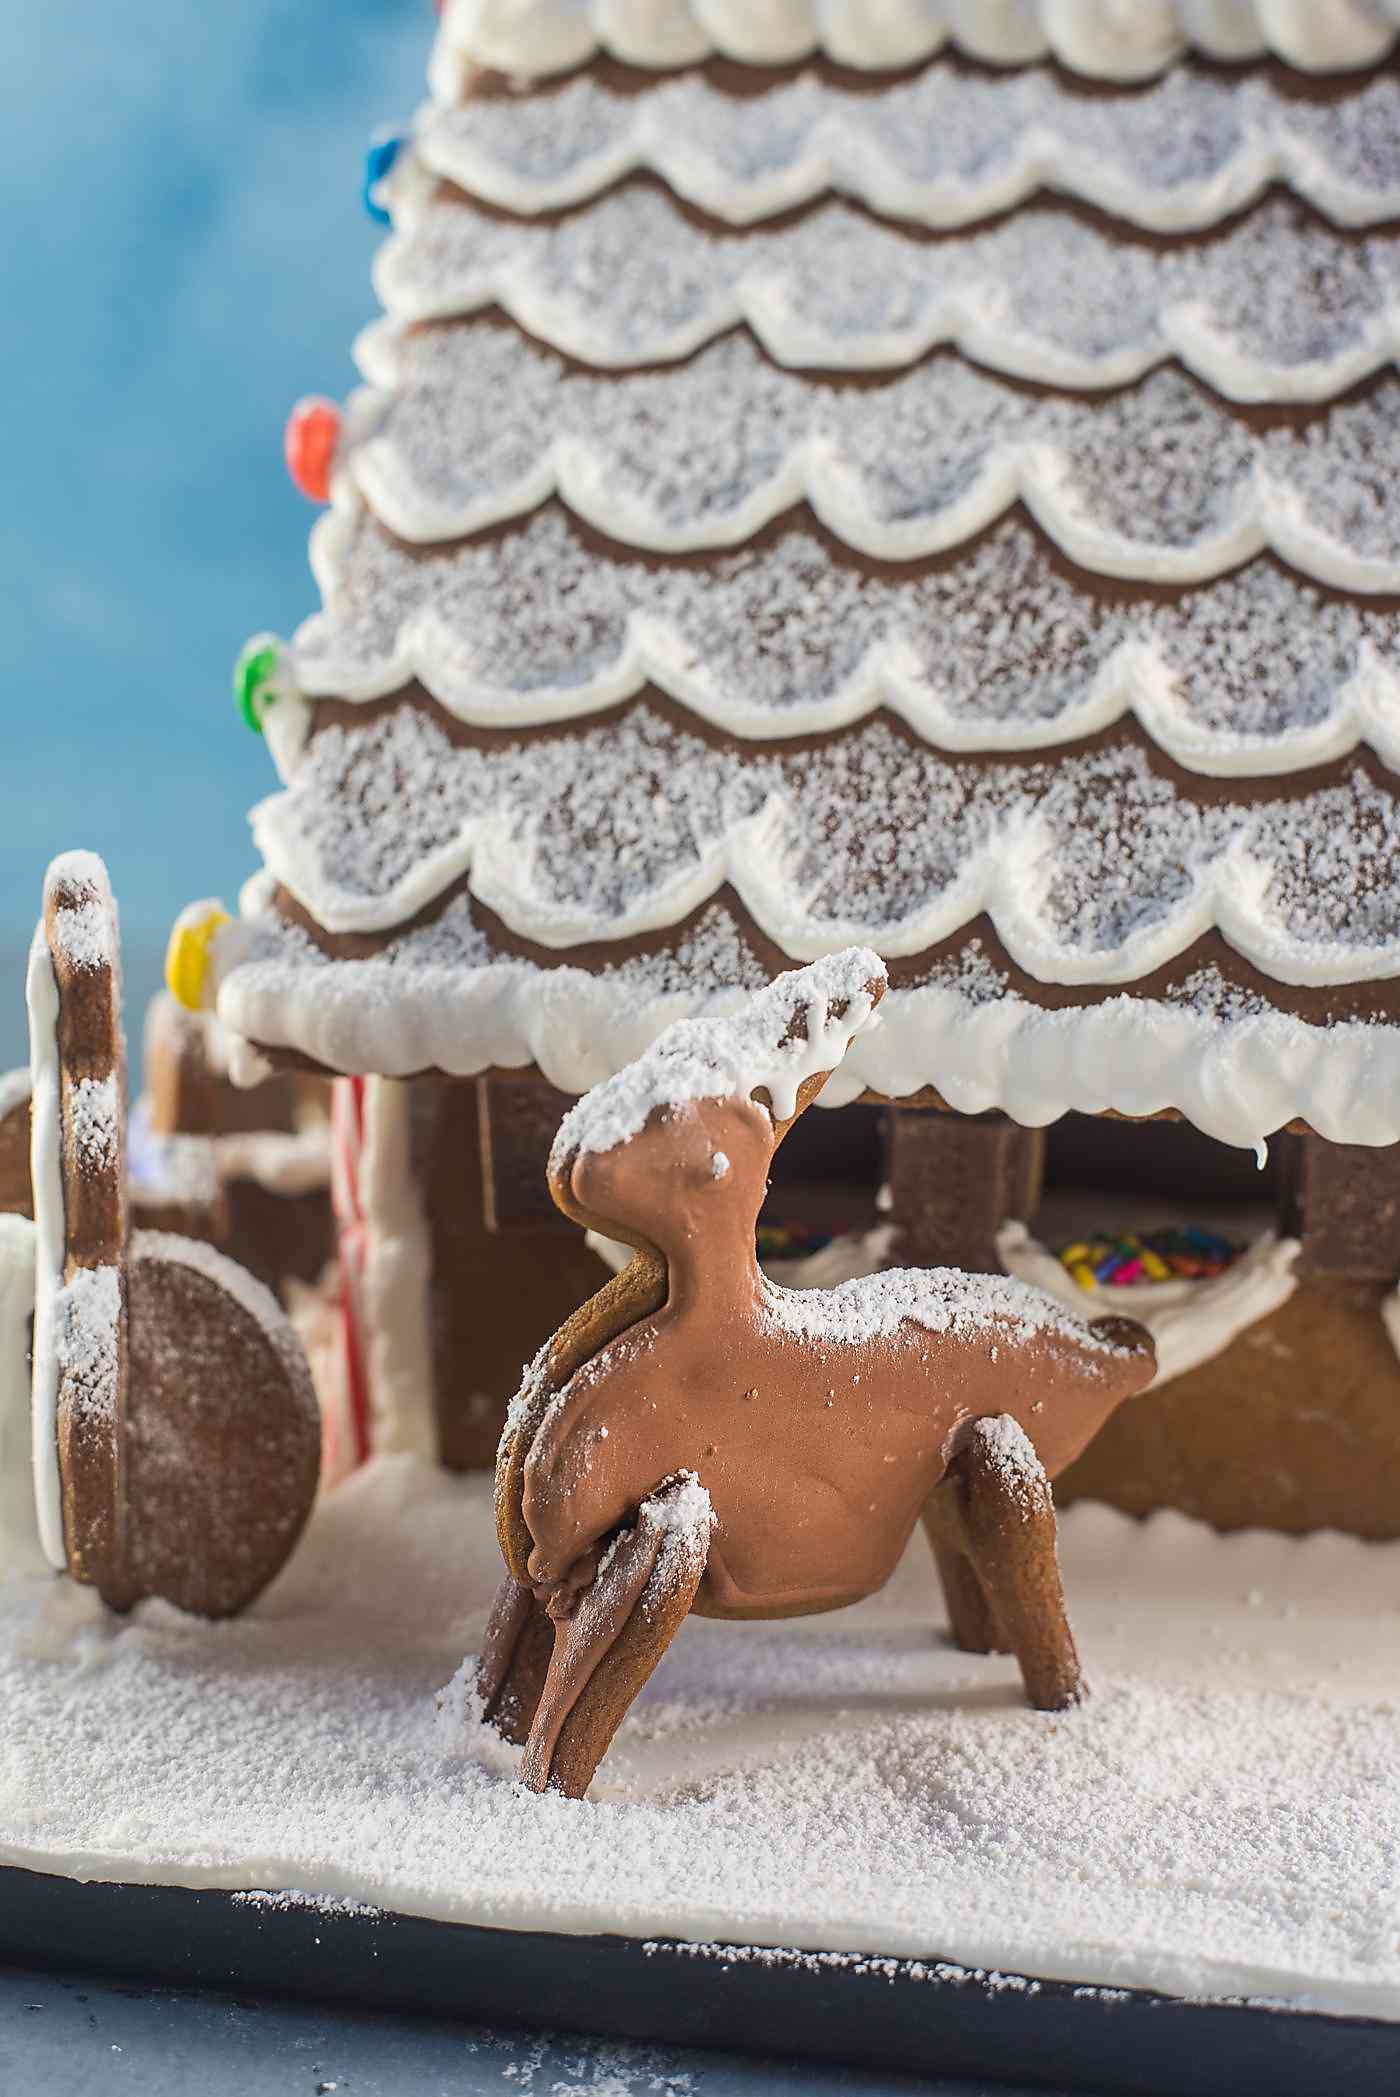
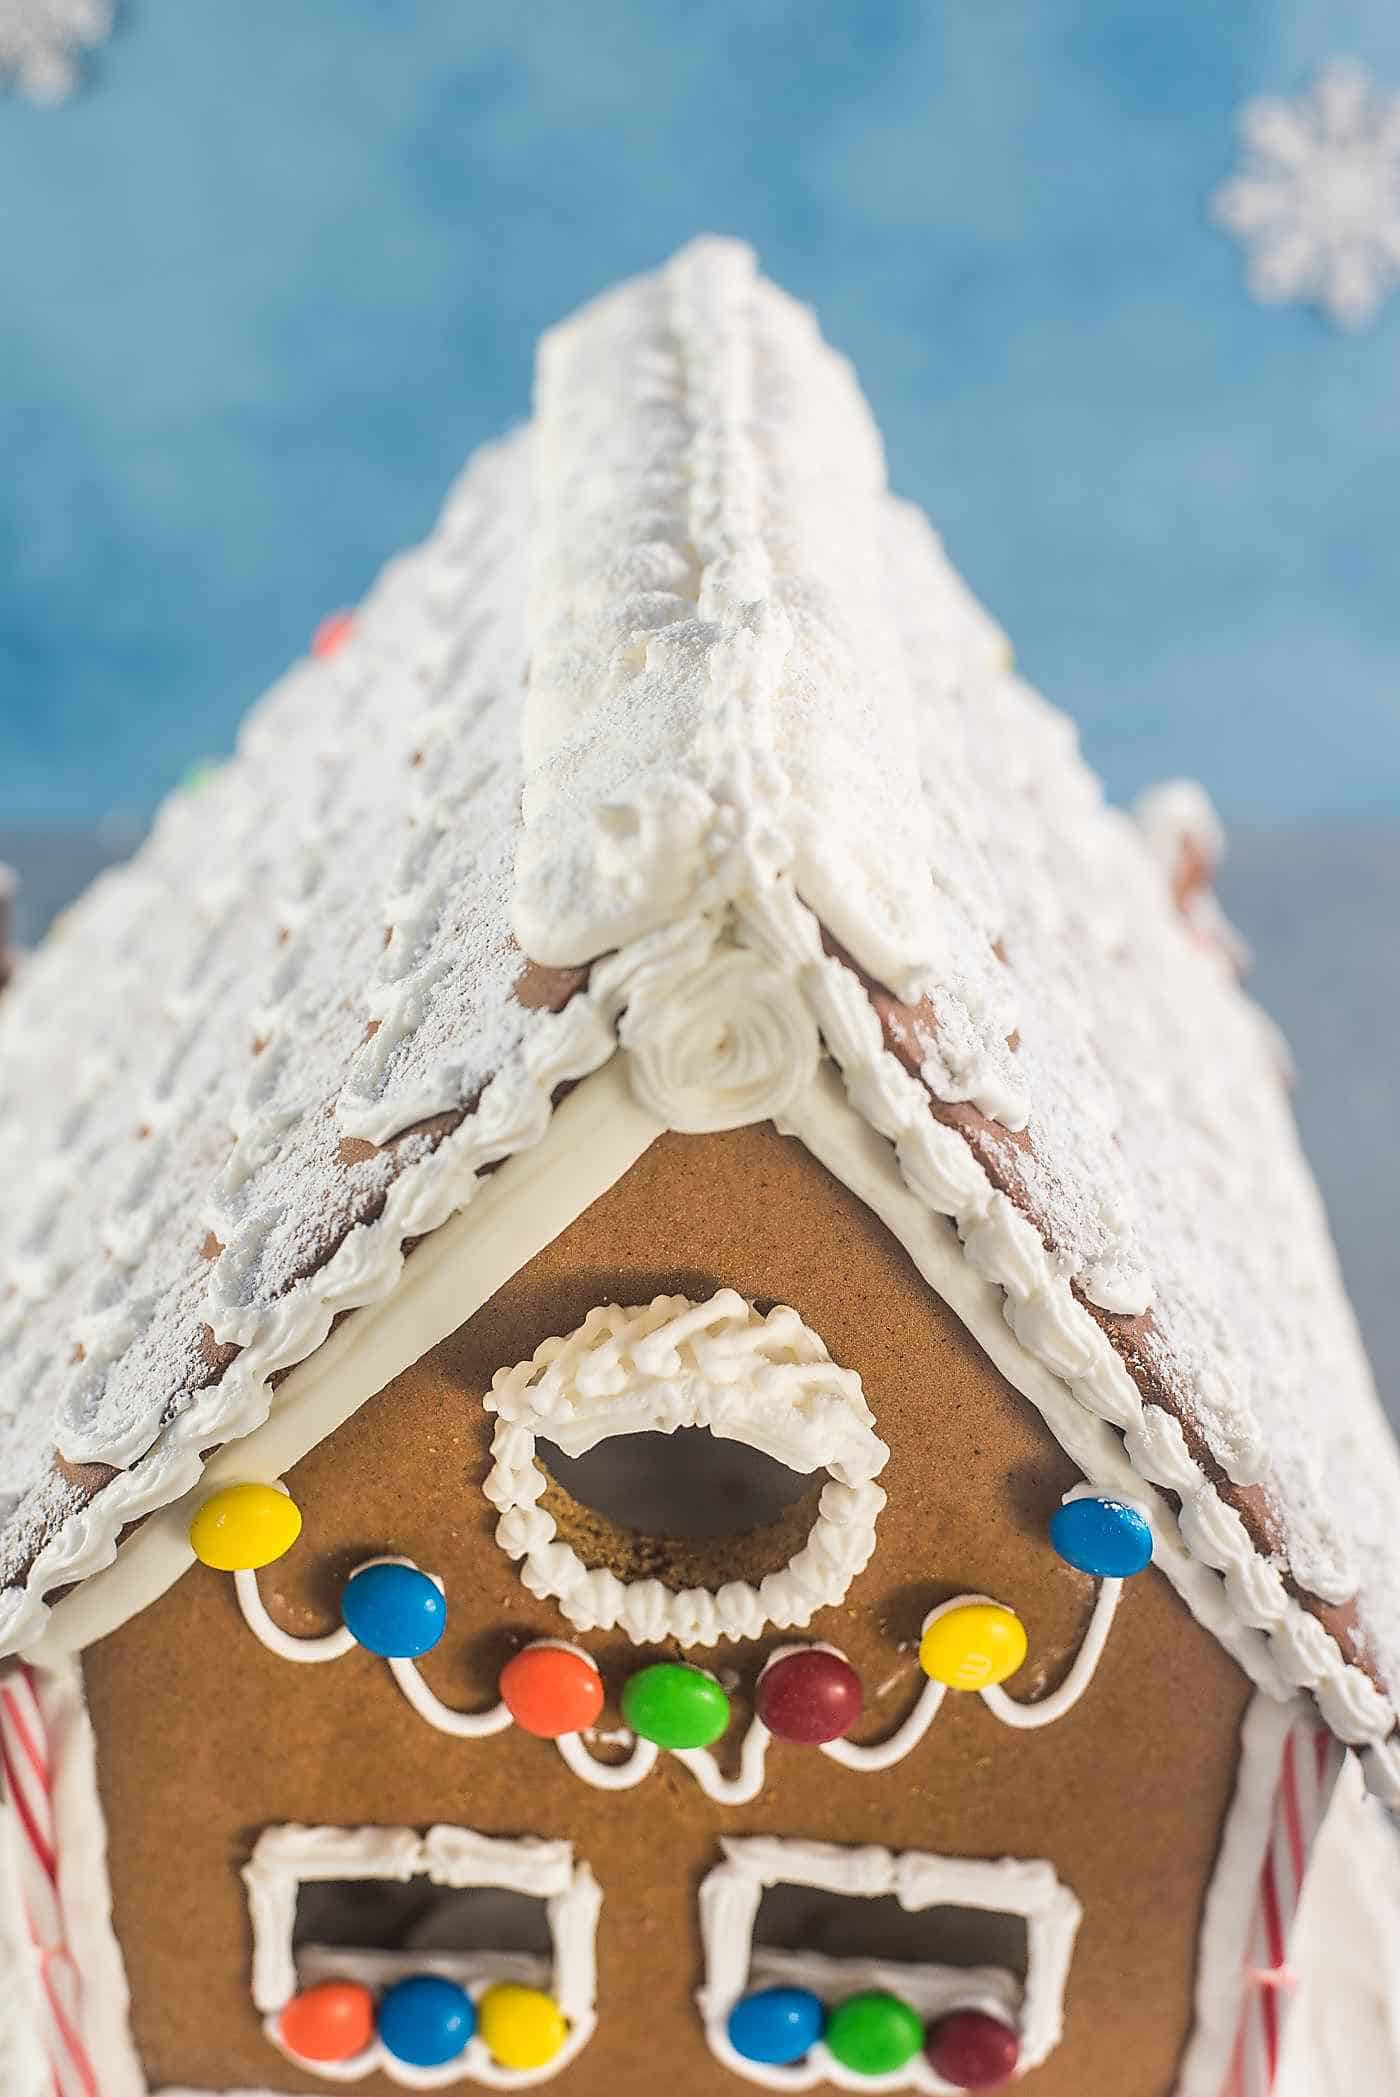
This is the fun part! Just like regular houses, there are infinite ways to decorate a gingerbread house! And the best part is you don’t have to be an interior designer or landscaper to design your very own gingerbread house! 😊 You can “landscape” your gingerbread house by adding “grass” or “snow”, and stick gingerbread Christmas trees in the “yard”. Including little gingerbread people too! Here, I used royal icing that was piped on top of each other to create 3D structures like these windowsill “baskets” and filled them with sprinkles. I piped 3D flower beds for the front of the house, and filled them with sprinkles too (can you tell that I love sprinkles?). Use your cookie cutters to make different shapes that you can also stick on or in front of your gingerbread house. Royal icing can also be used to pipe “shingles” or roof tiles on the roof, and then sprinkle confectioner’s sugar to make it look like there’s a dusting of snow (or spread thick royal icing for a thick layer of snow). I love to use candy to decorate the house and make it colorful. Here are my favorite candies to use;
M&Ms or smarties – Can even be used to stick to the edges of the roof to look like Christmas lights. Kit kat – Perfect to use as fence posts. Candy canes – To use as fence posts or light posts. Or just to stick on the sides of the walls. Gummy candy or sour candy – To stick to the walls or roof. Rainbow sprinkles – For anything! Licorice – Stick licorice along the edges to make the roof look pretty.
Pro tips for your Christmas gingerbread house recipe
Plan ahead! You can make this gingerbread house over 2 days, or plan the workflow to do it over 4 days if you don’t have enough time. If the gingerbread house is going to be left out for 4 days, then I recommend wrapping the house with plastic wrap carefully and thoroughly. Reduce as much contact with air as possible. The cookies will be baked to be on the crispy side. It’s very important that the gingerbread for a gingerbread house be nice and crisp. It might seem too hard at first, but the texture of the cookies will be perfect after assembling the house. Softer gingerbread cookies will become soggy, and not be able to hold up the roof and candy decorations. Make sure the royal icing is properly stored. Otherwise, it’ll harden before you can use it.
Frequently asked questions
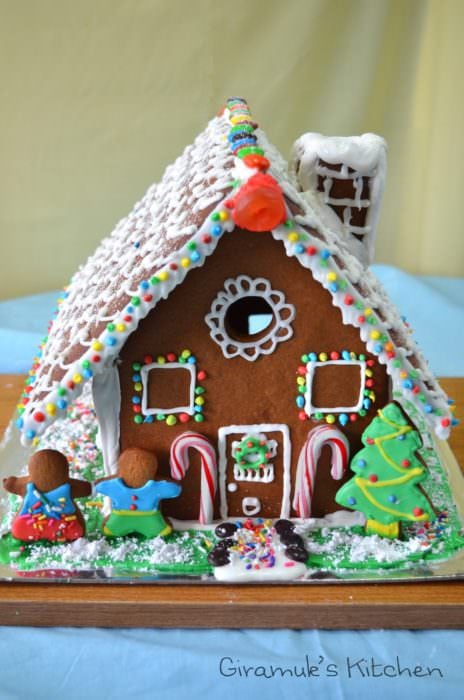
The original gingerbread house that I shared in 2014. I’ve made many more gingerbread houses over the years!