A very versatile recipe with only a few ingredients, you can serve these in different ways (like with this lemon meringue cocktail), and make different flavor variations too!
Lace cookies
Lace cookies are a super easy to make, delicious, delicate cookie! They are so named because they look like beautiful lace once baked. There are many different methods to make these cookies, with creative flavor combinations and variations. Lace cookies are meant to be very thin and delicate, and here I show you how to make perfect lace cookies every time, and troubleshoot any issues, plus how to ensure your lace cookies have the best flavor!
Why these oatmeal lace cookies are a favorite for me!
I love the addition of oats because they give the cookies a lovely texture and nutty flavor. Here are my oatmeal lace cookie recipe highlights.
They taste like a fancy oat cookie wafer! The addition of oats gives the cookies a lovely nutty flavor without adding any nuts. These lace cookies are nut free, and can be made gluten free too. You can make the dough ahead of time, and you don’t have to make the cookies immediately after the batter is made either. I share tips on how to get the most even and flat lace cookies, and what factors contribute to making the perfect lace cookie! Most lace cookie recipes make small cookies to help with even and quick baking. But I make large lace cookies that are still absolutely perfect every time, and I show how you can do that too! Suggestions on how to serve these cookies – creative and traditional ways!
Ingredients you’ll need to make lace cookies
To make these oatmeal lace cookies, you will need, So, in a way, this is a type of cookie that breaks ALL the rules of standard cookie baking to achieve perfect results.
The butter must be soft or melted
I use brown butter that is melted, and is softer than regular butter. Other recipes also use melted butter, and prefer to keep the dough on the warm side so that it’s more like batter than a dough. This will also help with the spreading. However, working with a liquid dough means that you have to work quickly and can’t make the dough ahead of time. With my recipe, you can make the dough ahead of time, and make lace cookies that spread and come out perfectly thin.
Must have a high ratio of sugar, and less flour
This is true for this recipe too. I use a combination of brown and white sugar. The brown sugar adds flavor and the white sugar helps to keep the lace cookies nice and crisp. Check out this guide on types of sugar used in baking for more information. Unfortunately, you cannot reduce the amount of sugar since it’s a key ingredient that helps with the spreading AND with the texture. We also add very little flour here. A little flour is needed for structure, but too much flour will prevent the cookie from spreading thinly as it bakes and form that lovely lace pattern. There are also recipes that use almond flour. I use a combination of oats and AP flour to keep these cookies nut free. Gluten free flour can also be used. Just note that the gluten free versions tend to be more delicate, so a little more care is required in handling them.
Less bulk in the dough
The dough should be smooth with very little “bulk”. This means no chocolate chips in lace cookies. I do add oats, but the oats are blended to make them smaller (but not like flour), but you can also use steel cut oats OR quick oats that are already very small. Previously, I talked about using dough that is soft, or liquid. Since my dough can be made ahead of time, we have can make one adjustment to promote spreading. Flatten the dough portions before baking them in the oven, especially if you’re using a light colored baking sheet (explanation below).
Oven or pan must be fairly hot
To encourage spreading, the oven and baking pan should promote high, but even heat. Light colored baking pans are fantastic to bake with as they don’t absorb too much heat, and bake the cookies a little slower. But because they don’t absorb a lot of heat, I find that I must flatten the lace cookie dough on the sheet before baking them. This allows for the lace cookie dough to heat faster and to bake evenly and spread more. I do like to use my dark colored pans that absorb more heat and distribute the heat faster. This will melt the lace cookie dough quicker and flatten it faster. The baking time is also less with a darker pan.
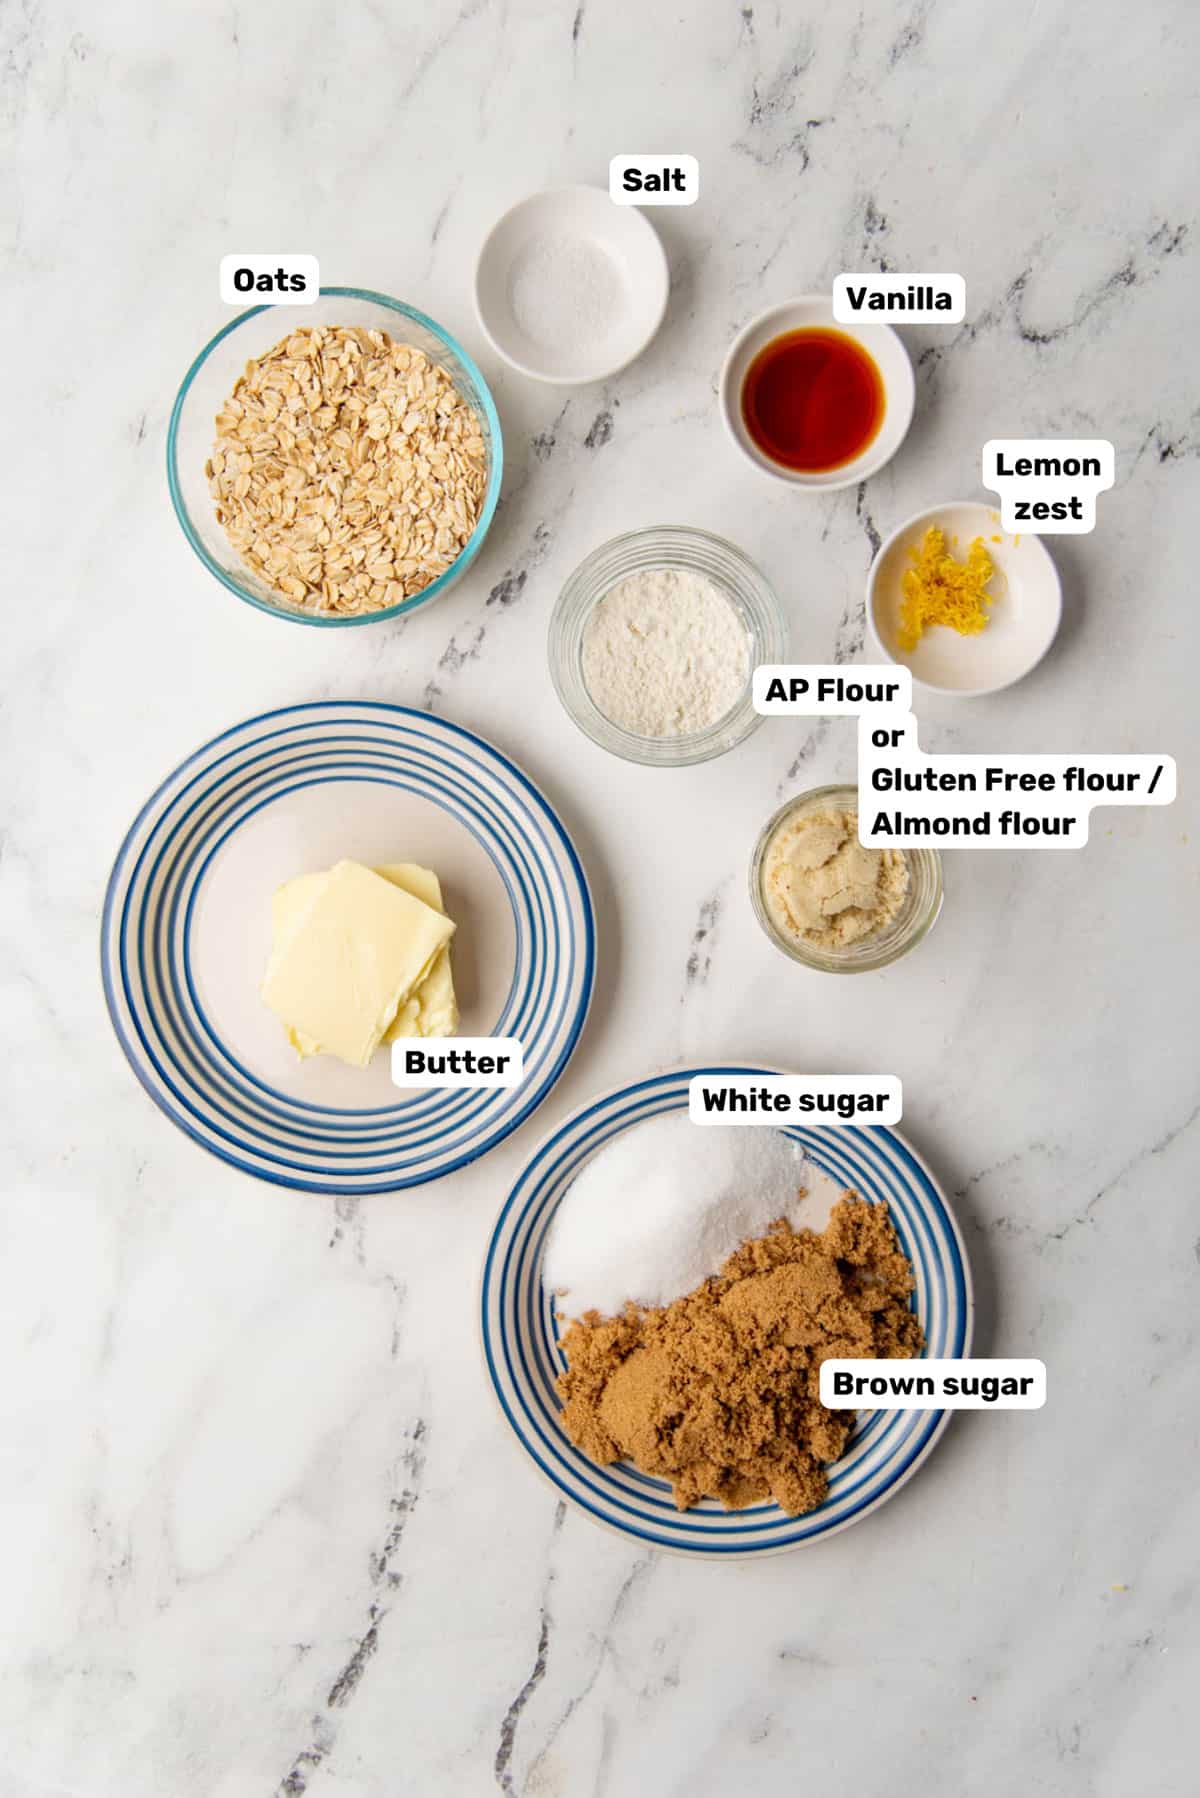
Oats – I use rolled oats, but you can use other types as well. Unsalted butter – While you can use melted butter, I made brown butter to add more flavor! Sugar – White sugar and brown sugar. Salt – Helps to balance the flavor. All purpose flour – Or gluten free flour. Vanilla extract Lemon zest or orange zest – Optional (for flavor). But you can skip this if you like, or add a different flavor extract. Milk or cream – This ingredient may or may not be needed. If you use brown butter, this will be needed to bring the dough together.
Ingredient notes
What type of oats to use?
I use rolled oats here, but I have made these with quick cook oats and steel cut oats too. It’s crucial that the oats are small, so I chop the rolled oats in a small food processor. To skip this step, you can easily use quick cook oats that are already thin and small. For gluten free cookies, make sure that the oats are GF certified.
What type of flour to use?
Oats add most of the starch in this recipe, but adding just a little bit of flour helps to give the cookie some structure and strength.
Gluten free variations
Many recipes use almond flour, which can be used here too. But to keep this nut free, I prefer to use flour. You can also use GF flour (1:1 substitute brands). Just bear in mind that the GF version will be more delicate and will crumble an already delicate cookie more easily.
How to make oatmeal lace cookies
Step one – Make brown butter
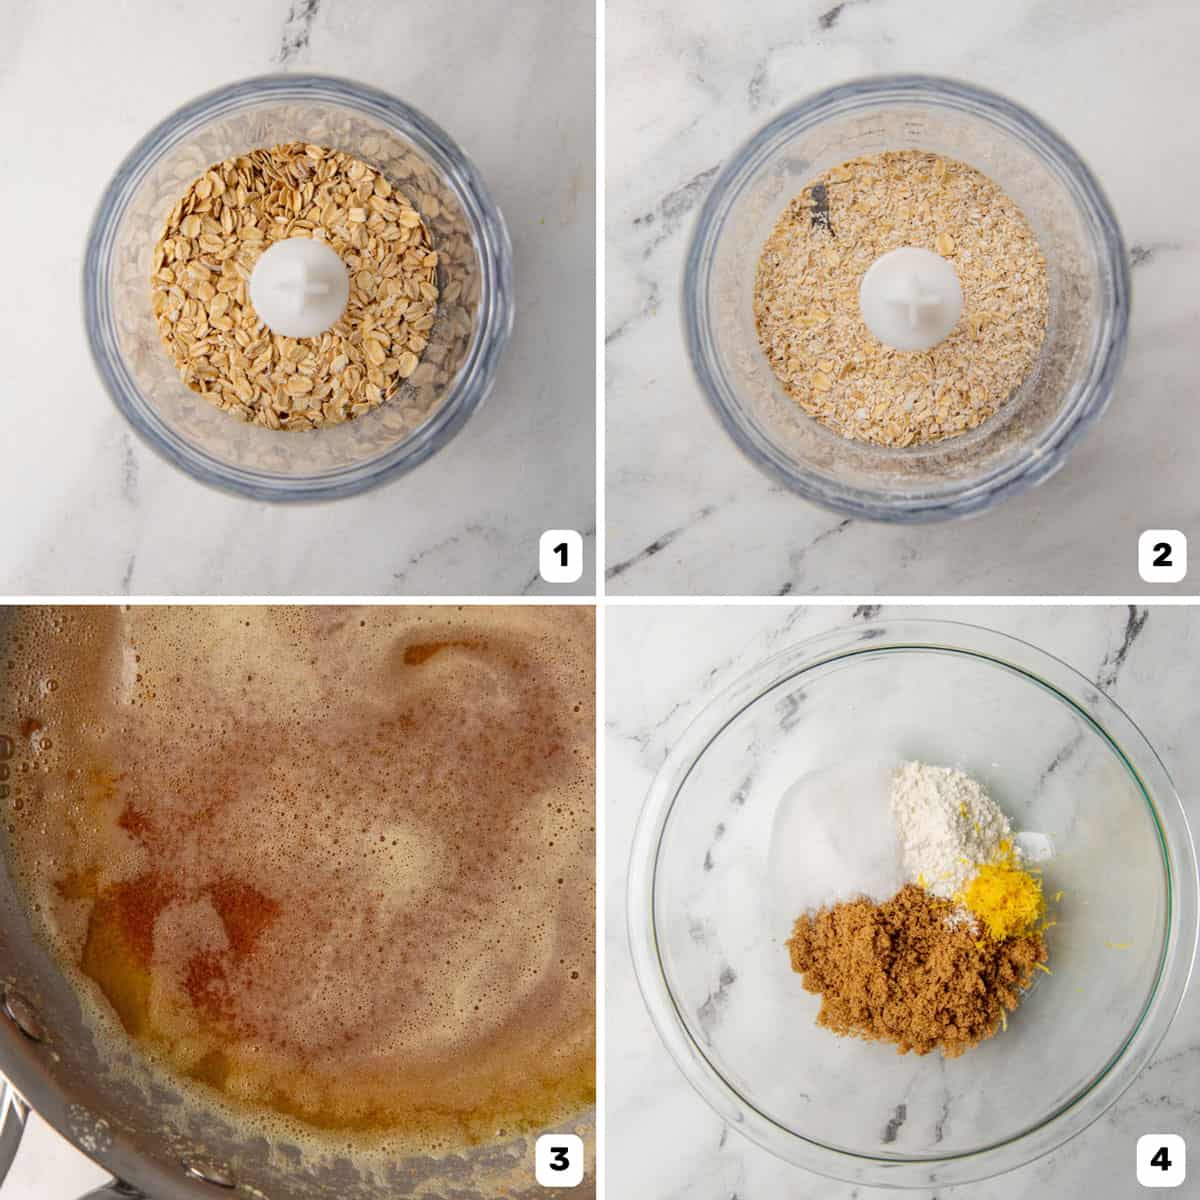
This step, while optional, will add SO MUCH flavor to the final cookie. I’ve previously shared a detailed tutorial on how to make brown butter, so you can follow the instructions there to make brown butter. It’s important to keep stirring the butter to prevent the milk solids from sticking and burning too fast. The milk solids in the brown butter should go from white / yellow to a lovely dark golden brown (image 3). Use the brown butter immediately, OR pour it into a microwave-safe bowl and set aside until needed.
Step two – Prepare the oats
If you’re using quick cook oats, this isn’t needed. If your oats are large, then place them in a chopper or small food processor. Process for a few seconds until the oats are finely chopped, but ideally not turned into flour (images 1 – 2).
Step three – Make the dough
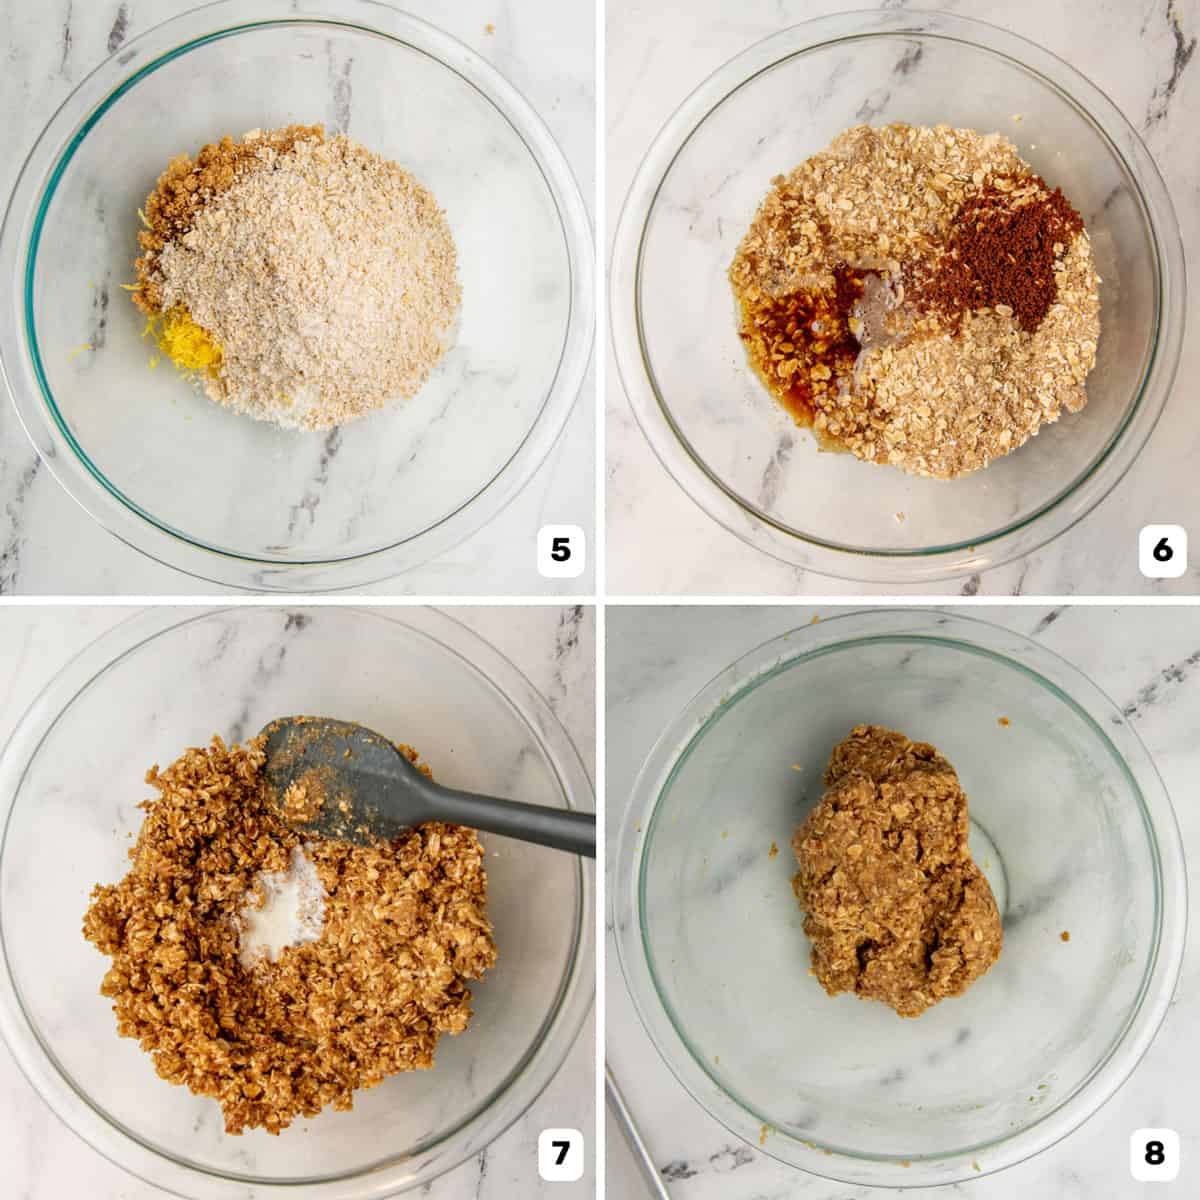
Place all the dry ingredients (including the oats and zest) in a large bowl (images 4 – 5). Mix really well until everything is combined. Add the warm (liquid) brown butter and vanilla, and mix until all the ingredients are well-mixed (image 6). As you mix, the butter will cool down and start to stiffen the dough, and that’s OK! Add about 1 – 2 tbsp of cream or milk (image 7) and mix it in, which will help bind the dough together. Set it aside to let the butter cool down and thicken the batter (image 8).
Step four – Portion the cookie dough
While portioning the cookies, preheat the oven to 350 F (conventional oven). As I mentioned, you can make these lace cookies really big or small. For larger oatmeal lace cookies, portion the dough into 1 tbsp portions (about 16 g). For smaller oatmeal lace cookies, split each 1 tbsp portion into 2, to make two smaller portions (about 8 g each). Roll each portion in your palms to make smooth balls (image 9).
Step five – Prepare the cookie sheet
Prepare a half pan sheet by lining it with parchment paper or silpat. I like to use a dark colored baking pan here, but you can also use a light colored baking pan. Since these cookies spread so much, you can also bake a few at a time, allowing each portion to spread out well. Place the cookie portions evenly spaced out on the prepared cookie sheet (image 10). Only 5 large cookies per half sheet pan. Only 7 small cookies per half sheet pan.
Dark colored baking sheet
Use your fingers to flatten just the top of the cookie ball (image 11).
Lighter colored baking sheet
Use your fingers OR the bottom of a glass to press down on the cookie dough to flatten it further. Make sure the flattened cookie dough is still perfectly round so that it keeps its shape as it bakes (image 12). Place the baking sheet in the middle rack of your preheated oven.
Step six – Bake the cookies
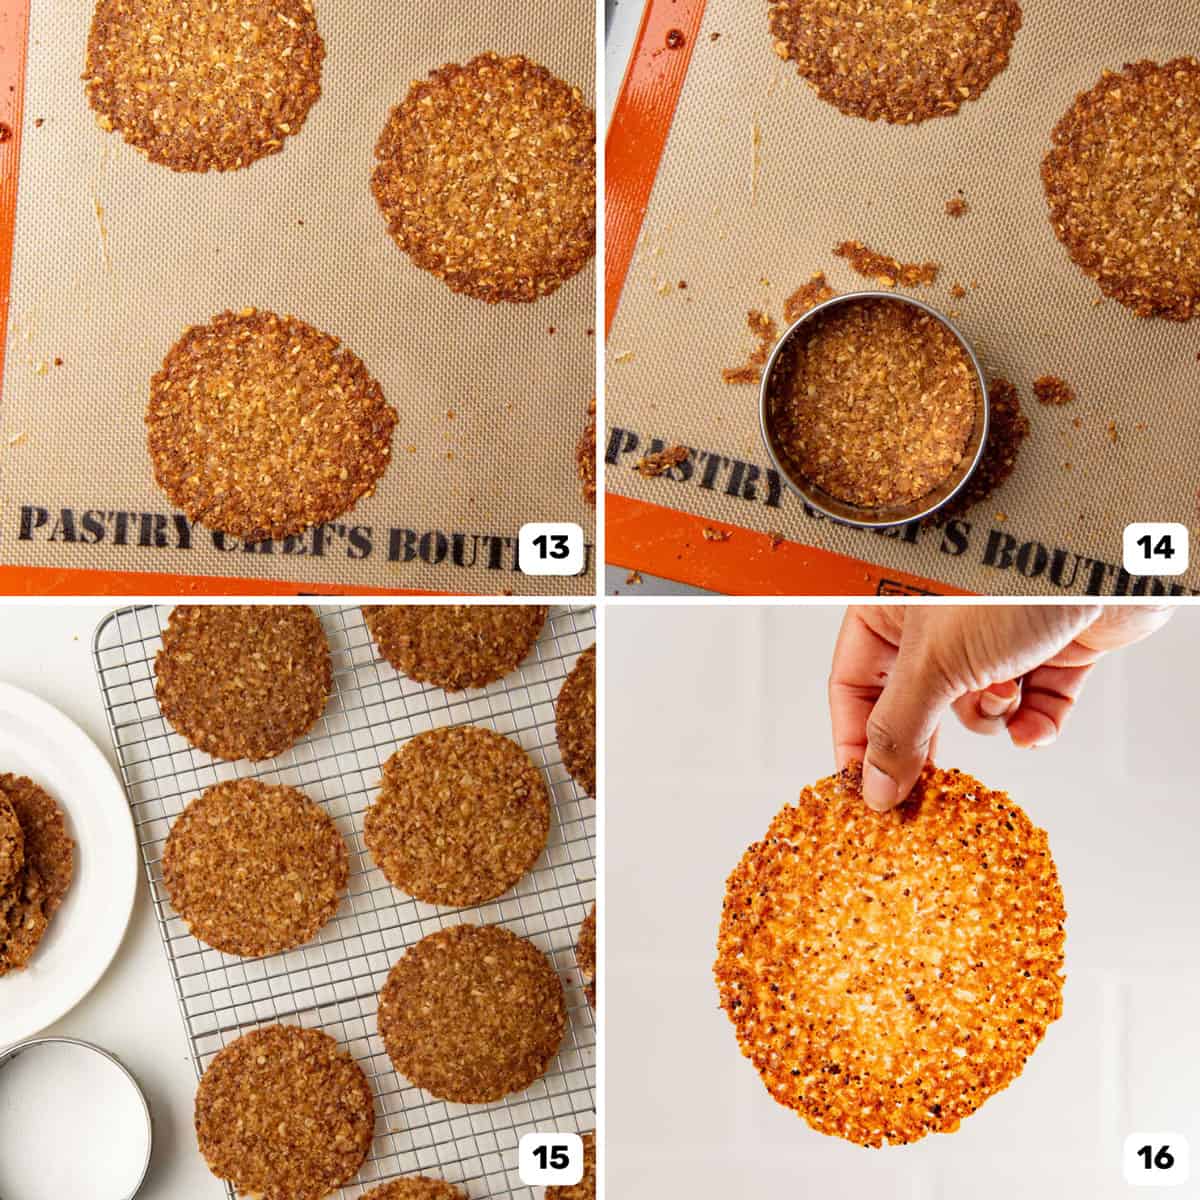
The cookies are done when they have spread thinly and have lacey holes. The dough will still be bubbling, and turn a dark golden brown (image 13). Don’t make the mistake of taking them out when they are only a light golden brown in color. The sugar will help hold the cookie together, so it’s important that the sugar caramelizes well. Smaller cookies are baked for about 7 – 9 minutes. Large lace cookies are baked for about 10 – 12 minutes. The bake time will vary depending on how soft, thin, warm the cookie dough was before going into the oven. It will also depend on your oven itself and the baking tray you used – lighter baking trays take longer and dark baking trays bake quicker.
Step seven – Cool down the cookies
When the cookies are slightly cooled, carefully remove them from the baking sheet using a thin spatula and place them on a wire rack to cool down completely (image 15).
Trimming cookies
To get perfectly round cookies, we can use a cookie cutter to trim the edges of the cookies. This step is optional, but once the cookies have cooled down slightly (but are still warm), use a sharp, clean cookie cutter and press down gently but firmly on the cookie while it’s still on the baking sheet (image 14). This will simply leave the impression of the cutter on the cookie. Do not twist the cookie cutter. Then place the whole lace cookie on the cooling rack to cool. Once cooled down, the cookie edges can now be easily trimmed off.
Step eight – Bake all of the dough
I like to rotate between two baking pans, so that one baking pan cools down as the other pan bakes another batch of cookies. This avoids using a warm baking pan to bake cookies. It’s faster to bake this way, and better for your pans to cool down gradually. If you only have 1 baking pan, then I recommend letting the baking pan cool down at least a little bit. Then run room temperature water along the back of the tray, so it cools down completely. DO NOT do this while the pan is hot, as large temperature shocks can warp the baking sheet! Then repeat the process.
Step nine – Decorate (optional), and serve!
Serve the cooled down cookies as they are (image 16). They have so much flavor that they make a great snack on their own, but they also make for great tea time snacks! My favorite combination with these crispy oatmeal lace cookies is chocolate. You can use a chocolate spread to spread on top of the lace cookies, but chocolate spread will make the cookies soggy very quickly. My recommendation is to use melted chocolate that will harden at room temperature. Melt chocolate in a small bowl and use this to decorate the lace cookie. Take care to gradually melt the chocolate, in small increments, to avoid burning the chocolate. Ideally, tempered chocolate is better, but this is time consuming. Instead, you can use compound chocolate that is more forgiving. Place the melted chocolate in a piping bag and cut a small hole at the tip. Drizzle the chocolate over the surface of the oatmeal lace cookies, OR spread a thin layer of melted chocolate on top (or bottom) of the cookie (like florentine cookies).
Recipe tips for success
Melt the butter! Whether you decide to use brown butter or not, the butter should be melted. You can also heat up the sugar to melt in the butter, but this will mean you have a batter rather than a dough. While this will work for this recipe, it’s harder to store, AND hard to get perfect circles. Instead, add the sugar to the melted, hot butter and let it melt in the residual heat, while also cooling down the butter to help make a dough. Make sure the oats are finely chopped. The smaller pieces will allow for a more intricate lace pattern. You can substitute the sugar for all brown sugar if you like, but I find that the best texture and flavor are from a mixture of both. If this is your first time, make 1 test batch first. This will help you figure out how your oven works for you. Adjust the baking times if needed. If the cookies don’t spread enough, then flatten the cookie dough more before baking. To get perfect rounds, make sure the dough portions are even, and rolled perfectly round. When flattening the dough, make sure the shape is a perfect circle with minimal jagged edges. If your cookies aren’t as perfectly round as you like, use a cookie cutter to press into the freshly baked lace cookies. Since the cookie is soft, it will leave an impression that will break off once the cookie has cooled down, leaving a perfect circle. The leftover crumbs (if you cut the cookies) can be used as a topping for ice cream, or any dessert served with whipped cream on top, because they taste like crunchy praline flakes. I love using my dark colored metal pan. This gives me evenly flat, intricately laced, caramelized cookies that are just gorgeous! Be gentle when handling them, as these are delicate cookies. Especially the gluten free version. These do not store long term, so only make what you need!
Variations
Regular lace cookies / almond lace cookies
Substitute the oats with almond flour (by weight), for regular lace cookies. Or use oat flour (by weight) to make a nut free version.
Fruit lace cookies
Add finely minced dried fruit, for a florentine-like lace cookie.
Chocolate oatmeal lace cookies
While you can drizzle melted chocolate to make chocolate oatmeal lace cookies, you can also spread chocolate on top, or dip half of the cookie in the chocolate as well.
Shaped lace cookies / cigar lace cookies
Want to shape the cookies? These oatmeal lace cookies are very malleable while they are hot, and can be shaped before they cool down. Once the cookie cools down it will be brittle and cannot be shaped. To make cigars – Use a wide spatula to gently lift up the lace cookie while it’s hot (as soon as it comes out of the oven), and wrap the cookie on a lightly greased (or parchment paper wrapped) tube. Let it cool down on the tube and remove it once the cookie sets. Work quickly with multiple tubes, so that you can shape all the hot cookies as they come out of the oven. To make a shell (like a taco) – Place the hot cookies gently in taco holders to get that shape. Alternatively, gently curve the hot cookie and hold it upright in that shape until it cools down, using other kitchen items (glasses, foil etc). Then these shaped cookies can be served as is, OR you can fill them with whipped cream, diplomat cream, or ganache JUST before serving. The filling will make the cookies soggy faster. These can be served with coffee or tea, but also as party food, especially when filled with a light whipped cream.
Other flavor substitutions
I add lemon zest to mine, because I love the subtle citrus flavor! But to make a more pronounced lemon lace cookie, add more lemon zest. These are perfect to be serve with my lemon meringue cocktail. Add coffee extract for a coffee flavored lace cookie. Just a touch of bourbon in the dough will add a nice depth of flavor to the lace cookies too. Add spice to the dough to make a spiced oatmeal lace cookie! My favorite additions would be cinnamon and nutmeg, but you can also add allspice, cardamom, or spice blends like pumpkin pie spice.
Storage tips
Baked cookies
Due to how delicate these cookies are, they do not keep for long. The cookies are best served the day you make them. But can also be kept in an airtight container for up to 1 day at room temperature. When the cookies have cooled down, stack them on top of each other and place them in an airtight container. You can create multiple stacks, but make sure the stacks are not overlapping each other as the edges can break off. While the cookies won’t go bad, they do lose their crispness the longer they are stored. They are still delicious and edible by day 2, but will not be as crisp.
Unbaked cookies (and make ahead tips)
Unbaked cookie dough can be stored for about 5 days in the fridge, and about 1 month in the freezer. However, the cookie dough must be thawed to room temperature before baking. This is so that it can bake evenly. Otherwise the outside of the dough will bake faster than the inside and the lace cookie will be thicker in the middle. For best results, flatten the cookie dough balls before refrigerating or freezing them, so that they will thaw out faster and bake better.
Frequently asked questions