You only need 5 simple ingredients to make this easy chocolate frosting. And it’s so creamy, fluffy, and soft! Perfect to frost a variety of cake recipes! For more delicious frosting recipes, check out my American vanilla buttercream frosting, chocolate Swiss meringue buttercream, and easy chocolate Swiss meringue buttercream frosting (cheat’s version).
Why you’ll love this chocolate buttercream
Looking for an easy chocolate buttercream recipe? Then this is it. American chocolate buttercream is by far the easiest to follow with amazingly delicious results! The texture of this frosting is so creamy, soft, and fluffy. This chocolate frosting is sweet, but not too sweet, and perfectly balanced with buttery flavor. Since it’s made with cocoa powder, there is no melting chocolate. Change the type and amount of cocoa powder to adapt this easy recipe to your taste! I also give you tips on how to make the BEST chocolate buttercream frosting, from prepping the butter to choosing the best cocoa powder. Because I use dutch cocoa powder (my favorite), this buttercream has a deeper chocolate flavor without the bitterness. This creamy chocolate buttercream frosting is very adaptable. Want an even softer and creamier frosting? Add more milk / cream. Want mocha buttercream frosting? Use 2 tsp of instant coffee that’s dissolved in 1 tbsp of cream or water, and add it to the mix. How about jaffa buttercream frosting? Add 2 – 3 tsp of orange extract (plus extra orange zest if you like). And one of my favorites – brandy chocolate buttercream frosting! Add 2 – 3 tbsp of brandy to the frosting for a good dose of booze. You can sub the brandy with bourbon, or even rum or Irish whiskey too.
And even better, with this American chocolate buttercream recipe, you can make TWO types of chocolate frosting! Milk chocolate buttercream frosting and dark chocolate buttercream frosting.
Ingredients to make chocolate buttercream frosting
Unsalted butter
Butter is the base for buttercream. I prefer to use unsalted butter, which allows me to control the amount of salt I add to the buttercream. I’m a big fan of sweet and salty flavors, and that’s even more true of chocolate recipes. So, using unsalted butter let’s me adjust the salt flavor to my liking. If you use salted butter, taste the buttercream and adjust the salt level to your liking, since different brands contain varying levels of salt in their butter.
Cocoa powder
The chocolate in this buttercream is in the form of cocoa powder. So you don’t have to melt chocolate separately, making the process that much easier. However, you can absolutely elevate the flavor of your chocolate buttercream frosting by choosing the right type of cocoa powder. I’ve shared an in-depth article about the types of cocoa powder that is a great read to learn more about cocoa powder and how to use it in your chocolate desserts. For the best chocolate buttercream frosting with cocoa powder, I recommend using Dutch cocoa powder, with a high fat content (22 – 24%). Dutch cocoa powder has a deeper chocolate flavor with very little acidity (due to the alkalizing process), and the higher fat content means that it has a richer mouthfeel and flavor AND it melts better into the butter too. You can use cocoa powder from the supermarket too if that’s what you have access to. Whether it’s natural cocoa powder or dutch cocoa powder. But if you’re looking to elevate the flavor of your cocoa based chocolate buttercream, then changing the cocoa powder is a fantastic way to achieve that.
Confectioner’s sugar (powdered sugar)
The sweetness component in the buttercream. You can use regular confectioners sugar or even organic powdered sugar if you prefer. Just make sure to sift the confectioners sugar before using it. This will remove any lumps, and ensure that the sugar dissolves well in the butter, giving you a a smooth velvety taste.
Heavy cream
Heavy cream is optional. I recommend adding heavy cream if you’re making buttercream in a cold climate, as it will help loosen up and make the butter more fluffy. But it’s absolutely not necessary if you live in a warmer area. In fact, adding heavy cream might even cause the butter to curdle in warmer environments. If you are using heavy cream, however, make sure to use one that has at least 35% fat content (whipping cream), or more (double cream).
Salt
As mentioned in the butter section, salt is absolutely necessary for almost all dessert recipes. Salt helps to balance the sweetness and prevents the buttercream from tasting bland. You can add just a little salt to deepen and balance the flavor of chocolate and sugar. But you can also add a little extra to give the buttercream a little saltiness.
Flavor extract
Chocolate buttercream doesn’t really need vanilla or any other base flavor extract. Especially since the salt helps to enhance and balance the flavors. BUT, you can still add coffee extract instead! The flavor of coffee complements chocolate very well. Just adding about 1 tsp will provide some depth of flavor to the chocolate buttercream. Adding more will make the chocolate buttercream taste like mocha buttercream!
Additional flavoring
There are also other flavoring options you can add to your american chocolate buttercream.
Orange extract (for jaffa buttercream) Alcohol – Just a little bit to give the buttercream a little boozy kick. Brandy Bourbon Whiskey Rum Kahlua Hazelnut liqueur Non alcoholic – You can also find non-alcoholic rum or brandy extract. Hazelnut chocolate spread – For a nutty hazelnut flavor, you can add some hazelnut chocolate spread like Nutella. I prefer Bon Mamman though! Praline paste – You can even add praline paste to elevate your buttercream frosting even further!
You can also make this frosting vegan or dairy free
Substitute the butter with a good quality vegan butter. Do not use margarine, as this is too soft for buttercream. Choose a vegan butter that tastes delicious, AND has similar properties to butter, such as,
Hardens in the fridge Softens at room temperature (similar to butter) Whips beautifully
Tools you will need to make this buttercream
Stand mixer with paddle attachment and / or whisk attachment – This recipe can be made with a hand-held mixer, but you will need to hold it over the butter for a long time to get the same consistency. So, I do highly recommend using a stand mixer. Use the whisk attachment for a fluffier, more airy buttercream. Use the paddle attachment for a creamier, slightly dense buttercream. This method will have fewer air pockets, resulting in a smooth buttercream for coating cakes (less air bubbles). Weighing scale – I’m a big fan of using a scale for weighing ingredients. This ensures more precision, especially when following a baking recipe. Sieve – Absolutely necessary to ensure that your cocoa powder and confectioners sugar don’t have any lumps. There are some brands that have fewer lumps, but it’s still good practice to ensure there are no lumps at the beginning. This will prevent any lumps in your final buttercream. Spatula – A flexible silicone spatula to scrape the sides and bottom of the mixing bowls.
How to make chocolate buttercream frosting
Step one – Get the ingredients ready
The first step is to weigh and prepare the ingredients. The butter should be soft, at room temperature. If it’s cold, then place the butter in a warm area, or cover it with a warm cloche (or upturned bowl) until it’s soft. This is between 70 – 75 F / 21 – 25 C. In summer, aim for a cooler 70 F, but in winter aim for a warmer 75 F. You should be able to press into the butter and leave a clear indentation. Sift the confectioners sugar and cocoa powder (separately). It’s important to weigh the cocoa powder because the type of cocoa powder you use will fill measuring cups differently. Store-bought cocoa powder is heavier in a cup than the dutched cocoa powder I use. Different brands may also have different densities. However, weighing the ingredients will always provide consistent results and flavor.
Step two – Whip the butter
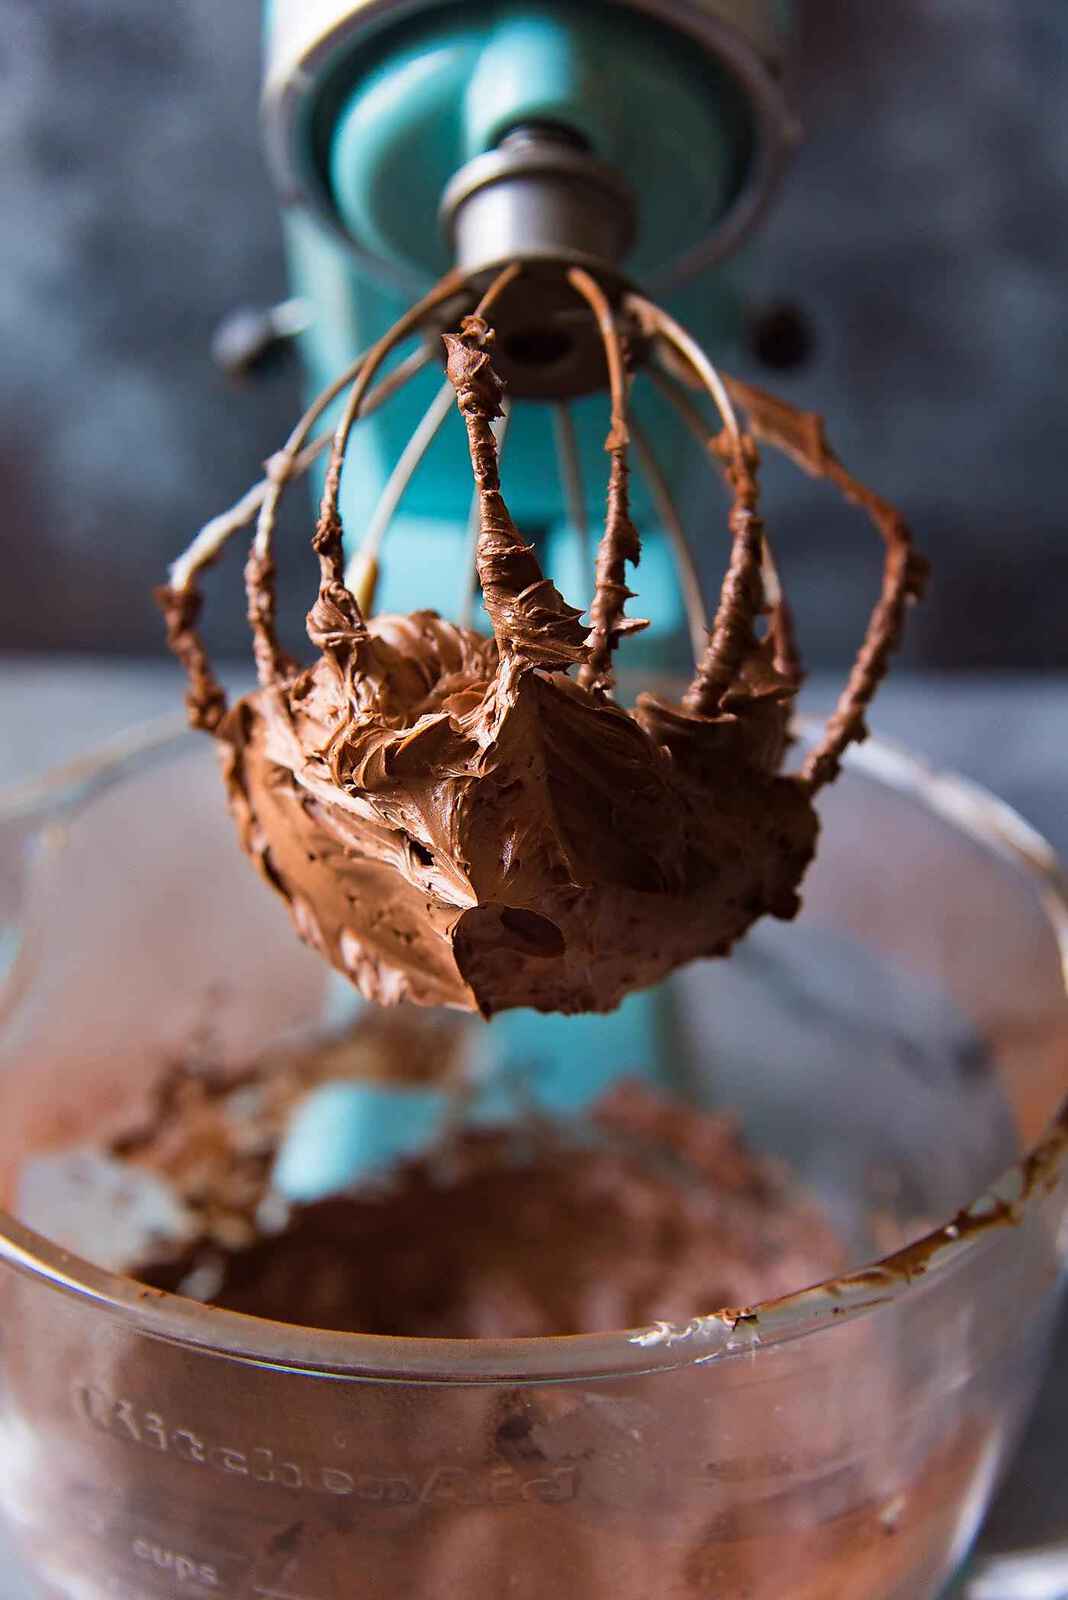
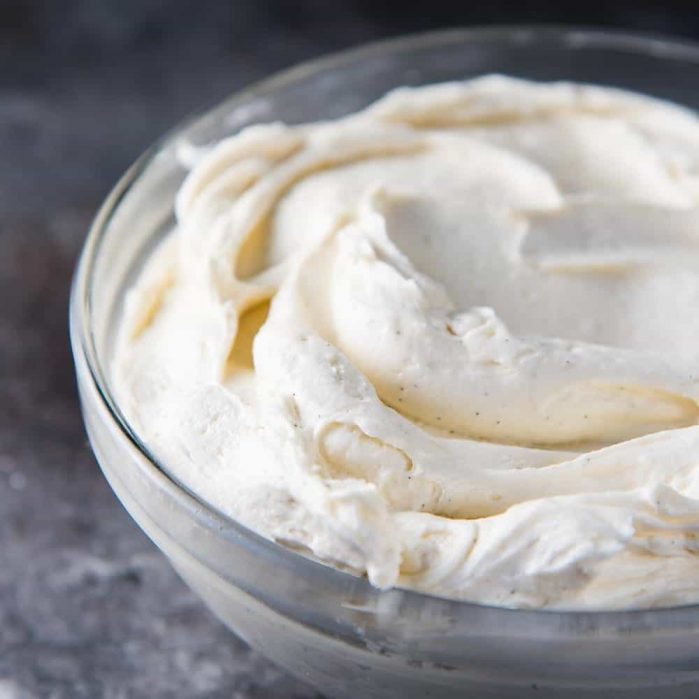
This is very important for a super creamy and fluffy buttercream frosting. Place the softened butter and salt in the mixing bowl of your stand mixer, and whip the butter for a good 10 – 15 minutes (Image 1).
It’s absolutely crucial to stop the mixer to scrape the sides AND the bottom of the bowl to ensure that the butter whips very well. Otherwise, you will end up with clumps of butter in your buttercream.
Use the whisk attachment for airy, fluffy, and light buttercream. The whisk attachment will introduce more air into the buttercream, and generate more air bubbles. I love this frosting for cupcakes and cakes with a more old-fashioned finish. The texture is more like old-fashioned buttercream.
However, use a paddle attachment to make a buttercream that is creamy and fluffy. The paddle attachment will introduce less air, and result in a buttercream that is a little denser. The result is buttercream that has fewer air bubbles – so it’s great for smooth buttercream applications for cakes.
Step three – Add cocoa powder and other add-ins
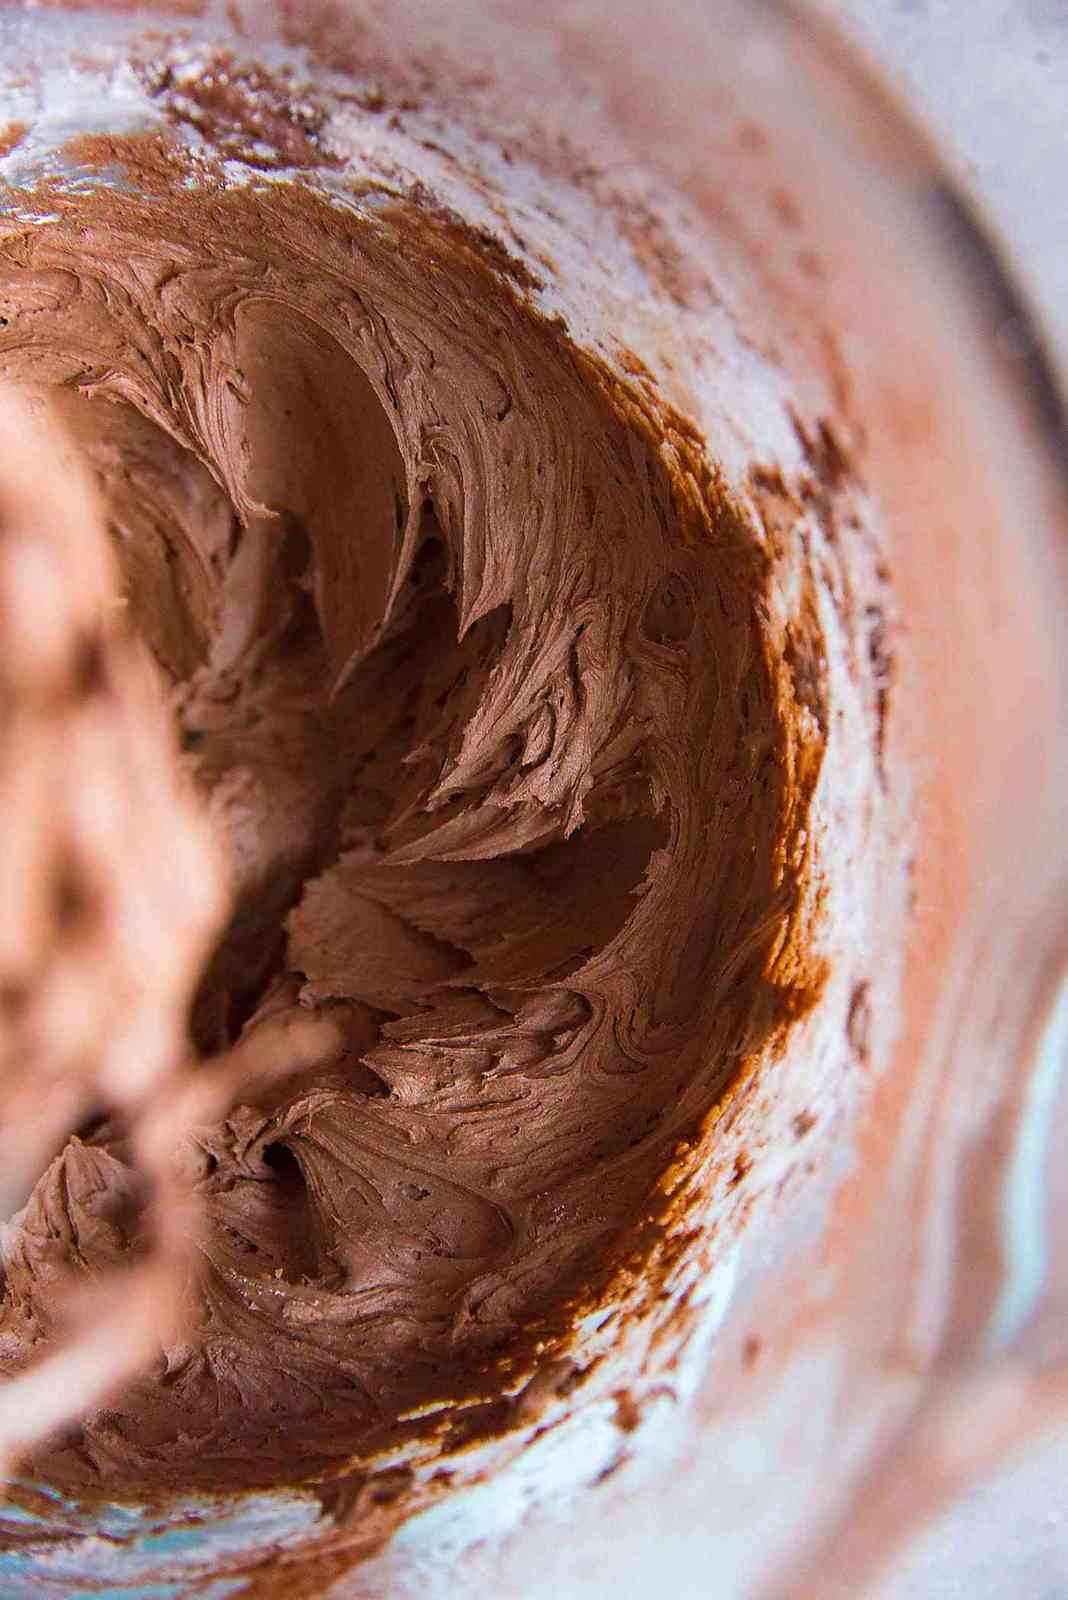
At this point, I would add some heavy cream if I’m making the buttercream in winter, along with the vanilla or coffee extract as well (Image 2). I like to add cocoa powder directly to the butter, especially since I use high fat cocoa powder. This allows the cocoa powder to really mix in with the butter, and for the cocoa powder to dissolve with the butter. It also helps with preventing any cocoa powder lumps (Image 3). Scrape the bowl half way through to ensure there are no cocoa powder clumps stuck to the bottom or sides of the bowl (Image 4).
Step four – Add the confectioner’s sugar
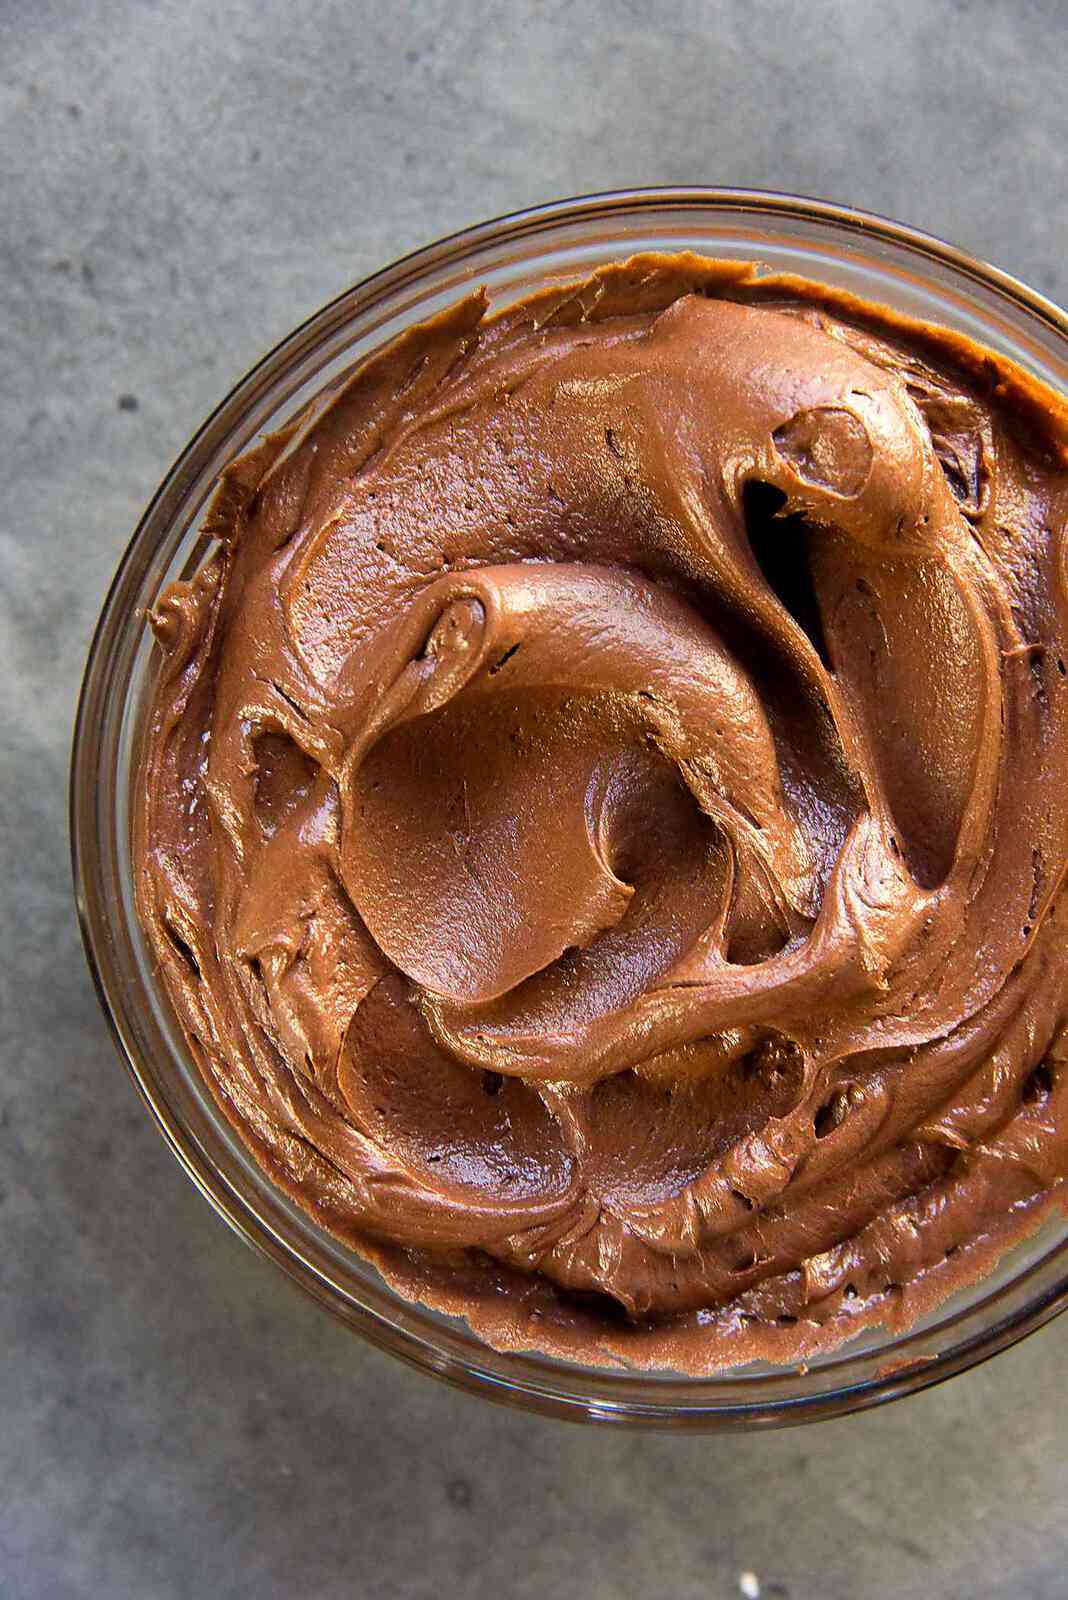
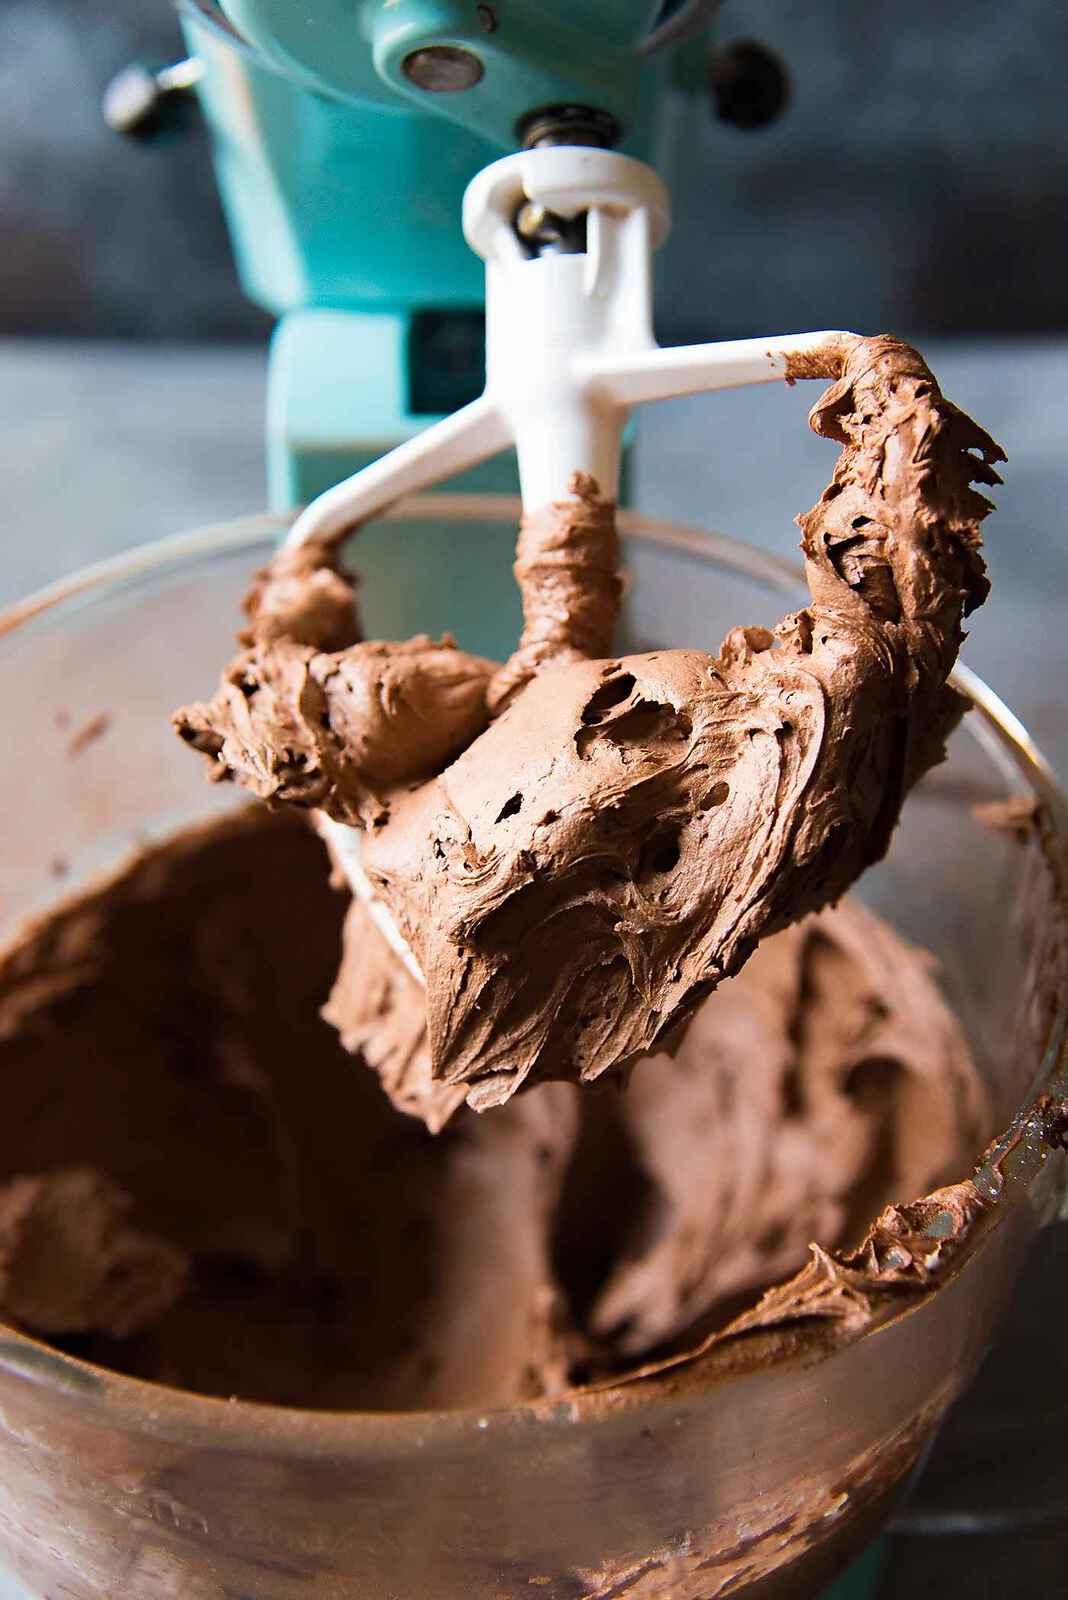
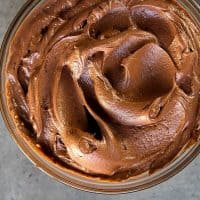
Now, I add the sifted confectioners sugar (powdered sugar). Add the confectioners sugar in batches, on low speed. This prevents the powdered sugar from flying off and causing a sugar storm in your kitchen! (Image 5) Once the powdered sugar has been added and mixed on low to incorporate, increase the speed to cream the sugar and butter together. Again, scrape the bowl to ensure that the sugar and butter are mixing well. The buttercream will be super creamy, fluffy, and airy, and then it’s ready to be used! (Image 6).
Optional step – Add extra flavoring
After making the buttercream, taste it and add any other flavoring you like. You can add extra coffee extract, vanilla extract, or some alcohol to give it a nice boozy kick. But make sure to not add too much because you don’t want to curdle the buttercream (Image 7 and 8).
Pro tips for making perfect chocolate buttercream frosting
Make sure to use softened butter that is NOT melted (between 70 – 75 F)! I also find that slightly cooler butter works better during summer, and slightly warmer butter works better in winter. Weigh the ingredients. Especially the cocoa powder. The brand of cocoa powder will have an impact on the density. Weighing will eliminate such variations. Sift the cocoa powder and confectioners sugar to avoid lumps. Make sure to scrape the sides and bottom of the mixing bowl periodically, at each step! Use a high fat, dutch cocoa powder for the best flavor for your chocolate frosting. Don’t skip the salt! Use the right mixing attachment for the type of frosting you’re looking for. Whisk attachement for airy, light buttercream Paddle attachement for smooth, creamy buttercream (less air bubbles) Always make extra if you’re not sure! It’s better to have a little extra frosting to fix cake mistakes and for decorations, than to run out of frosting.
How to remove excess bubbles from the frosting
If you used a paddle attachment, your buttercream should ALREADY be nice and smooth, with very few air bubbles. However, if you used a whisk attachment, you can reduce the bubbles further too. The trick is to remove the air in the buttercream. This can be done by melting a small portion of the buttercream (only until it’s just melted), and then re-whipping it with the rest of the buttercream using a paddle attachment. This is the heat and mix method that I talk about in my American vanilla buttercream frosting recipe as well. The heat of the melted buttercream should warm up the rest of the buttercream and soften it. The buttercream should then deflate slightly because the air is removed as the buttercream is warmed. This will also thin out the buttercream ever so slightly, but it will thicken again as it cools down to room temperature (or in the fridge for a few minutes).
Storage instructions
Just like vanilla American buttercream, this chocolate buttercream frosting can also stay at room temperature for about 2 – 3 days. However, I prefer to store it in the fridge as this prolongs its shelf-life. Chocolate buttercream frosting will last in the fridge for about 1 week if stored in an airtight container (or well-wrapped mixing bowl). This will also last about 2 months in the freezer (perhaps more) if stored in an airtight container. This is to prevent freezer burn and to prevent the butter from absorbing any other food odors in the freezer.
To use chilled buttercream
Let the buttercream come to room temperatuer and then remix it using a paddle attachement. I wouldn’t use a whisk attachement on cold buttercream as it will introduce a lot more air. Alternatively, you can heat a small portion of the buttercream until it just melts, and reintroduce it to the remaining buttercream using a paddle attachment. The heat will warm up the rest of the buttercream enough to make it creamy and spreadable. The amount of buttercream that should be melted will vary depending on how much buttercream you have, and how cold the buttercream is at the start. So, start with a small portion and repeat the steps until you get the consistency you like. If the buttercream becomes too thin, refrigerate and re-whip it when it has cooled down slightly.
How to use this chocolate frosting
Since this chocolate buttercream is super easy to make, it’s the perfect frosting for when you’re short on time but need a good, reliable and delicious frosting. The cocoa powder in the chocolate frosting will make this a super rich tasting, creamy buttercream.
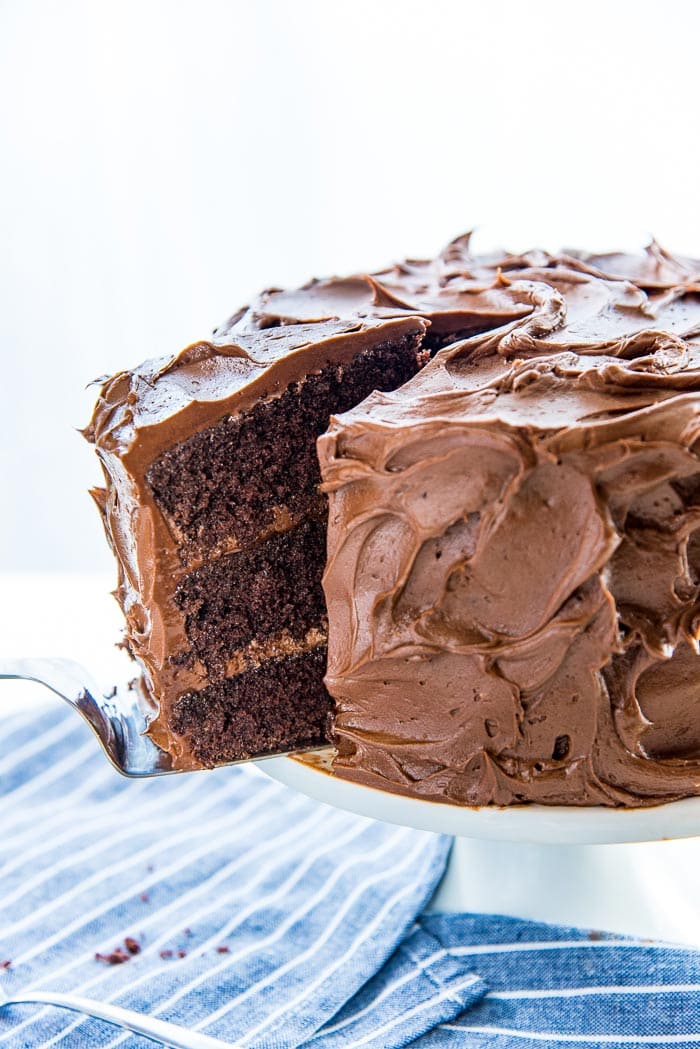
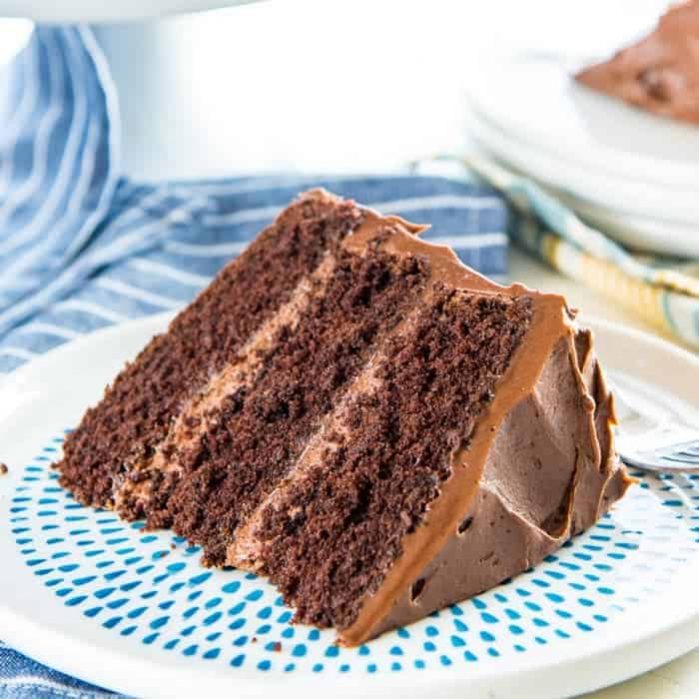
Frost and fill cakes
Perfect to frost layer cake like my classic chocolate cake, devil’s food cake, or sheet cake like my fudgy one bowl chocolate cake, and even classic vanilla cake with chocolate buttercream.
Just use it to crumb coat and sandwich the cake layers, and to frost the entire cake as well. While the buttercream is still soft, you can create beautiful swirls or patterns with your offset spatula. For a more refined look, use a bench scraper to get smooth sides and top.
This buttercream frosting will make about 3 cups of frosting (with a whisk attachment) and slightly less with a paddle attachment. With this amount of buttercream, you will have enough to frost and fill a 2 layer 8 inch cake generously, or a 9 inch cake with 2 layers.
If you only add a thin layer of frosting between cake layers, then the buttercream will cover more cake, and if you want a thicker layer of frosting, it will cover less cake.
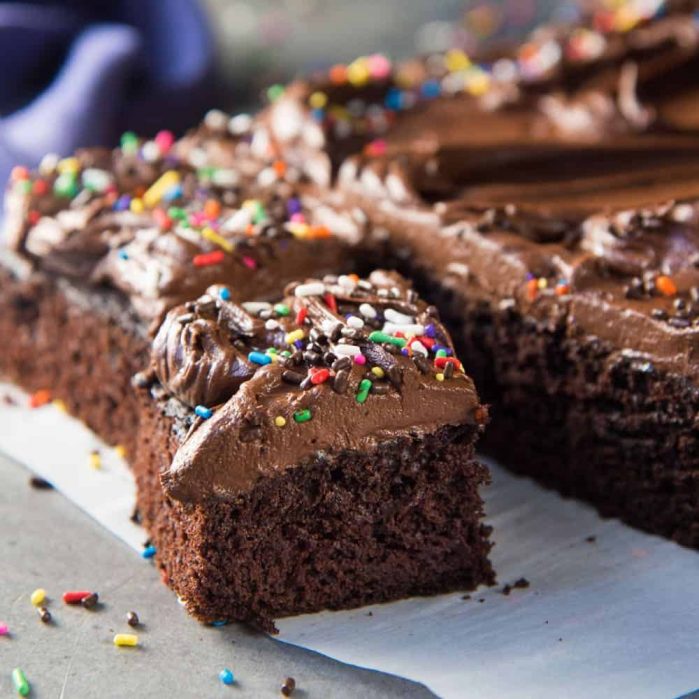
Frost cupcakes
Another lovely way to use buttercream. You can use an ice cream scoop to place the buttercream and then use a spatula to smooth it out. Perfect to frost these chocolate cupcakes, these black Halloween cupcakes, and even vanilla cupcakes with chocolate frosting! For a thinner layer of buttercream, just take some of the frosting with the spatula and spread it on top. You can also use piping tips to pipe this on top of cupcakes, which will definitely be more decorative. If you assume you will be using 4 tbsp of frosting per cupcake, this batch should frost 12 cupcakes. But if you use less frosting per cupcake, it will frost more than 12 cupcakes. This entirely depends on your preference, whether you want to have a flat, thinner frosting or tall, swirled frosting on your cupcakes.
Decorative piping
For cakes and cupcakes. There are many frosting tips that you can use too. Use these tips to create decorative borders, or create decorative frosting tops for your cakes and cupcakes.
Round tip Closed star tip Open star tip Open French star tip And many more
Frequently asked questions